I was standing in the middle of a grocery store parking lot last November when the smell hit me—someone nearby was carrying a tray of those little maple-glazed pastries from the bakery section, and the combination of sweet, warm maple and butter just stopped me cold. Suddenly I was seven years old, sitting on a cracked vinyl stool in my aunt Delia’s tiny kitchen, watching her pull a baking sheet out of the oven. The acorn squash halves were glistening, each one holding a pool of melted butter and brown sugar that bubbled around the edges like little amber lakes. She’d let me help scoop out the seeds—my tiny hands were always too small to do it properly, and I’d leave stringy bits behind, but she never corrected me. She’d just say, “That’s the rustic look, honey.”
I haven’t seen Aunt Delia in almost fifteen years now. She moved out west, and we lost touch somewhere between my college graduation and my first real job. But every time fall rolls around and the acorn squash starts showing up at the farmers’ market, I find myself trying to recreate that exact moment—the way the maple and butter soaked into the tender, golden flesh, the way the edges caramelized just a little bit, the way she’d always save me the smallest half because she knew I liked the “crunchy part” around the rim. Honestly, I’ve made this recipe probably thirty times over the past decade, and it took me about twenty tries before I got it to taste the way I remembered. Maybe you’ve been there—chasing a flavor from your past that you can almost but not quite hold onto. This roasted acorn squash with maple brown butter is my closest attempt yet.
The thing is, I don’t want it to be exactly like hers anymore. I’ve made it my own over the years—lightened it up a little, swapped in a touch of cinnamon and a pinch of smoked paprika for warmth, found a way to keep it cozy without being heavy. It’s the kind of side dish that feels special enough for Thanksgiving but simple enough for a random Tuesday when you just need something warm and sweet and good for you. And honestly, it’s the reason I keep making it: because every time I pull that baking sheet out of the oven, I’m seven years old again for just a second, and that’s a feeling worth chasing.
Why You’ll Love This Recipe
Let me tell you why this roasted acorn squash with maple brown butter has become my go-to fall side dish—and why I think it’ll become yours too. I’ve tested this recipe more times than I care to admit, tweaking the temperature, the butter-to-maple ratio, even the thickness of the slices. What I landed on is something that feels indulgent without being heavy, which is exactly what I want when I’m trying to eat well but still crave comfort food.
- Quick & Easy: This comes together in about 40 minutes total, with only 10 minutes of hands-on prep. Perfect for busy weeknights when you want something that feels special without spending hours in the kitchen.
- Simple Ingredients: You likely already have maple syrup, butter, cinnamon, and salt in your pantry. The acorn squash is the only thing you might need to pick up—and it’s available at almost any grocery store from September through January.
- Perfect for Fall Gatherings: This dish works beautifully for Thanksgiving, Friendsgiving, or any cozy dinner where you want to impress without stress. It’s also great for meal prep—the flavors actually get better after a day in the fridge.
- Crowd-Pleaser: I’ve served this to picky eaters, health-conscious friends, and die-hard comfort food lovers, and it gets rave reviews every single time. The combination of sweet maple, nutty brown butter, and tender squash is just universally appealing.
- Unbelievably Delicious: The texture is what gets me every time—the edges caramelize into something almost candy-like, while the centers stay so soft they practically melt. And that maple brown butter sauce? You’ll want to put it on everything.
What makes this version different from the rest is the technique. Instead of just roasting the squash with butter and syrup, I brown the butter first—this adds a nutty, toasty depth that regular melted butter just can’t match. Then I whisk in the maple syrup while the butter is still hot, which creates a glossy, emulsified sauce that clings to every ridge and valley of the squash. It’s a small extra step that makes a huge difference, and I promise you’ll taste it.
This recipe isn’t just good—it’s the kind that makes you close your eyes after the first bite. It’s comfort food reimagined: lighter, faster, but with the same soul-soothing satisfaction. Perfect for impressing guests without stress, or turning a simple weeknight dinner into something memorable.
What Ingredients You Will Need
This recipe uses simple, wholesome ingredients to deliver bold flavor and satisfying texture without the fuss. Most of these are pantry staples, and the ones that aren’t are easy to find and worth keeping on hand during squash season.
- Acorn squash (2 medium, about 2 pounds each): Look for squash that feels heavy for its size with a deep green color and some orange patches—those patches mean it’s fully ripe and will be sweeter. I prefer organic squash when I can find it, but conventional works just fine. You’ll cut each squash in half and scoop out the seeds, then slice into 1-inch thick wedges or half-moons.
- Unsalted butter (4 tablespoons, or ½ stick): Use unsalted so you can control the salt level. I recommend a good-quality butter like Kerrygold or Plugrà for the richest flavor—the browning process really highlights the quality of the butter. If you only have salted butter, just reduce the added salt to ¼ teaspoon.
- Pure maple syrup (3 tablespoons): Please use real maple syrup, not pancake syrup. The flavor is completely different, and the thickness helps create that glossy sauce. Grade A dark amber works beautifully here—it has a stronger maple flavor that stands up to the brown butter. (adds richness and sweetness)
- Brown sugar (1 tablespoon, packed): Light or dark brown sugar both work. Dark brown sugar will give a deeper molasses flavor, while light keeps it more maple-forward. You can skip this if you’re watching sugar, but it helps with caramelization.
- Ground cinnamon (½ teaspoon): I use Saigon cinnamon for its warm, slightly spicy flavor, but regular cinnamon works perfectly. Freshness matters here—if your cinnamon is more than a year old, it might taste flat.
- Smoked paprika (¼ teaspoon): This is my secret ingredient. It adds a subtle warmth that balances the sweetness without making the dish taste savory or smoky. Regular paprika works too, but you’ll miss that little something extra.
- Kosher salt (½ teaspoon, plus more for sprinkling): I use Diamond Crystal kosher salt. If you use table salt, reduce to ¼ teaspoon. The salt is crucial for balancing the sweetness and bringing out the squash’s natural flavor.
- Fresh thyme (4-5 sprigs, optional but recommended): The thyme adds an earthy, slightly floral note that cuts through the richness. I’ve made it without and it’s still delicious, but the thyme really makes it feel special. Strip the leaves off the stems and sprinkle them over the squash before roasting.
- Pecans or walnuts (¼ cup, chopped, optional): For crunch. I add these about 5 minutes before the squash is done so they toast without burning. They’re completely optional but add a lovely textural contrast.
Ingredient Selection Tips: When choosing acorn squash, avoid any with soft spots, cuts, or moldy stems. The squash should feel firm and heavy. If you’re buying ahead, acorn squash keeps well in a cool, dark place for up to a month—just don’t refrigerate it whole. For the maple syrup, I prefer brands from Vermont or New York, but any pure maple syrup will work.
Substitution Guidance: For a dairy-free version, use vegan butter or coconut oil—just note that coconut oil won’t brown the same way, so skip the browning step and melt it with the maple syrup instead. For a lower-sugar option, reduce the maple syrup to 2 tablespoons and omit the brown sugar. The squash is naturally sweet enough to carry the dish. If you don’t have fresh thyme, use ½ teaspoon dried thyme—just rub it between your fingers to release the oils before sprinkling.
Equipment Needed
You don’t need much fancy equipment for this recipe, which is part of why I love it. Here’s what you’ll need:
- Large baking sheet (18×13 inches or similar): A rimmed baking sheet is ideal because the maple brown butter sauce can bubble up. I use a half-sheet pan from Nordic Ware—it’s sturdy, distributes heat evenly, and has never warped on me. If you don’t have a large sheet, use two smaller ones or a 9×13 baking dish.
- Parchment paper or silicone baking mat: This makes cleanup a breeze and prevents the squash from sticking. If you don’t have either, you can grease the pan lightly with butter or oil—just watch that the sugar doesn’t burn onto the pan.
- Small saucepan (1- or 2-quart): For browning the butter. A light-colored pan is actually helpful here because you can see the butter solids turn golden. I’ve used a dark nonstick pan before and ended up with burnt butter twice before I learned my lesson.
- Chef’s knife: A sharp, heavy knife is essential for cutting through the tough skin of acorn squash. I recommend a 8-inch chef’s knife. Please be careful—acorn squash can be slippery, and I’ve had a few close calls. If the squash is too hard to cut, microwave it whole for 2 minutes to soften the skin slightly.
- Large spoon or ice cream scoop: For scooping out the seeds and stringy pulp. A metal spoon works fine, but a sturdy ice cream scoop with a sharp edge makes the job much faster.
- Whisk: For combining the brown butter and maple syrup. A small wire whisk works perfectly. If you don’t have one, a fork will do in a pinch.
- Cutting board: Use a sturdy board that won’t slip. I put a damp paper towel under mine to keep it in place while I’m cutting the squash.
Budget-Friendly Options: If you don’t have a rimmed baking sheet, a 9×13 baking dish works—just make sure the pieces aren’t too crowded. You can skip the parchment paper and use a light coating of butter or oil instead. A small skillet works just fine for browning the butter if you don’t have a saucepan.
Preparation Method
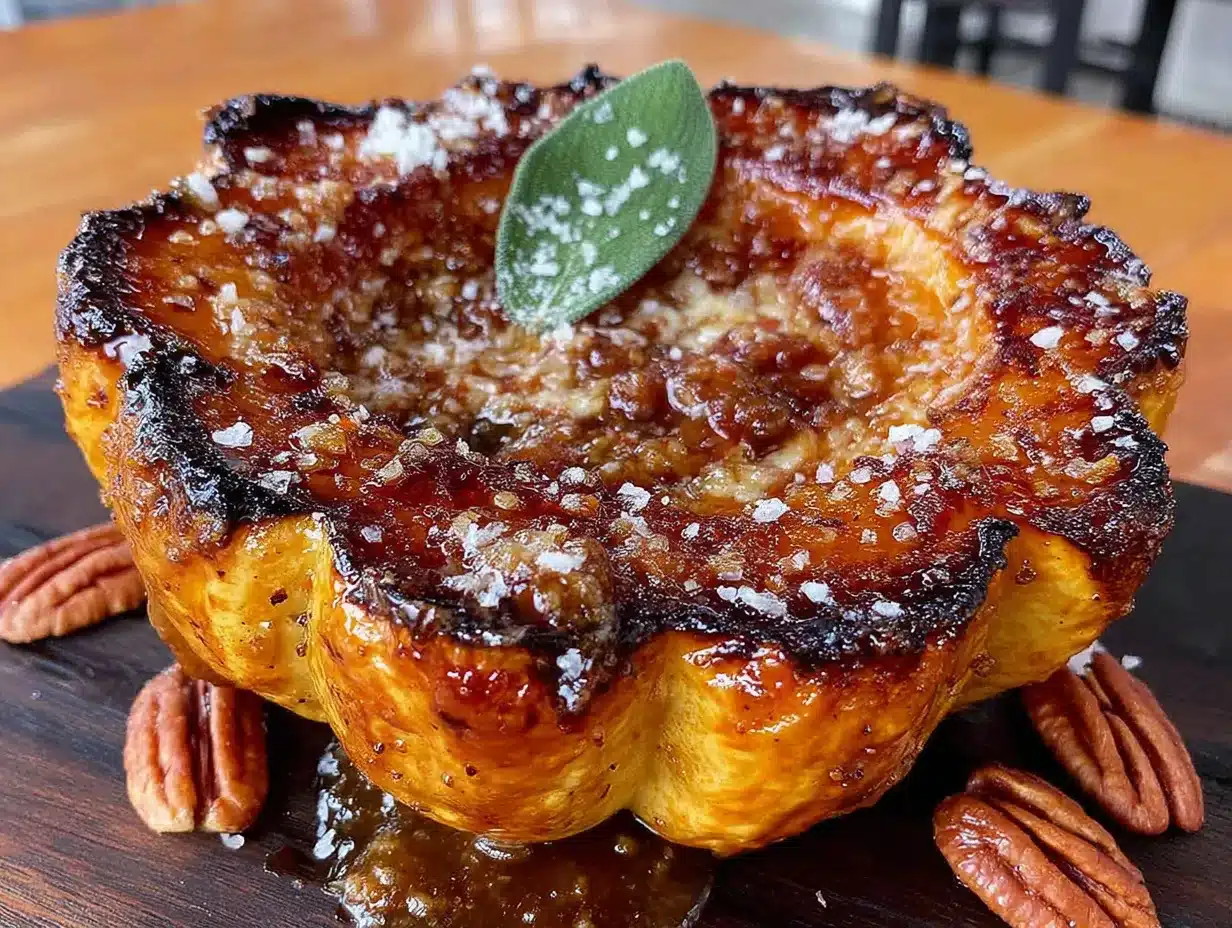
Let me walk you through this step by step. I’ve made this recipe enough times to know exactly where things can go wrong, so I’ll share those little tips along the way.
- Preheat your oven to 400°F (200°C). Position the rack in the middle of the oven. Getting the temperature right is important—too low and the squash won’t caramelize; too high and the sugar might burn before the squash is tender.
- Prepare the acorn squash. Using a sharp chef’s knife, carefully cut each acorn squash in half from stem to tip. Scoop out the seeds and stringy pulp with a large spoon. Then slice each half into 1-inch thick wedges or half-moons. You should get about 4-5 pieces per half, depending on the size. Pro tip: If the squash is rolling around on your cutting board, slice a thin piece off the bottom to create a flat surface before cutting it in half. I learned this after one too many near-misses.
- Arrange the squash on the baking sheet. Line your baking sheet with parchment paper or a silicone mat. Place the squash pieces in a single layer, making sure they’re not touching each other too much—crowding leads to steaming instead of roasting. If they’re overlapping, use two sheets or bake in batches.
- Brown the butter. In a small saucepan over medium heat, melt the 4 tablespoons of unsalted butter. Swirl the pan occasionally as it melts. The butter will foam up, then subside, and you’ll start to see tiny brown specks forming at the bottom. This takes about 3-4 minutes. The moment the butter turns a light golden brown and smells nutty—like toasted hazelnuts—remove it from the heat immediately. Don’t walk away from the pan during this step. Brown butter can go from perfect to burnt in about 15 seconds. I’ve ruined more batches than I’d like to admit by answering a text message.
- Make the maple brown butter sauce. Whisk the 3 tablespoons of maple syrup, 1 tablespoon of brown sugar, ½ teaspoon of cinnamon, ¼ teaspoon of smoked paprika, and ½ teaspoon of kosher salt into the hot brown butter. Keep whisking until the sugar dissolves and the mixture is smooth and glossy. The sauce will look thin now but will thicken slightly as it cools.
- Coat the squash. Pour the maple brown butter sauce evenly over the squash pieces. Use a pastry brush or the back of a spoon to make sure every piece is coated—especially the cut sides and the ridges. This is where you want to be generous. The sauce is what makes this dish special, so don’t skimp.
- Roast the squash. Place the baking sheet in the preheated oven and roast for 20 minutes. After 20 minutes, flip each piece of squash using tongs or a spatula. The bottoms should be starting to caramelize. Roast for another 15-20 minutes, until the squash is fork-tender and the edges are golden brown and slightly crispy.
- Add the optional toppings. If you’re using fresh thyme or chopped pecans, sprinkle them over the squash during the last 5 minutes of roasting. This gives the nuts time to toast and the thyme to release its oils without burning.
- Finish and serve. Remove the baking sheet from the oven. Let the squash rest for 2-3 minutes—this allows the sauce to set slightly. Transfer to a serving platter and spoon any remaining sauce from the pan over the top. Sprinkle with a tiny pinch of flaky sea salt if you have it (Maldon is my favorite).
Sensory Cues: At the 20-minute mark, the squash should look glossy and the edges should be starting to brown. When you flip the pieces, the bottoms should have a sticky, caramelized appearance. At the end of roasting, a fork should slide into the thickest part of the squash with almost no resistance. The aroma in your kitchen will be incredible—like maple, toasted nuts, and warm spices.
Cooking Tips & Techniques
Over the years, I’ve learned a few things about making this roasted acorn squash that I wish someone had told me from the start. Here are my best tips:
Don’t skip the brown butter step. I know it adds an extra pan to wash, but the difference between melted butter and brown butter in this recipe is night and day. Brown butter adds a nutty, toasty depth that makes the dish taste much more complex than it actually is. If you’ve never browned butter before, watch it carefully—the solids at the bottom will go from golden to dark brown very quickly. When it smells like hazelnuts and looks like amber, you’re there.
Cut the squash into uniform pieces. This is one of those tips that seems obvious but is easy to rush through. If some pieces are thicker than others, they’ll cook unevenly—the thin ones will burn while the thick ones are still firm. Take an extra minute to make sure your wedges are all about the same thickness. I aim for 1 inch, and I’m not afraid to trim any pieces that are way off.
Watch your oven temperature. Ovens vary wildly—I’ve baked in apartments where the oven ran 25 degrees hot. If your squash is browning too quickly on the outside but isn’t tender inside, lower the temperature to 375°F (190°C) and extend the cooking time by 5-10 minutes. Conversely, if the squash is soft but not caramelized after 35 minutes, crank the heat to 425°F (220°C) for the last 5 minutes.
Don’t overcrowd the pan. This is probably the most common mistake I see. If the squash pieces are touching or overlapping, they’ll steam instead of roast, and you’ll miss out on that beautiful caramelization. Leave at least half an inch between each piece. If you have to use two baking sheets, rotate them halfway through cooking.
Make extra sauce. I always double the maple brown butter sauce. I use about half for the squash and save the rest to drizzle over roasted vegetables, pancakes, or even oatmeal the next morning. It keeps in the fridge for up to a week—just reheat it gently in the microwave or on the stove.
My biggest failure: The first time I made this, I forgot to flip the squash halfway through. The bottoms were practically burnt, and the tops were pale and undercooked. I salvaged it by scraping off the burnt parts and finishing the pieces under the broiler, but it taught me to set a timer for flipping. Now I always set two timers—one for the flip and one for the finish.
Variations & Adaptations
One of the best things about this recipe is how easily it adapts to different tastes and dietary needs. Here are some variations I’ve tried and loved:
Savory Herb Version: Skip the maple syrup and brown sugar entirely. Brown the butter with 2 cloves of smashed garlic and a sprig of rosemary, then toss the squash with the garlic-herb butter, salt, pepper, and a pinch of red pepper flakes. Roast as directed. The result is a savory, aromatic side dish that pairs beautifully with roast chicken or pork.
Vegan Option: Use 4 tablespoons of coconut oil or vegan butter instead of dairy butter. Coconut oil won’t brown the same way, so skip the browning step and simply melt it with the maple syrup. The flavor will be slightly different—more coconut-forward—but still delicious. I’ve also used a high-quality olive oil in a pinch, and it works surprisingly well.
Spicy Maple Version: Add ¼ teaspoon of cayenne pepper or a pinch of chipotle powder to the maple brown butter sauce. The heat balances the sweetness beautifully and adds a nice warmth that lingers on your palate. This version is my husband’s favorite—he likes things with a kick.
Different Squash Options: This technique works with almost any winter squash. Butternut squash should be peeled and cut into 1-inch cubes. Delicata squash doesn’t need to be peeled (the skin is thin and edible) and roasts faster—check it at 20 minutes. Kabocha squash has a slightly drier texture but works beautifully with the sauce.
Allergen-Friendly Adjustments: For nut-free version, skip the pecans or walnuts. For gluten-free, this recipe is naturally gluten-free—just double-check that your spices and maple syrup are certified gluten-free if that’s a concern. For low-FODMAP diet, reduce the maple syrup to 1 tablespoon and skip the brown sugar—the squash is naturally sweet enough.
Personal Variation I Love: I once added a tablespoon of bourbon to the brown butter sauce right after taking it off the heat. The alcohol cooked off, but it left behind a warm, slightly smoky flavor that was absolutely incredible. I only do this when I’m not serving it to kids, but it’s a fun twist for adult dinner parties.
Serving & Storage Suggestions
This roasted acorn squash is incredibly versatile when it comes to serving. Here’s how I like to enjoy it:
Serving Temperature: Serve it warm, straight from the oven. The sauce is at its glossiest and the edges are at their crispiest right after roasting. That said, it’s also delicious at room temperature—I’ve been known to eat the leftovers cold from the fridge as a snack.
Presentation Ideas: Arrange the squash pieces on a large white platter in a fan pattern, with the caramelized edges facing up. Drizzle any remaining sauce from the pan over the top. Sprinkle with fresh thyme leaves and a pinch of flaky sea salt. If you’re serving it for Thanksgiving, garnish with pomegranate seeds for a pop of red color—it looks stunning against the orange squash.
Complementary Dishes: This squash pairs beautifully with roasted chicken, turkey, pork tenderloin, or grilled salmon. For vegetarian meals, serve it alongside a hearty grain salad with farro and roasted Brussels sprouts, or with a lentil stew. It’s also fantastic as part of a holiday spread—it holds its own against richer dishes like stuffing and mashed potatoes.
Storage Instructions: Store leftovers in an airtight container in the refrigerator for up to 4 days. The squash will soften as it sits, and the sauce will thicken and become more like a glaze. To reheat, place the squash on a baking sheet in a 350°F (175°C) oven for 8-10 minutes, or until warmed through. You can also microwave it, but the edges won’t be as crispy.
Freezer Instructions: This recipe freezes surprisingly well. Let the squash cool completely, then transfer to a freezer-safe container or zip-top bag. Freeze for up to 3 months. To reheat, thaw overnight in the refrigerator, then reheat in a 350°F oven for 10-12 minutes. The texture won’t be quite as perfect as fresh, but it’s still delicious—especially in soups or grain bowls.
How Flavors Develop: The flavors actually meld and deepen after a day in the fridge. The maple and brown butter soak into the squash more, and the spices become more integrated. I sometimes make this a day ahead on purpose for Thanksgiving—it saves oven space and tastes even better the next day.
Nutritional Information & Benefits
While I don’t claim to be a nutritionist, I do pay attention to what goes into my body, and this recipe hits a sweet spot between indulgence and nourishment.
Estimated Nutritional Values (per serving, based on 6 servings):
- Calories: 180-200
- Total Fat: 9g
- Saturated Fat: 5g
- Carbohydrates: 28g
- Fiber: 4g
- Sugar: 14g (naturally occurring plus added)
- Protein: 2g
- Sodium: 200mg
Health Benefits of Key Ingredients: Acorn squash is a nutritional powerhouse—it’s packed with vitamin A (beta-carotene), vitamin C, potassium, and fiber. The fiber helps with digestion and keeps you feeling full, while the beta-carotene supports eye health and immune function. Maple syrup contains antioxidants and minerals like zinc and manganese, though it should still be used in moderation. Butter provides fat-soluble vitamins A, D, E, and K, and the browning process actually creates new flavor compounds that have been studied for their potential antioxidant properties.
Dietary Considerations: This recipe is naturally gluten-free, nut-free (if you skip the pecans), and can easily be made dairy-free or vegan with the substitutions mentioned above. It’s also relatively low in added sugar compared to many fall desserts—most of the sweetness comes from the squash itself.
Potential Allergens: Dairy (butter), tree nuts (if using pecans or walnuts). Always check your spice blends for hidden allergens if that’s a concern.
My Personal Perspective: I love that this recipe lets me enjoy something that feels indulgent—maple brown butter, caramelized edges, that little hit of salt—while still eating a vegetable. It’s the kind of dish that makes you feel good about what you’re eating, not just because it’s nutritious, but because it’s genuinely satisfying. For me, that’s the key to eating well: finding food that nourishes your body and your soul at the same time.
Conclusion
This roasted acorn squash with maple brown butter is more than just a side dish—it’s the taste of fall, the warmth of a cozy kitchen, and the comfort of a recipe that’s been tested and loved. Whether you’re making it for a holiday feast, a weeknight dinner, or just because you need something warm and beautiful on your plate, I hope it brings you the same joy it’s brought me.
Don’t be afraid to make it your own—add more spice, skip the nuts, double the sauce, whatever feels right. The best recipes are the ones that evolve with you. And honestly, that’s what I love most about cooking: the way a dish can carry memories from one kitchen to another, from one person to the next.
I’d love to hear how yours turns out. Did you try a variation? Burn the butter like I did the first time? Find a new favorite way to serve it? Drop a comment below and let me know—I read every single one, and your stories are what make this community so special. And if you loved this recipe, share it with someone who needs a little fall comfort. Happy cooking, friends!
Frequently Asked Questions
Can I use butternut squash instead of acorn squash?
Absolutely. Butternut squash works beautifully with this recipe. Just peel it first, cut it into 1-inch cubes, and follow the same roasting instructions. The cooking time might be slightly shorter—check for tenderness at 25 minutes instead of 35.
How do I prevent the squash from sticking to the pan?
Use parchment paper or a silicone baking mat. The sugar in the maple brown butter sauce can caramelize and stick to bare metal pans. If you don’t have parchment, grease the pan well with butter or oil, and let the squash cool for 2-3 minutes before trying to remove it.
Can I make this recipe ahead of time?
Yes! You can roast the squash up to 2 days ahead and store it in the refrigerator. Reheat it in a 350°F oven for 8-10 minutes before serving. The sauce will thicken and become more glaze-like, which is actually quite nice. You can also prep the squash by cutting it and scooping out the seeds up to 24 hours ahead—just store the pieces in the fridge.
Is this recipe suitable for a diabetic diet?
While acorn squash has natural sugars, this recipe does include added maple syrup and brown sugar. For a lower-sugar version, reduce the maple syrup to 1 tablespoon, omit the brown sugar, and rely on the natural sweetness of the squash. The brown butter alone adds plenty of flavor. Always consult with your healthcare provider for personalized dietary advice.
Can I freeze the maple brown butter sauce separately?
Yes, and I actually recommend it. The sauce freezes beautifully for up to 3 months. Pour it into an ice cube tray, freeze until solid, then transfer the cubes to a zip-top bag. You can thaw individual cubes for quick weeknight dinners—just reheat gently and toss with fresh roasted squash or vegetables.
Pin This Recipe!
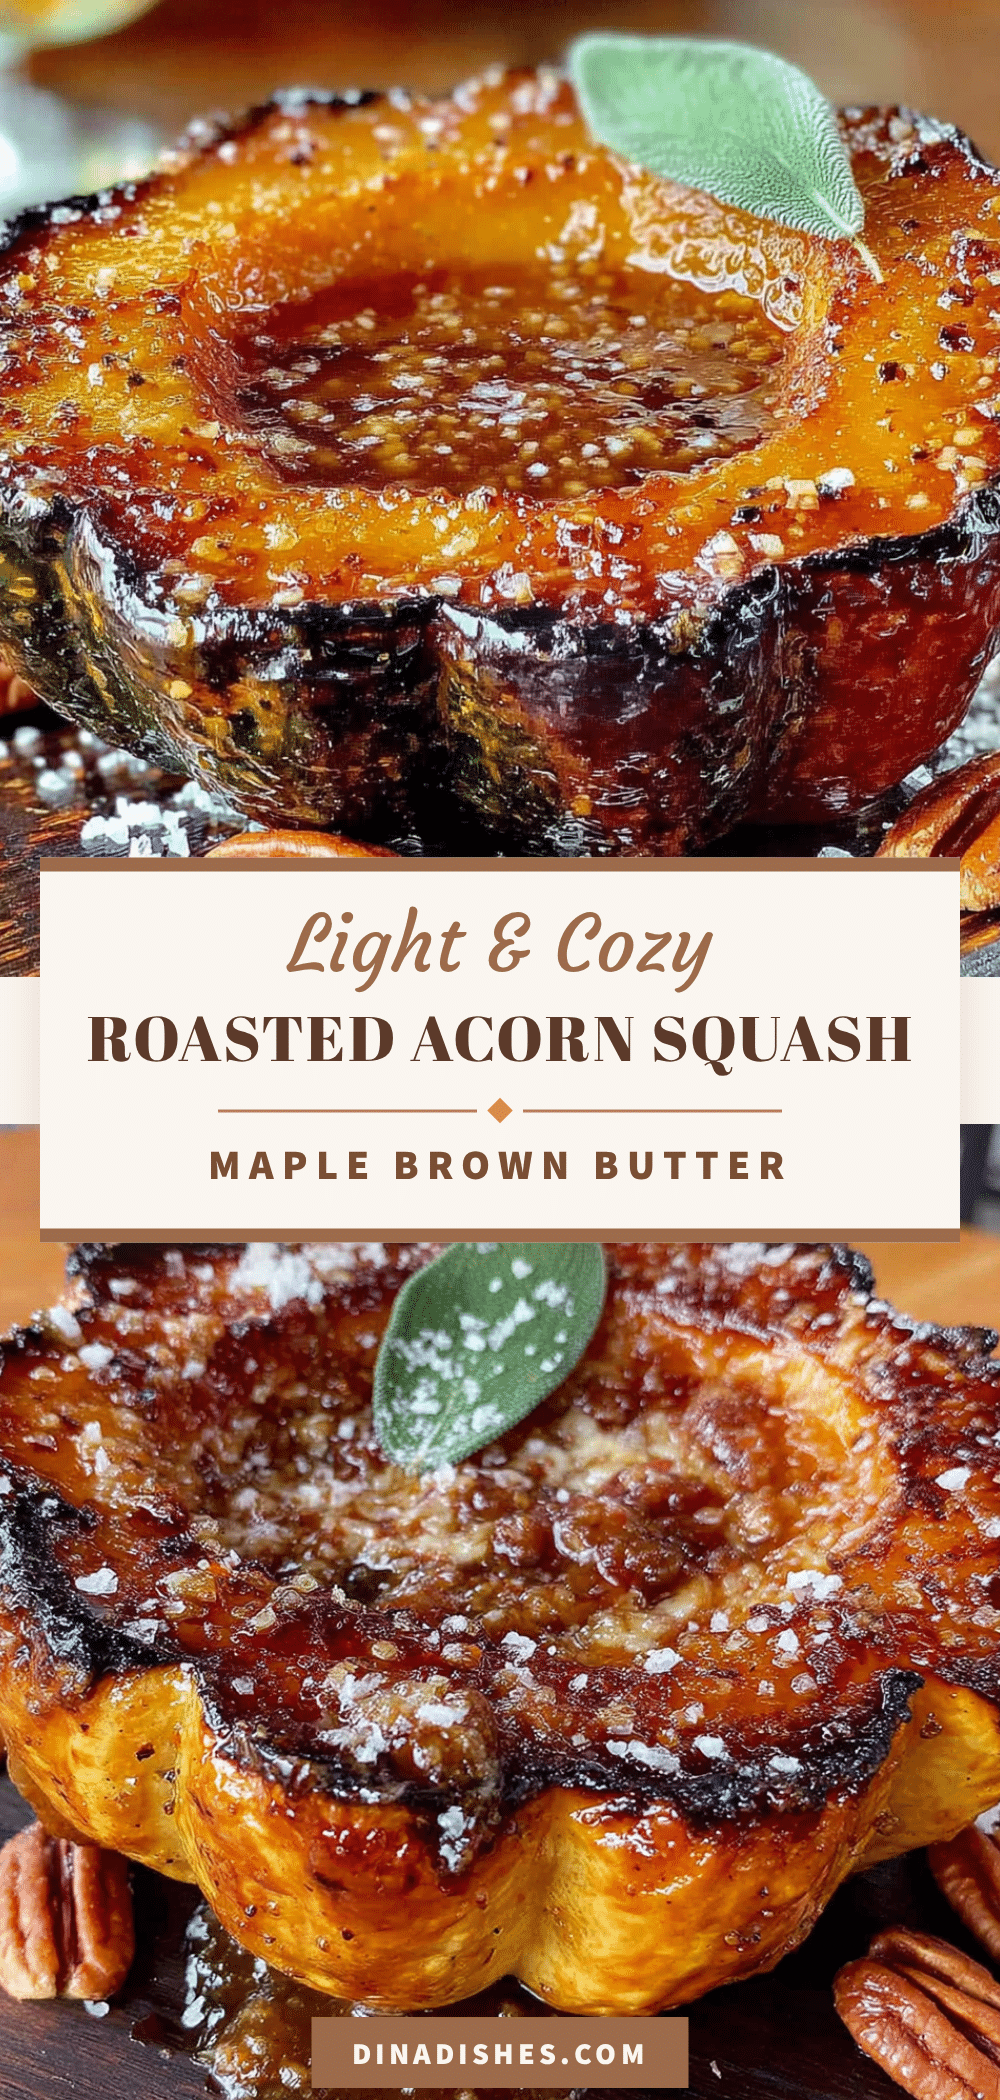
Easy Roasted Acorn Squash with Maple Brown Butter
This roasted acorn squash with maple brown butter is a quick and easy fall side dish that feels special enough for Thanksgiving but simple enough for a weeknight. The nutty brown butter and sweet maple syrup create a glossy, caramelized glaze that makes this squash absolutely irresistible.
- Prep Time: 10 minutes
- Cook Time: 35-40 minutes
- Total Time: 45-50 minutes
- Yield: 6 servings 1x
- Category: Side Dish
- Cuisine: American
Ingredients
- 2 medium acorn squash (about 2 pounds each)
- 4 tablespoons unsalted butter (½ stick)
- 3 tablespoons pure maple syrup
- 1 tablespoon brown sugar, packed
- ½ teaspoon ground cinnamon
- ¼ teaspoon smoked paprika
- ½ teaspoon kosher salt, plus more for sprinkling
- 4–5 sprigs fresh thyme (optional)
- ¼ cup chopped pecans or walnuts (optional)
Instructions
- Preheat your oven to 400°F (200°C). Position the rack in the middle of the oven.
- Prepare the acorn squash: Using a sharp chef’s knife, carefully cut each acorn squash in half from stem to tip. Scoop out the seeds and stringy pulp with a large spoon. Slice each half into 1-inch thick wedges or half-moons (about 4-5 pieces per half).
- Arrange the squash on a parchment-lined baking sheet in a single layer, ensuring pieces are not touching.
- Brown the butter: In a small saucepan over medium heat, melt the 4 tablespoons of unsalted butter. Swirl the pan occasionally. The butter will foam, then subside, and tiny brown specks will form at the bottom. When the butter turns light golden brown and smells nutty (about 3-4 minutes), remove from heat immediately.
- Make the maple brown butter sauce: Whisk the maple syrup, brown sugar, cinnamon, smoked paprika, and kosher salt into the hot brown butter until smooth and glossy.
- Coat the squash: Pour the sauce evenly over the squash pieces, using a pastry brush or spoon to coat all sides.
- Roast for 20 minutes. Flip each piece using tongs, then roast for another 15-20 minutes until fork-tender and edges are golden brown and slightly crispy.
- If using fresh thyme or chopped pecans, sprinkle over the squash during the last 5 minutes of roasting.
- Remove from oven and let rest for 2-3 minutes. Transfer to a serving platter, spoon remaining sauce from the pan over the top, and sprinkle with flaky sea salt if desired.
Notes
Don’t skip browning the butter—it adds a nutty depth that regular melted butter can’t match. For even cooking, cut squash into uniform 1-inch pieces. If squash is browning too quickly but not tender, lower oven to 375°F and extend cooking time. Make extra sauce to save for other dishes. Leftovers keep in the fridge for up to 4 days and reheat well in a 350°F oven.
Nutrition
- Serving Size: 1 serving (about ⅙ o
- Calories: 190
- Sugar: 14
- Sodium: 200
- Fat: 9
- Saturated Fat: 5
- Carbohydrates: 28
- Fiber: 4
- Protein: 2
Keywords: roasted acorn squash, maple brown butter, fall side dish, Thanksgiving side, easy squash recipe, caramelized squash, gluten-free side dish