The woman at the table next to mine at the community potluck watched me eyeing her dessert plate for a solid five minutes before she finally laughed. “You’re not even pretending to be subtle,” she said, sliding the dish toward me. Her name was Eleanor, and she’d brought these creamy no-bake eggnog cheesecake bars that everyone was raving about. I asked if she’d share the recipe, and she told me straight up — “I don’t measure anything, honey. I just feel it.”
That should have been the end of it, honestly. But Eleanor and I kept running into each other at Saturday morning markets, and eventually she invited me over to watch her make them. Let me tell you, watching someone cook without measuring cups is both terrifying and magical. She’d dump cream cheese into a bowl, splash in some eggnog, and taste it off her finger like a sommelier. I stood there with my notebook, frantically writing down approximate amounts while she told me about her grandmother making something similar during the war.
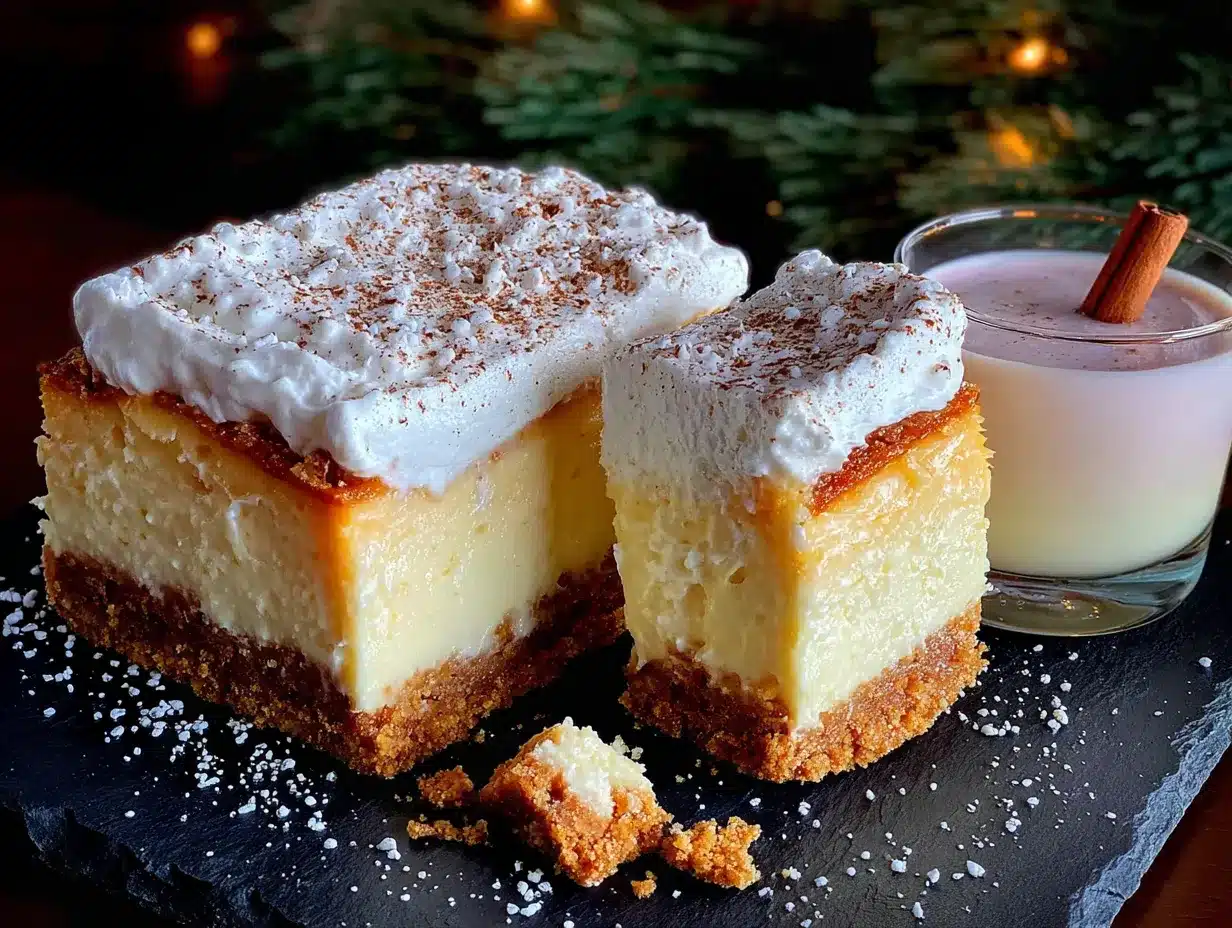
The thing is, I’ve tried making these bars maybe six times since that afternoon. The first batch was too soft. The second was too sweet. But somewhere around attempt number four, I found the balance. These creamy no-bake eggnog cheesecake bars have become my go-to for every holiday gathering, and honestly, they never last long. There’s something about that buttery crust, the silky filling, and the whisper of nutmeg on top that makes people close their eyes when they take a bite. Maybe you’ve been there — standing in your kitchen at 11 PM the night before a party, wondering why you volunteered to bring dessert. This recipe was made for those moments.
Why You’ll Love This Recipe
I’ve tested this recipe more times than I care to admit, and let me tell you — it’s foolproof when you follow the steps. Here’s why these creamy no-bake eggnog cheesecake bars deserve a spot on your holiday dessert table:
- No oven required. Your oven is probably already busy with a turkey or cookies anyway. These bars come together on the countertop and set up in the fridge.
- Simple ingredients. No weird specialty items that you’ll use once and forget about. Cream cheese, eggnog, graham crackers — you know, normal stuff.
- Perfect for parties. These bars slice cleanly, hold their shape at room temperature for a while, and feed a crowd without any fussy plating.
- Make-ahead magic. You can prep these two days before your gathering. One less thing to stress about when guests are walking through the door.
- That eggnog flavor. It’s subtle enough that even people who say they don’t like eggnog will go back for seconds. I’ve seen it happen.
What makes this recipe different from every other eggnog cheesecake bar out there? It’s the texture. Most no-bake cheesecakes use too much gelatin and end up rubbery, or not enough and turn into soup. I spent three batches getting the ratio right — the filling sets up firm enough to slice but stays incredibly creamy on the tongue. Plus, I use a combination of whipped cream and cream cheese that gives you that light, mousse-like feel without being heavy.
This isn’t just another holiday dessert. It’s the one people text you about the next morning asking for the recipe. It’s the one that makes your sister-in-law say “you outdid yourself this year” while reaching for a second piece. And honestly, that feeling never gets old.
What Ingredients You Will Need
This recipe uses simple, honest ingredients that come together to create something genuinely special. Most of these are pantry staples during the holiday season, which makes these bars dangerously easy to whip up on a whim.
For the Crust
- 2 cups graham cracker crumbs (about 14-16 full sheets, crushed finely)
- 1/2 cup unsalted butter, melted (salted butter works too, just skip the added salt)
- 3 tablespoons granulated sugar
- 1/4 teaspoon ground cinnamon (optional, but it adds warmth)
For the Cheesecake Filling
- 16 ounces cream cheese, softened to room temperature (I use Philadelphia — the full-fat block, not the spreadable tub)
- 1/2 cup granulated sugar
- 1 1/4 cups cold eggnog (use the good stuff from the refrigerated section, not the shelf-stable carton)
- 1 teaspoon vanilla extract
- 1/2 teaspoon ground nutmeg (freshly grated if you have it)
- 1/4 teaspoon ground cinnamon
- 1 envelope (about 2 1/4 teaspoons) unflavored gelatin
- 3 tablespoons cold water (for blooming the gelatin)
- 1 cup heavy whipping cream
- 2 tablespoons powdered sugar
For the Topping (Optional but Recommended)
- 1 cup heavy whipping cream
- 2 tablespoons powdered sugar
- 1/2 teaspoon vanilla extract
- Freshly grated nutmeg or cinnamon for dusting
- Optional: crushed gingersnap cookies or caramel drizzle
A few notes on ingredients. The gelatin is non-negotiable here — it’s what gives these bars their structure without baking. Don’t try to skip it or substitute with cornstarch, because you’ll end up with a mess. For the eggnog, I really recommend using a higher-fat brand. The cheaper stuff has more water and less cream, which affects how the bars set up. And please, please let your cream cheese come to room temperature. Cold cream cheese creates lumps that no amount of mixing will fix — I learned that the hard way on my first attempt.
If you’re feeding someone who can’t have dairy, this recipe is harder to adapt because of the gelatin and cream cheese. But I’ve had success using Kite Hill dairy-free cream cheese and full-fat oat milk-based eggnog. Just know the texture won’t be quite as firm.
Equipment Needed
You don’t need a fancy kitchen to pull these off, which is part of why I love this recipe. Here’s what you’ll need:
- 9×9-inch square baking pan (an 8×8 works too, your bars will just be slightly thicker)
- Parchment paper (for lining the pan — makes lifting the bars out so much easier)
- Food processor or zip-top bag and rolling pin (for crushing graham crackers)
- Medium mixing bowls (at least two)
- Electric hand mixer or stand mixer (you can do this by hand but your arm will hate you)
- Small microwave-safe bowl (for blooming and melting gelatin)
- Spatula (a rubber one for scraping every last bit of filling)
- Measuring cups and spoons
- Plastic wrap (for covering while chilling)
If you don’t have a food processor, honestly, the zip-top bag and rolling pin method works great. Just put the graham crackers in a bag, seal it, and go to town. It’s oddly satisfying. For the mixer, any cheap hand mixer will do the job. I used a $15 one for years before upgrading. Budget-friendly options work perfectly here.
Preparation Method
Let me walk you through this step by step. I’ve included all the little details that make the difference between good bars and great ones.
Step 1: Prepare the Pan
Line your 9×9-inch baking pan with parchment paper, leaving some overhang on two opposite sides. This creates handles that let you lift the whole block of cheesecake out later. Lightly grease the parchment with a tiny bit of butter or non-stick spray — just enough so it doesn’t slide around.
Step 2: Make the Crust
Crush your graham crackers into fine crumbs. If using a food processor, pulse about 14-16 full sheets until they look like sand. If using the bag method, seal them up and crush with a rolling pin — try to get the crumbs as even as possible, because big chunks make the crust crumbly later. Transfer the crumbs to a medium bowl. Add the melted butter, sugar, and cinnamon if using. Stir with a fork until every crumb is coated and the mixture looks like wet sand. Press this mixture firmly into your prepared pan. I use the bottom of a flat measuring cup to really pack it down. Pop it in the fridge while you make the filling.
Step 3: Bloom the Gelatin
In a small microwave-safe bowl, sprinkle the gelatin over the cold water. Let it sit for 5 minutes without stirring. It’ll look like a weird, bumpy surface — that’s normal. After 5 minutes, microwave it for 10 seconds, then stir until the gelatin dissolves completely. Set it aside to cool slightly while you work on the rest.
Step 4: Make the Cheesecake Base
In a large bowl, beat the softened cream cheese with the granulated sugar until smooth and fluffy — about 2 minutes with a hand mixer on medium speed. Scrape down the sides and bottom of the bowl. Add the eggnog, vanilla extract, nutmeg, and cinnamon. Beat on low until combined, then increase to medium for another minute. The mixture will be thinner than regular cheesecake batter — that’s okay.
Step 5: Add the Gelatin
With the mixer running on low, slowly pour in the dissolved gelatin. Mix until fully incorporated, about 30 seconds. Make sure you scrape the bowl well here — gelatin likes to hide at the bottom.
Step 6: Whip the Cream
In a separate bowl, beat the heavy whipping cream and powdered sugar until stiff peaks form. You want the cream to hold its shape when you lift the beaters. This usually takes about 2-3 minutes on medium-high speed. Don’t overwhip it into butter — stop as soon as it looks firm and glossy.
Step 7: Fold Everything Together
Take about one-third of the whipped cream and stir it into the cream cheese mixture to lighten it up. Then gently fold in the remaining whipped cream using a spatula. Use a cutting motion — down through the center, across the bottom, up the side, and over the top. Keep going until you don’t see any white streaks. Be gentle but thorough.
Step 8: Assemble and Chill
Pour the filling over the chilled crust and spread it evenly. Tap the pan gently on the counter a few times to release any air bubbles. Cover with plastic wrap and refrigerate for at least 6 hours, but overnight is better. I know it’s tempting to rush this, but the bars need time to set properly. Patience pays off here.
Step 9: Add the Topping
Once the bars are fully set, make the whipped topping. Beat the cream, powdered sugar, and vanilla until soft peaks form. Spread or pipe it over the top of the bars. Dust with freshly grated nutmeg and crushed gingersnaps if you’re feeling fancy. Refrigerate for another 30 minutes before slicing.
Step 10: Slice and Serve
Lift the entire block out using the parchment handles. Use a sharp knife, wiping it clean between cuts, to get neat slices. For extra clean cuts, dip the knife in hot water and dry it before slicing.
Cooking Tips & Techniques
After making these bars more times than I can count, here are the things I wish someone had told me from the start.
Room temperature cream cheese is not optional. I know, I sound like a broken record. But cold cream cheese creates those little lumps that won’t go away no matter how long you beat them. Take it out of the fridge at least an hour before you start. If you forgot, unwrap it and microwave it in 10-second bursts until it’s soft but not warm.
Don’t skip the gelatin step. I tried making these without gelatin once because I was out and thought “how different could it be?” The answer is very different. The bars never set up properly and I ended up eating eggnog soup with a spoon. Not my finest moment.
Let the gelatin cool before adding it. If you pour hot gelatin into the cream cheese mixture, it can seize up and create little rubbery bits. Let it cool for about 5 minutes after microwaving — it should feel warm but not hot to the touch.
Patience with chilling. Six hours is the minimum, but I’ve found that 8-12 hours gives you the best texture. The flavors meld together and the bars slice so cleanly. I usually make these the day before my party and it’s honestly less stressful.
Clean knife for clean slices. Run your knife under hot water, dry it off, and slice. Wipe the blade between each cut. This gives you those beautiful, Instagram-worthy slices with clean edges.
Variations & Adaptations
One of the best things about this recipe is how easy it is to customize. Here are some variations I’ve tried and loved:
Gingersnap crust. Swap the graham crackers for crushed gingersnap cookies. The spicy, molasses flavor pairs beautifully with the eggnog. Use the same amount — 2 cups crushed cookies — and follow the same method.
Boozy eggnog bars. Replace 2 tablespoons of the eggnog with dark rum or bourbon. Add it along with the vanilla extract. Just don’t add too much or the bars won’t set properly. A little goes a long way.
Chocolate eggnog cheesecake bars. Melt 4 ounces of semi-sweet chocolate and swirl it into the filling before pouring it over the crust. Use a knife to create swirls on top. The chocolate and eggnog combo is surprisingly good.
Dairy-free version. Use dairy-free cream cheese (Kite Hill works best), coconut cream instead of heavy cream, and a dairy-free eggnog. The texture will be slightly softer, so chill for a full 12 hours. I’ve made this for a friend with dairy allergies and she said it was the best dessert she’d had in years.
Pumpkin eggnog bars. Reduce the eggnog to 1 cup and add 1/4 cup pumpkin puree. Increase the cinnamon to 1 teaspoon and add 1/4 teaspoon ginger and 1/8 teaspoon cloves. It’s like Thanksgiving and Christmas had a delicious baby.
Serving & Storage Suggestions
These bars are best served cold, straight from the fridge. The filling is firm but creamy at refrigerator temperature, and the flavors really shine when they’re chilled. If you’re serving them at a party, you can leave them out for about 30-45 minutes — they’ll soften slightly but still hold their shape.
For presentation, I like to arrange the bars on a platter with a dusting of fresh nutmeg and a few sprigs of mint or rosemary for color. A drizzle of caramel sauce over the top never hurts either. These pair beautifully with hot coffee, spiced tea, or a glass of cold eggnog. If you’re serving them as part of a dessert spread, they go great with brown sugar shortbread cookies or a spiced apple cider punch.
Storage: Keep leftover bars in an airtight container in the refrigerator for up to 5 days. The texture stays perfect for the first 3 days, then starts to soften slightly. I’ve never had them last longer than that because they disappear too fast.
Freezing: These bars freeze beautifully. Wrap the entire block (without the whipped topping) tightly in plastic wrap, then in foil. Freeze for up to 3 months. When you’re ready to serve, thaw overnight in the refrigerator, then add the topping. You can also freeze individual bars wrapped in plastic — perfect for when you want just one.
Reheating: Don’t. These are meant to be served cold. If you want a warm dessert, make something else.
Nutritional Information & Benefits
Let’s be real — these are a treat, not a health food. But here’s the approximate nutritional breakdown per bar (based on 16 servings):
- Calories: 320
- Fat: 22g
- Carbohydrates: 27g
- Protein: 5g
- Sugar: 18g
- Sodium: 210mg
On the bright side, eggnog contains calcium, vitamin A, and a bit of protein from the milk and eggs. The cream cheese adds some calcium too. And honestly, there’s something to be said for the mental health benefits of treating yourself during the holiday season. I’m a firm believer that dessert made with love and shared with people you care about is good for the soul.
If you’re watching your sugar intake, you can reduce the sugar in the filling to 1/3 cup without affecting the texture too much. The bars won’t be as sweet, but the eggnog flavor comes through more clearly.
Conclusion
These creamy no-bake eggnog cheesecake bars have become my signature holiday dessert, and I think they deserve to be yours too. They’re forgiving enough for a beginner baker, impressive enough for a fancy party, and delicious enough to make everyone ask for the recipe. The best part? You can make them ahead of time and actually enjoy your own party instead of stressing in the kitchen.
I love how this recipe lets me share a little bit of Eleanor’s kitchen wisdom with everyone who tries them. She was right about feeling your way through cooking, but having a reliable recipe to fall back on doesn’t hurt either. Play around with the variations, make them your own, and don’t forget to save a piece for yourself before they disappear.
Have you tried these bars? Did you add your own twist? I’d love to hear about it in the comments below. And if you’re looking for more no-fuss holiday desserts, check out my easy peppermint bark recipe or these cranberry orange bars — they’re both crowd-pleasers that won’t keep you tied to the kitchen.
Frequently Asked Questions
Can I use low-fat cream cheese or eggnog?
You can, but the texture won’t be as rich and creamy. Low-fat cream cheese has more water and less fat, which can make the filling softer. If you’re trying to lighten things up, I’d recommend using full-fat cream cheese and low-fat eggnog instead of swapping both.
My bars didn’t set properly. What went wrong?
This usually happens for one of three reasons: the gelatin wasn’t fully dissolved, the mixture wasn’t chilled long enough, or the ratios were off. Make sure your gelatin is completely dissolved in the water before adding it, and give the bars a full 6-8 hours in the fridge. If you’re in a hurry, you can pop them in the freezer for 2 hours, but watch them closely so they don’t freeze solid.
Can I make these without gelatin?
Honestly, no. Gelatin is what gives no-bake cheesecake its structure. Without it, you’ll end up with a soft, scoopable dessert — which is still delicious, but not sliceable. If you need a vegetarian option, you can try agar agar, but I haven’t tested it with this recipe and can’t guarantee results.
How far in advance can I make these bars?
You can make them up to 2 days ahead of time without the whipped topping. Add the topping the day you’re serving them for the best presentation. The bars actually taste better after a day in the fridge — the flavors have time to meld together.
Can I double this recipe for a larger crowd?
Absolutely. Double all the ingredients and use a 9×13-inch pan instead of a 9×9. The chilling time stays the same. You’ll get about 24 bars from a double batch. This is my go-to for holiday parties and family gatherings.
Pin This Recipe!
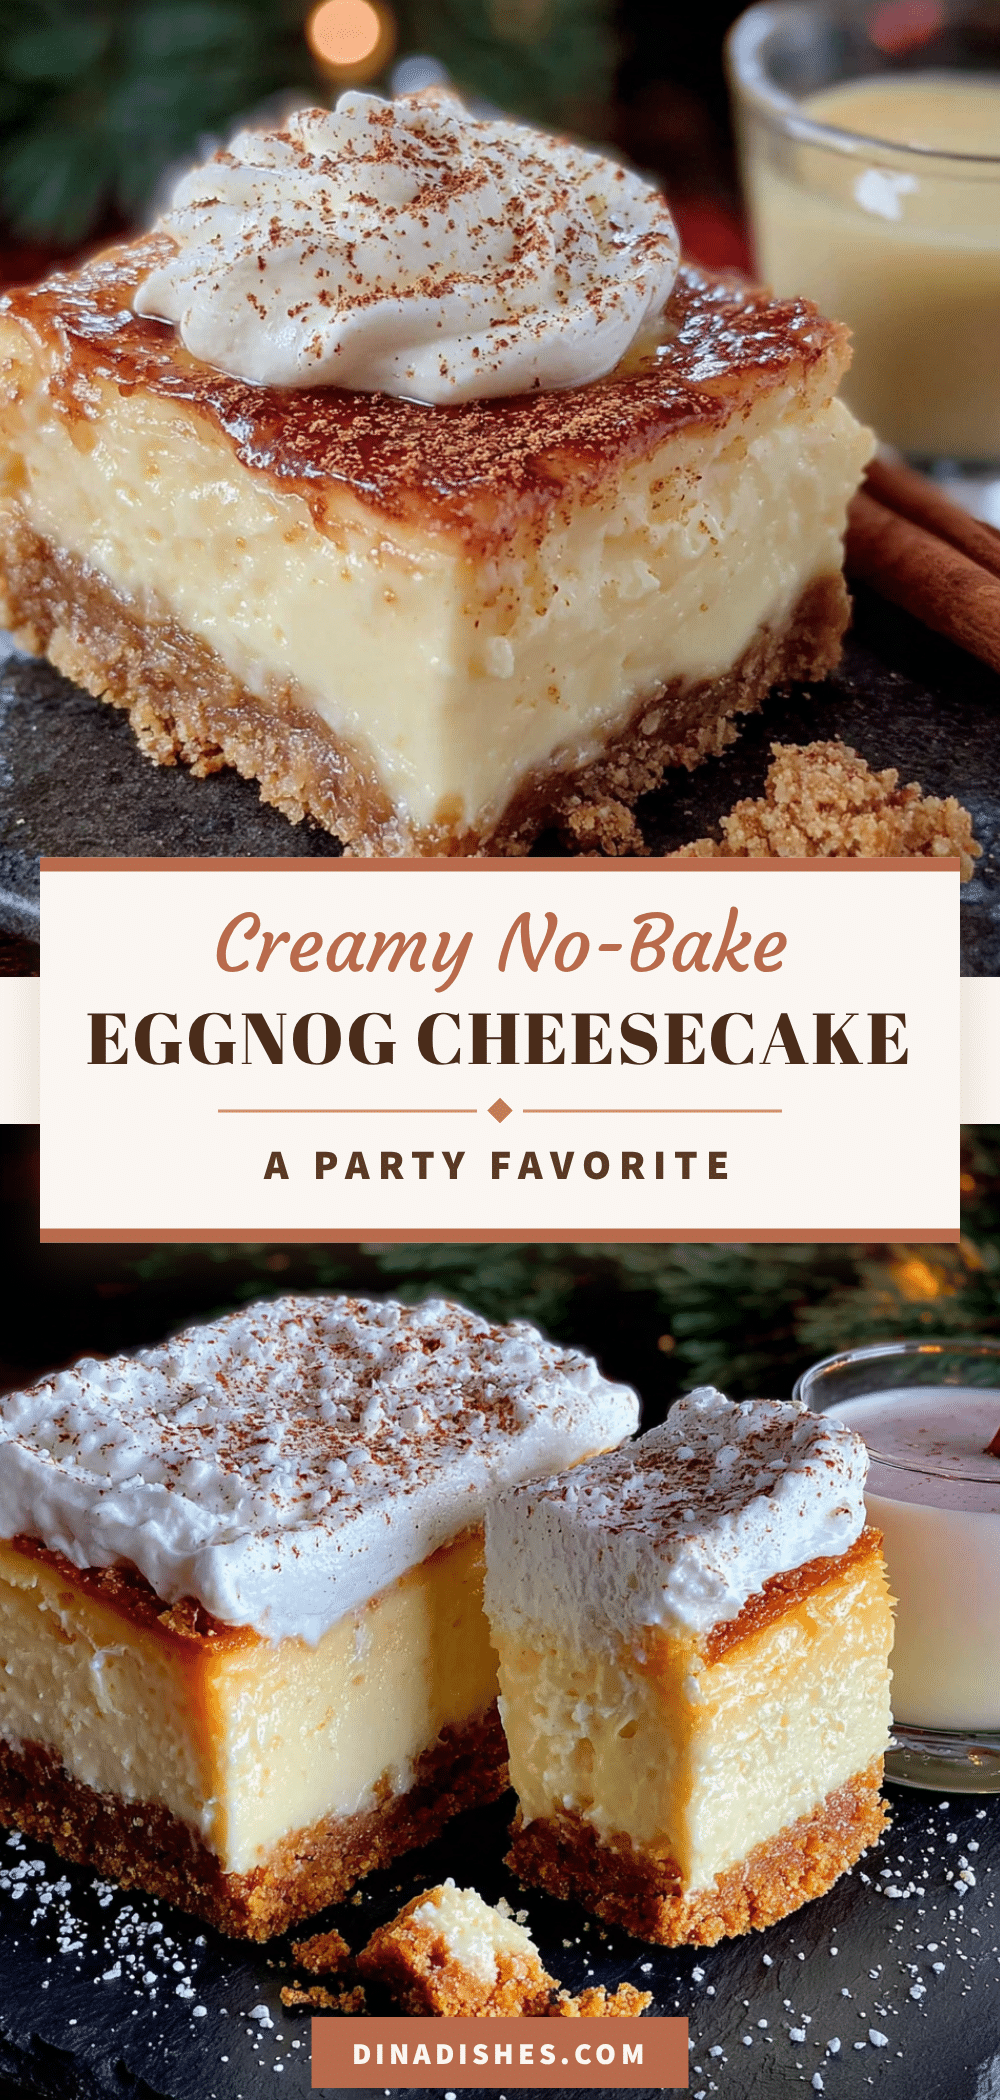
Creamy No-Bake Eggnog Cheesecake Bars – Easy Holiday Dessert Recipe
These creamy no-bake eggnog cheesecake bars feature a buttery graham cracker crust, a silky eggnog filling, and a whisper of nutmeg on top. They’re perfect for holiday gatherings, easy to make ahead, and require no oven.
- Prep Time: 30 minutes
- Cook Time: 0 minutes
- Total Time: 6 hours 30 minutes (includes chilling time)
- Yield: 16 servings 1x
- Category: Dessert
- Cuisine: American
Ingredients
- 2 cups graham cracker crumbs (about 14–16 full sheets, crushed finely)
- 1/2 cup unsalted butter, melted
- 3 tablespoons granulated sugar
- 1/4 teaspoon ground cinnamon (optional)
- 16 ounces cream cheese, softened to room temperature
- 1/2 cup granulated sugar
- 1 1/4 cups cold eggnog
- 1 teaspoon vanilla extract
- 1/2 teaspoon ground nutmeg
- 1/4 teaspoon ground cinnamon
- 1 envelope (about 2 1/4 teaspoons) unflavored gelatin
- 3 tablespoons cold water
- 1 cup heavy whipping cream
- 2 tablespoons powdered sugar
- 1 cup heavy whipping cream (for topping)
- 2 tablespoons powdered sugar (for topping)
- 1/2 teaspoon vanilla extract (for topping)
- Freshly grated nutmeg or cinnamon for dusting
- Optional: crushed gingersnap cookies or caramel drizzle
Instructions
- Line a 9×9-inch baking pan with parchment paper, leaving overhang on two opposite sides. Lightly grease the parchment.
- Crush graham crackers into fine crumbs. In a medium bowl, combine crumbs with melted butter, sugar, and cinnamon (if using). Stir until every crumb is coated. Press mixture firmly into the prepared pan using a flat measuring cup. Refrigerate while making the filling.
- In a small microwave-safe bowl, sprinkle gelatin over cold water. Let sit for 5 minutes without stirring. Microwave for 10 seconds, then stir until gelatin dissolves completely. Set aside to cool slightly.
- In a large bowl, beat softened cream cheese with granulated sugar until smooth and fluffy, about 2 minutes. Scrape down sides. Add eggnog, vanilla extract, nutmeg, and cinnamon. Beat on low until combined, then increase to medium for 1 minute.
- With mixer running on low, slowly pour in dissolved gelatin. Mix until fully incorporated, about 30 seconds. Scrape bowl well.
- In a separate bowl, beat heavy whipping cream and powdered sugar until stiff peaks form, about 2-3 minutes.
- Stir one-third of the whipped cream into the cream cheese mixture to lighten it. Gently fold in remaining whipped cream using a spatula until no white streaks remain.
- Pour filling over chilled crust and spread evenly. Tap pan gently on counter to release air bubbles. Cover with plastic wrap and refrigerate for at least 6 hours, preferably overnight.
- Once bars are fully set, make the whipped topping: beat cream, powdered sugar, and vanilla until soft peaks form. Spread or pipe over bars. Dust with freshly grated nutmeg and crushed gingersnaps if desired. Refrigerate for another 30 minutes before slicing.
- Lift entire block out using parchment handles. Use a sharp knife, wiping clean between cuts, to slice into bars. For extra clean cuts, dip knife in hot water and dry before slicing.
Notes
Room temperature cream cheese is essential to avoid lumps. Do not skip the gelatin step as it provides structure. Let gelatin cool slightly before adding to prevent rubbery bits. Chill for at least 6 hours, but overnight is better for best texture. Use a clean knife dipped in hot water for neat slices. Bars can be made up to 2 days ahead without whipped topping. Freeze without topping for up to 3 months.
Nutrition
- Serving Size: 1 bar
- Calories: 320
- Sugar: 18
- Sodium: 210
- Fat: 22
- Carbohydrates: 27
- Protein: 5
Keywords: no-bake cheesecake, eggnog cheesecake bars, holiday dessert, easy dessert, no-bake dessert, Christmas dessert, Thanksgiving dessert