I had refused to put squash in macaroni and cheese for a solid decade. Maybe longer. It felt like a betrayal, you know? Mac and cheese is supposed to be this gloriously unapologetic, creamy, cheesy mess—not a vehicle for vegetables. I mean, I love butternut squash. Roasted with sage, yes. Tossed into a fall salad, absolutely. But stirred into my cheddar sauce? Hard pass.
Then last November, my sister-in-law Jen showed up at our family Friendsgiving with a baking dish of this orange-hued mac and cheese. I gave her this look—the one that says, “I see what you’re trying to do, and I’m not buying it.” She just laughed and put a scoop on my plate anyway. I ate it to be polite, honestly. And then I ate a second scoop because, well, I needed to be sure. And a third because I had to admit I was wrong.
The thing is, she hadn’t told anyone there was squash in it until halfway through dinner. She just let the dish speak for itself. And it did—all creamy, subtly sweet, and somehow cheesier than my regular recipe. I sat there feeling like a fool, but the good kind of fool. The kind who just learned something important.
So I asked for the recipe, tweaked it about six times over the following weeks, and landed on this version. It’s the one that finally made me shut up about my stupid rule. And now? I make it every time the weather turns cold. Maybe you’ve been there—stubborn about a food rule that doesn’t actually make sense. This one’s worth breaking.
Why You’ll Love This Recipe
Let me tell you why this one-pot butternut squash mac and cheese has earned a permanent spot in my dinner rotation. It’s not just because it tastes incredible—though it absolutely does. It’s because this recipe actually works for real life, the kind where you’re tired and hungry and don’t want to wash a mountain of dishes.
- Quick & Easy: From start to table in about 35 minutes. One pot. That’s it. No boiling pasta separately, no draining, no extra colander to scrub.
- Simple Ingredients: You probably have most of this in your kitchen right now. The squash is the star, but everything else is pantry-friendly and budget-conscious.
- Perfect for Cozy Nights: This is the definition of comfort food. Cold weather, rough day, or just need a hug in a bowl? This is your answer.
- Crowd-Pleaser: I’ve served this to kids, picky eaters, and squash skeptics (like my former self). It disappears every single time.
- Unbelievably Delicious: The texture is next-level. The squash blends into the cheese sauce so smoothly that you get this velvety richness without any grittiness.
What makes this recipe different from the dozens of other mac and cheese recipes out there? It’s the way the squash puree melds with the sharp cheddar and the touch of nutmeg. It’s not trying to hide the squash—it’s using it to make the cheese sauce even better. The squash adds body and a subtle sweetness that balances the salty, sharp cheese perfectly. This isn’t just another version of mac and cheese. It’s the best version, and I’m not just saying that because I’m biased. I’m saying it because I’ve tested it, tweaked it, and watched it win over people who swore they’d never eat orange mac and cheese.
This recipe is the kind that makes you close your eyes after the first bite. It’s comfort food reimagined—healthier, faster, but with the same soul-soothing satisfaction. Perfect for impressing guests without stress, or turning a simple Tuesday night into something memorable.
What Ingredients You Will Need
This recipe uses simple, wholesome ingredients to deliver bold flavor and satisfying texture without the fuss. Most of these are pantry staples, and the fresh ingredients are easy to find year-round.
- Butternut Squash (2 cups, peeled and cubed) – Look for one that feels heavy for its size. You can also use pre-cut cubes from the grocery store to save time. Fresh is best here, but frozen works in a pinch (just thaw and pat dry first).
- Elbow Macaroni (2 cups, about 8 oz) – I prefer De Cecco or Barilla for texture. They hold up well to the creamy sauce without getting mushy. Any short pasta works—cavatappi, shells, or rotini are great options.
- Sharp Cheddar Cheese (2 cups, shredded) – Please shred your own! Pre-shredded cheese has anti-caking agents that prevent smooth melting. I like Cabot or Tillamook for consistent quality.
- Milk (2 cups, whole milk preferred) – Whole milk gives the creamiest result. You can use 2% in a pinch, but avoid skim—it won’t give you that luscious texture. For dairy-free, unsweetened oat milk works surprisingly well.
- Chicken or Vegetable Broth (1 cup) – Low-sodium is best so you can control the salt. Vegetable broth keeps this vegetarian-friendly.
- Unsalted Butter (2 tablespoons) – Salted butter works too, just reduce the added salt later.
- All-Purpose Flour (2 tablespoons) – This helps thicken the sauce. For gluten-free, use a 1:1 gluten-free flour blend.
- Garlic (2 cloves, minced) – Fresh garlic adds depth. Don’t skip it—it’s subtle but important.
- Dijon Mustard (1 teaspoon) – Trust me on this. It doesn’t make it taste like mustard. It just makes the cheese taste cheesier. It’s a little secret professional chefs use.
- Ground Nutmeg (¼ teaspoon) – Just a pinch. It brings out the sweetness of the squash and adds warmth.
- Salt and Black Pepper (to taste) – Start with ½ teaspoon salt and ¼ teaspoon pepper, then adjust.
- Breadcrumbs (½ cup, optional for topping) – Panko breadcrumbs give the best crunch. Toss them with a tablespoon of melted butter before sprinkling on top.
- Fresh Sage Leaves (a few, optional for garnish) – Fried sage leaves make this look restaurant-worthy. Just fry them in a little butter for 30 seconds.
Ingredient Selection Tips: When choosing butternut squash, look for one with a long neck rather than a bulbous bottom—the neck has fewer seeds and more usable flesh. If you’re using pre-cut cubes, check that they’re bright orange and not pale or dried out around the edges.
Substitution Guidance: Swap the cheddar for Gruyère or Gouda for a different flavor profile. Use gluten-free pasta and flour for a gluten-free version. For a vegan option, use plant-based butter, unsweetened oat milk, and your favorite vegan cheddar shreds (though the texture will be slightly different).
Equipment Needed
You don’t need a fancy kitchen to make this recipe work. Here’s what you’ll actually use:
- Large Dutch Oven or Heavy-Bottomed Pot (5-6 quart) – This is your one pot. A Le Creuset or Staub is lovely, but a Lodge enameled cast iron pot or even a heavy stainless steel stockpot works just fine. The key is even heat distribution so the sauce doesn’t scorch.
- Chef’s Knife – A sharp 8-inch knife makes quick work of cubing the squash. Dull knives are dangerous—they slip more easily.
- Cutting Board – A sturdy wooden or plastic board. Put a damp paper towel underneath to keep it from sliding.
- Box Grater or Food Processor – For shredding the cheese. I use my food processor with the shredding disc when I’m feeling lazy, and it takes 30 seconds.
- Wooden Spoon or Silicone Spatula – For stirring. Silicone won’t scratch your pot, but a good wooden spoon has been my go-to for years.
- Measuring Cups and Spoons – For accuracy. I’ve learned the hard way that eyeballing flour leads to lumpy sauce.
- Immersion Blender or Potato Masher – For pureeing the squash right in the pot. An immersion blender is easier and creates a silkier texture. A potato masher works if you’re patient and don’t mind a few small chunks.
- Small Baking Dish (optional) – If you want to broil the breadcrumb topping. An 8×8 or 9×9 works perfectly.
Budget-friendly tip: You don’t need an expensive immersion blender. A $20 one from a well-known brand will do the job for years. I’ve had my basic Cuisinart for almost a decade.
Preparation Method
- Prep the Squash (5 minutes)
Peel the butternut squash with a vegetable peeler, then cut it in half lengthwise. Scoop out the seeds and stringy bits with a spoon. Cut the flesh into ½-inch cubes. You’ll need about 2 cups of cubes. If you’re using pre-cut squash, give them a quick rinse and pat them dry. - Sauté the Aromatics (3 minutes)
Place your large pot over medium heat and melt the butter. Once it’s bubbling, add the minced garlic. Stir for about 30 seconds until it smells amazing—don’t let it brown. Browning garlic makes it bitter, and we want it sweet and mellow here. - Build the Base (2 minutes)
Sprinkle the flour over the butter and garlic. Whisk constantly for about a minute until the mixture turns light golden and smells a bit nutty. This is your roux, and it’s the foundation of a smooth sauce. If you see lumps forming, don’t panic—just whisk harder. They’ll smooth out once you add the liquid. - Add Liquids and Squash (10 minutes)
Slowly pour in the milk while whisking continuously. Then add the broth, still whisking. Bring this to a gentle simmer—you’ll see small bubbles around the edges, not a rolling boil. Add the cubed butternut squash, the Dijon mustard, nutmeg, ½ teaspoon salt, and ¼ teaspoon pepper. Stir everything together, reduce the heat to medium-low, and cover the pot. Let it cook for about 10 minutes, or until the squash is tender enough to be pierced easily with a fork. Stir once halfway through to make sure nothing sticks to the bottom. - Pasta Time (8-10 minutes)
Add the dry macaroni directly to the pot. Stir well to make sure every piece is submerged in the liquid. Increase the heat to medium-high and bring it to a gentle boil, then reduce to a simmer. Cook uncovered, stirring occasionally, for about 8-10 minutes or until the pasta is al dente. The liquid will reduce and thicken as the pasta absorbs it. If it looks too dry before the pasta is done, add a splash more milk or broth. - Puree the Sauce (2 minutes)
Remove the pot from the heat. Use your immersion blender to puree the mixture right in the pot until it’s completely smooth. If you’re using a potato masher, mash the squash pieces against the side of the pot until the sauce is mostly smooth—a few small chunks are fine and add texture. Be careful, the mixture is hot. I’ve splashed myself before, and it’s not fun. - Add the Cheese (2 minutes)
Stir in the shredded cheddar cheese a handful at a time, letting each addition melt before adding the next. Keep stirring gently until the sauce is smooth and all the cheese has melted. Taste it and adjust the salt and pepper. You might want a little more—cheese can be salty, so go easy at first. - Optional Crunchy Topping (5 minutes)
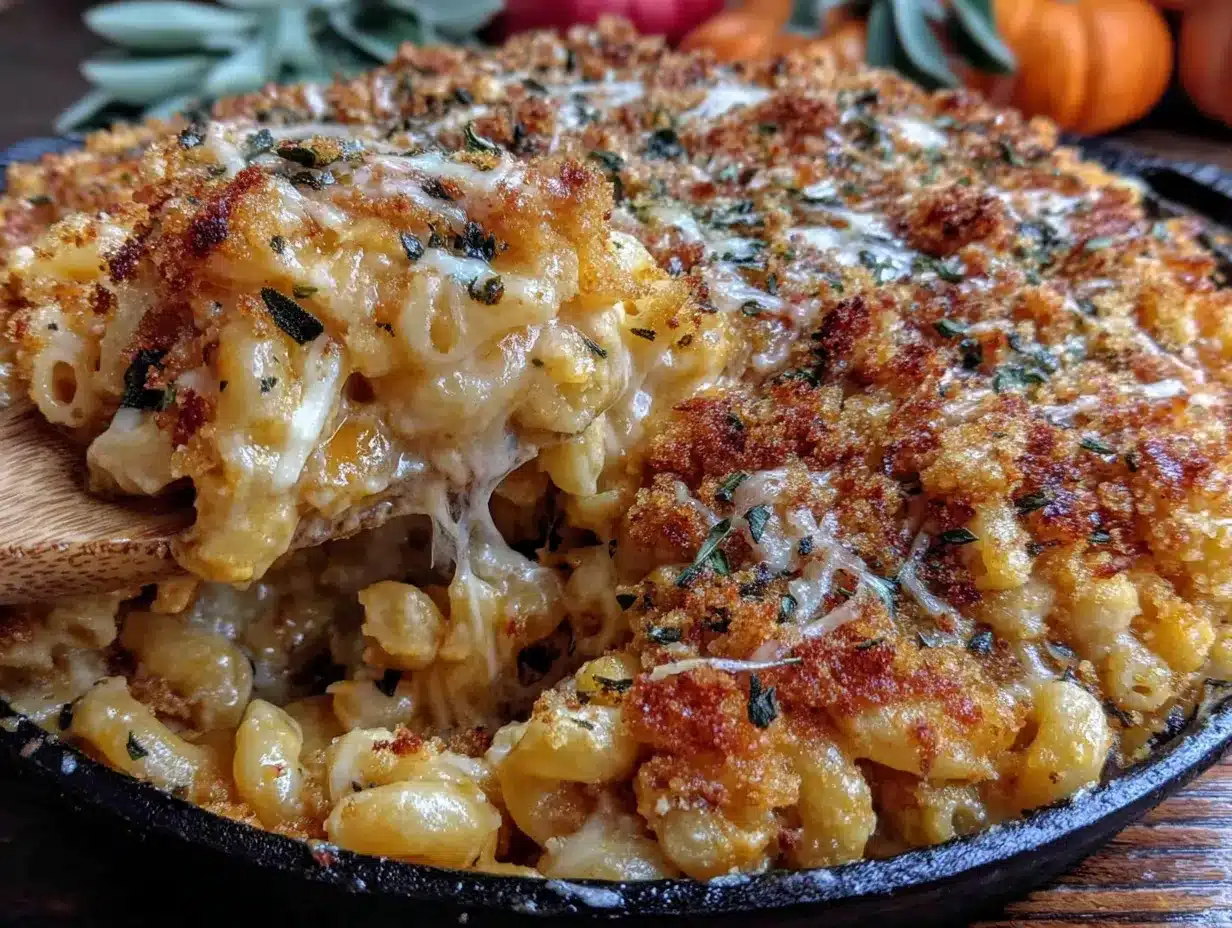
If you want that golden, crispy top, preheat your broiler. Transfer the mac and cheese to a small baking dish (or use an oven-safe pot). In a small bowl, toss the breadcrumbs with a tablespoon of melted butter. Sprinkle them over the top. Broil for 2-3 minutes, watching closely—they burn fast. You want them golden brown, not black. Let it sit for 2 minutes before serving.
Sensory Cue: At step 4, the squash should be soft enough that when you press a cube against the side of the pot with your spoon, it collapses easily. At step 7, the sauce should coat the back of a spoon—if you run your finger through it, the line should hold.
Cooking Tips & Techniques
I’ve made this recipe about fifteen times now, and I’ve messed it up in almost every way possible. Here’s what I learned so you don’t have to.
Don’t rush the roux. That minute you spend whisking the flour and butter together isn’t just for show. It cooks out the raw flour taste and helps the sauce thicken properly. I once got distracted by my phone and let it go too long—the sauce had a slightly burnt flavor that I couldn’t fix. Aim for pale gold, not brown.
Low and slow for the cheese. This is the biggest mistake people make. High heat makes cheese sauce grainy and separates the fats. Keep the heat on low when you add the cheese, and stir gently. If the sauce looks a little broken at first, keep stirring—it usually comes back together. If it doesn’t, a splash of cold milk and vigorous whisking can save it.
Salt your pasta water? Normally yes, but since we’re cooking the pasta directly in the sauce, you don’t need to. The broth and cheese add enough salt. If you’re used to salting pasta water, just resist the urge here. Trust me.
Multitasking strategy: While the squash is simmering in step 4, shred your cheese if you haven’t already. It’s the perfect window of time. Also, if you’re adding breadcrumbs, mix them with butter now so they’re ready to go.
Consistency tip: The sauce will thicken as it sits. If you’re making this ahead, add an extra ¼ cup of milk when reheating to loosen it back up. I learned this the hard way when I served leftovers that were basically mac and cheese bricks.
Personal failure: The first time I made this, I used pre-shredded cheese because I was in a hurry. The sauce turned out grainy and weird. I spent twenty minutes trying to fix it, adding more milk, whisking furiously, and finally just accepting defeat. Shred your own cheese. It’s worth the extra two minutes.
Variations & Adaptations
This recipe is a great starting point, but don’t be afraid to make it your own. Here are some variations I’ve tried and loved:
1. Bacon and Sage Version: Cook 4 slices of bacon until crispy, then crumble them. Stir half into the mac and cheese before serving, and sprinkle the rest on top along with fried sage leaves. The smoky saltiness is incredible against the sweet squash. I made this for a friend who claimed to hate butternut squash, and he asked for seconds.
2. Spicy Southwest Twist: Add 1 diced jalapeño (seeds removed if you want less heat) along with the garlic. Stir in ½ teaspoon cumin and ¼ teaspoon chili powder with the flour. Use pepper jack cheese instead of half the cheddar. Top with crushed tortilla chips instead of breadcrumbs. This version is great when you want something with a kick.
3. Dairy-Free Adaptation: Use plant-based butter, unsweetened oat milk, and your favorite vegan cheddar shreds. The texture won’t be exactly the same—vegan cheese doesn’t melt the same way—but it’s still creamy and satisfying. I’ve tried this with Miyoko’s brand and it worked well. Add an extra tablespoon of nutritional yeast for a cheesier flavor.
4. Protein-Packed Version: Stir in 2 cups of shredded rotisserie chicken or cooked Italian sausage after the cheese melts. This turns it into a complete meal. I do this when I want leftovers for lunch the next day—it reheats beautifully.
5. Different Squash Options: No butternut squash? Use acorn squash, pumpkin puree, or even sweet potato. Each gives a slightly different sweetness and texture. Pumpkin makes it a bit more earthy, while sweet potato makes it sweeter. Adjust the nutmeg accordingly—sweet potato needs a little more.
Serving & Storage Suggestions
Serving Temperature: Serve this mac and cheese hot, straight from the pot. If you’ve added the breadcrumb topping, let it rest for 2-3 minutes after broiling so the top sets and doesn’t slide off when you scoop it.
Presentation: Spoon it into shallow bowls so you can see the creamy sauce. Garnish with a few fried sage leaves or a sprinkle of fresh black pepper. If you’re serving it for company, transfer it to a warm serving dish—it stays hot longer.
Complementary Dishes: This mac and cheese is rich enough to be a main dish, but it pairs beautifully with a simple green salad dressed with lemon vinaigrette. The acidity cuts through the creaminess. Roasted broccoli or Brussels sprouts also work great—the caramelized edges contrast nicely with the smooth pasta. For a cozy meal, serve it alongside roasted chicken or meatloaf.
Storage Instructions: Let the mac and cheese cool completely before storing. Transfer it to an airtight container and refrigerate for up to 4 days. The flavors actually meld together overnight, so leftovers might taste even better.
Freezer Instructions: This freezes well for up to 3 months. Let it cool completely, then transfer to a freezer-safe container. Leave a little room for expansion. Thaw overnight in the refrigerator before reheating.
Reheating Methods: The stovetop is best. Place the mac and cheese in a pot with a splash of milk (about 2 tablespoons per cup of leftovers). Warm over medium-low heat, stirring frequently, until heated through. The microwave works in a pinch—use 50% power and stir every 30 seconds. Add a little milk each time you stir. The sauce will tighten up in the fridge, so don’t skip the milk.
Flavor Development: I honestly think this mac and cheese tastes better on day two. The squash and cheese flavors meld together more, and the texture becomes even creamier. If you can resist eating it all on day one, you’re in for a treat.
Nutritional Information & Benefits
Here’s the approximate nutritional breakdown for one serving (about 1 cup, without breadcrumb topping):
- Calories: 380
- Protein: 16g
- Fat: 18g
- Carbohydrates: 40g
- Fiber: 4g
- Sugar: 8g
- Sodium: 520mg
- Calcium: 25% of Daily Value
- Vitamin A: 120% of Daily Value
- Vitamin C: 20% of Daily Value
Health Benefits: Butternut squash is packed with vitamin A (great for eye health and immune function) and fiber (keeps you full and supports digestion). The squash also adds natural sweetness, which means you can use less salt and still get amazing flavor. The calcium from the cheese and milk is good for bone health. This dish is a sneaky way to get a serving of vegetables into a meal that feels completely indulgent.
Dietary Considerations: This recipe can be made gluten-free by using gluten-free pasta and a 1:1 gluten-free flour blend. For a lower-carb option, use half the pasta and add an extra cup of roasted broccoli or cauliflower. The cheese and milk contain dairy, so it’s not suitable for those with dairy allergies unless you use the vegan adaptations mentioned above.
Personal Wellness Perspective: I love that this recipe lets me feel good about eating comfort food. It’s not “healthy” in the diet sense, but it’s made with real ingredients and has more nutritional value than boxed mac and cheese. That’s a win in my book.
Conclusion
This one-pot butternut squash mac and cheese is everything I used to think it couldn’t be. It’s creamy, cheesy, comforting, and secretly packed with vegetables. It’s the kind of recipe that proves you can have your comfort food and eat it too—without the guilt and without the mountain of dishes.
I’ve made this for picky kids, skeptical adults, and friends who swore they’d never eat orange pasta. And every single time, I watch them take that first bite, pause, and go back for more. That’s the moment that makes all the testing and tweaking worth it.
Don’t be afraid to customize this recipe to your taste. Add more cheese if you want. Throw in some bacon. Swap the pasta shape. Make it your own. That’s the beauty of cooking—you get to decide what perfect looks like.
I’d love to hear how this turns out for you. Did you try a variation? Did your family love it? Drop a comment below and let me know. And if you share it on social media, tag me—I want to see your cozy creations. Until next time, happy cooking, and remember: sometimes the best recipes are the ones that prove you wrong.
Frequently Asked Questions
Can I use frozen butternut squash for this recipe?
Yes, you absolutely can. Just thaw it first and pat it dry with paper towels to remove excess moisture. Frozen squash tends to be a bit waterier than fresh, which can make the sauce thinner. If that happens, let it simmer for an extra 2-3 minutes uncovered to thicken up.
Why did my cheese sauce turn out grainy?
This usually happens for two reasons: the heat was too high when you added the cheese, or you used pre-shredded cheese. Pre-shredded cheese contains anti-caking agents like cellulose that prevent smooth melting. Always shred your own cheese from a block, and keep the heat on low when melting it in. If your sauce still turns grainy, try whisking in a splash of cold milk—it can sometimes bring it back together.
Can I make this recipe ahead of time?
Definitely. You can make the entire dish up to 2 days ahead. Let it cool completely, then cover and refrigerate. When you’re ready to serve, reheat it on the stovetop with a splash of milk, stirring until hot. If you’re adding the breadcrumb topping, do that right before serving so it stays crispy.
What other cheeses work well in this recipe?
Gruyère is my favorite substitute—it melts beautifully and has a nutty flavor that pairs well with the squash. Gouda adds a smoky sweetness. Monterey Jack makes it extra creamy. You can also use a mix of cheeses. Just avoid very hard cheeses like Parmesan (they don’t melt smoothly) or pre-shredded blends.
How do I make this recipe gluten-free?
It’s simple. Use gluten-free pasta (I like the brown rice pasta from Tinkyada) and substitute the all-purpose flour with a 1:1 gluten-free flour blend. Everything else in the recipe is naturally gluten-free. Just be sure to check your broth and Dijon mustard labels—some brands contain gluten.
PrintEasy One Pot Butternut Squash Mac and Cheese Recipe

This one-pot butternut squash mac and cheese is creamy, cheesy, and secretly packed with vegetables. It’s a quick and easy comfort food that comes together in about 35 minutes with minimal cleanup.
- Prep Time: 10 minutes
- Cook Time: 25 minutes
- Total Time: 35 minutes
- Yield: 4 servings 1x
- Category: Main Course
- Cuisine: American
Ingredients
- 2 cups butternut squash, peeled and cubed
- 2 cups elbow macaroni (about 8 oz)
- 2 cups sharp cheddar cheese, shredded
- 2 cups whole milk
- 1 cup low-sodium chicken or vegetable broth
- 2 tablespoons unsalted butter
- 2 tablespoons all-purpose flour
- 2 cloves garlic, minced
- 1 teaspoon Dijon mustard
- ¼ teaspoon ground nutmeg
- ½ teaspoon salt (or to taste)
- ¼ teaspoon black pepper (or to taste)
- ½ cup panko breadcrumbs (optional for topping)
- 1 tablespoon melted butter (for breadcrumbs, optional)
- Fresh sage leaves for garnish (optional)
Instructions
- Prep the squash: Peel the butternut squash, cut in half lengthwise, scoop out seeds, and cut into ½-inch cubes. You’ll need about 2 cups of cubes.
- Sauté the aromatics: In a large pot over medium heat, melt the butter. Add minced garlic and stir for about 30 seconds until fragrant, without browning.
- Build the base: Sprinkle the flour over the butter and garlic. Whisk constantly for about 1 minute until the mixture turns light golden and smells nutty.
- Add liquids and squash: Slowly pour in the milk while whisking, then add the broth. Bring to a gentle simmer. Add the cubed butternut squash, Dijon mustard, nutmeg, ½ teaspoon salt, and ¼ teaspoon pepper. Stir, reduce heat to medium-low, cover, and cook for about 10 minutes until squash is tender.
- Cook the pasta: Add the dry macaroni directly to the pot. Stir well. Increase heat to medium-high and bring to a gentle boil, then reduce to a simmer. Cook uncovered, stirring occasionally, for 8-10 minutes until pasta is al dente.
- Puree the sauce: Remove from heat. Use an immersion blender to puree the mixture until smooth. Alternatively, use a potato masher to mash the squash against the side of the pot.
- Add the cheese: Stir in the shredded cheddar cheese a handful at a time, letting each addition melt before adding the next. Taste and adjust salt and pepper.
- Optional crunchy topping: If desired, preheat broiler. Transfer mac and cheese to a baking dish. Toss breadcrumbs with melted butter and sprinkle on top. Broil for 2-3 minutes until golden brown. Let rest 2 minutes before serving.
Notes
Shred your own cheese for the smoothest sauce. The sauce will thicken as it sits; add a splash of milk when reheating. For a gluten-free version, use gluten-free pasta and a 1:1 gluten-free flour blend.
Nutrition
- Serving Size: 1 cup
- Calories: 380
- Sugar: 8
- Sodium: 520
- Fat: 18
- Saturated Fat: 10
- Carbohydrates: 40
- Fiber: 4
- Protein: 16
Keywords: butternut squash mac and cheese, one pot mac and cheese, easy mac and cheese, comfort food, fall recipe, vegetarian mac and cheese


