It was 11:47 PM on a rainy Tuesday, and I had a serious craving for chili. Not just any chili—the kind that sticks to your ribs, warms you from the inside out, and makes the whole house smell like someone actually knows what they’re doing in the kitchen. The problem? I didn’t have any ground beef in the freezer (story of my life), and my pantry was looking pretty sad. But I had a can of pumpkin puree left over from a pie I never got around to making, two cans of black beans, and a half-empty jar of smoked paprika that was about to expire. And honestly? That’s when the magic happened.
I stood there in my pajamas, staring at the pumpkin like it was going to talk back to me. “You’re going in a chili?” I whispered to myself. It sounded weird. It sounded wrong. But something about that smoky paprika and the creamy pumpkin just clicked in my tired brain. I figured if I messed it up, no one would know but me and the cat. So I grabbed my biggest pot and started throwing things together, not really measuring, just going with that late-night gut feeling. I mean, what’s the worst that could happen—I waste a few bucks worth of beans?
What came out of that pot was honestly one of the best things I’ve ever made. The pumpkin made it silky and rich without any cream, and that smoky kick from the paprika? Chef’s kiss. My husband woke up from the smell and stumbled into the kitchen, still half-asleep, and ate a bowl standing over the sink. That’s when I knew this was something special. Maybe you’ve been there—standing in your kitchen at an ungodly hour, making something that shouldn’t work but absolutely does. This budget-friendly smoky pumpkin chili is that recipe. It’s the one you’ll keep coming back to when you need a win, a warm hug, and a full belly without breaking the bank.
Why You’ll Love This Recipe
Let me tell you why this chili has earned a permanent spot in our weekly rotation. I’ve tested this recipe a dozen times, tweaking the spices and the cooking time until it was just right. My neighbor Linda, who’s a self-proclaimed chili snob, actually asked for the recipe after I brought her a bowl. That’s the kind of approval that matters, you know?
- Budget-Friendly: This whole pot costs under $10 to make, and most of the ingredients are pantry staples. No fancy cuts of meat or expensive produce required.
- Quick & Easy: From start to finish, you’re looking at about 45 minutes. Most of that is hands-off simmering time, so you can throw it together on a busy weeknight without breaking a sweat.
- Simple Ingredients: You probably already have canned beans, diced tomatoes, and spices in your kitchen right now. The pumpkin is the only “surprise” ingredient, and it’s cheap as chips at any grocery store.
- Perfect for Family Meals: This chili pleases everyone—picky kids, hungry teenagers, and adults who want something hearty and satisfying. Serve it with cornbread or over rice, and watch it disappear.
- Crowd-Pleaser: I’ve brought this to potlucks and family gatherings, and it always gets devoured. People are skeptical about the pumpkin until they taste it, then they’re asking for seconds.
- Unbelievably Delicious: The texture is velvety and rich, with a smoky depth that makes you think it simmered all day. The pumpkin doesn’t make it sweet—it makes it creamy and luxurious.
What makes this recipe different from every other chili out there? It’s that clever trick of using pumpkin puree to create a silky, satisfying base without any dairy or heavy cream. The smoked paprika and cumin do the heavy lifting on flavor, while the black beans and kidney beans give you that hearty, meaty texture you crave. It’s comfort food reimagined—healthier, faster, and way more affordable than takeout, but with the same soul-soothing satisfaction. This is the kind of meal that makes you close your eyes after the first bite and just breathe.
What Ingredients You Will Need
This recipe uses simple, wholesome ingredients that work together to create big, bold flavor without the fuss. Most of these are pantry staples or cheap finds at any grocery store, so you won’t need to make a special trip.
For the Chili Base
- 1 tablespoon olive oil – (or any neutral oil you have on hand)
- 1 large yellow onion, diced – (about 1 ½ cups; adds sweetness and depth)
- 3 cloves garlic, minced – (fresh is best, but jarred minced garlic works in a pinch)
- 1 red bell pepper, diced – (adds color and a slight sweetness; green bell pepper works too)
- 1 jalapeño, seeded and minced – (optional, for heat; leave it out if feeding kids or spice-sensitive folks)
For the Spice Blend
- 2 tablespoons smoked paprika – (this is non-negotiable for that smoky flavor; I use Savory Spice Shop’s smoked paprika for the best depth)
- 1 tablespoon ground cumin – (warm, earthy, essential)
- 1 teaspoon chili powder – (use a mild or hot blend depending on preference)
- 1 teaspoon dried oregano – (Mexican oregano if you have it, but regular works fine)
- ½ teaspoon cayenne pepper – (adjust to taste; skip if you want a mild chili)
- 1 teaspoon salt – (plus more to taste)
- ½ teaspoon black pepper – (freshly ground if possible)
For the Body of the Chili
- 1 can (15 oz / 425g) pumpkin puree – (not pumpkin pie filling! Look for 100% pure pumpkin. I like Libby’s for consistent texture)
- 1 can (15 oz / 425g) black beans, drained and rinsed – (rinsing removes excess sodium and prevents the chili from getting too salty)
- 1 can (15 oz / 425g) kidney beans, drained and rinsed – (or pinto beans if that’s what you have)
- 1 can (15 oz / 425g) diced tomatoes, with their juices – (fire-roasted adds extra smoky flavor if available)
- 1 can (15 oz / 425g) tomato sauce – (adds body and richness)
- 2 cups (480ml) vegetable broth – (or chicken broth if you’re not keeping it vegetarian; low-sodium is best so you control the salt)
For Serving (Optional but Recommended)
- Fresh cilantro, chopped – (a handful for garnish)
- Sour cream or Greek yogurt – (for a cool, creamy finish)
- Shredded cheddar cheese – (because chili and cheese are best friends)
- Diced avocado – (adds healthy fats and creaminess)
- Lime wedges – (a squeeze of lime brightens everything up)
- Tortilla chips or cornbread – (for dipping and scooping)
Ingredient Tip: If you can’t find smoked paprika, you can use regular paprika plus a drop of liquid smoke. But honestly, smoked paprika is cheap and widely available, and it makes a huge difference in this recipe. It’s worth picking up a jar—it’ll last for months and you’ll find yourself adding it to everything from eggs to roasted vegetables.
Equipment Needed
You don’t need a fancy kitchen to make this chili. Here’s what you’ll need:
- Large pot or Dutch oven – (5-6 quart capacity is ideal; I use my trusty Lodge enameled Dutch oven that I got on sale for $40)
- Sharp chef’s knife – (for dicing onions and peppers; a dull knife makes everything harder)
- Cutting board – (any sturdy board will do)
- Wooden spoon or spatula – (for stirring; metal can scratch your pot)
- Can opener – (the manual kind never lets you down)
- Measuring spoons – (eyeballing spices is risky with a new recipe)
- Ladle – (for serving; optional but nice to have)
Budget-Friendly Tip: If you don’t have a Dutch oven, any heavy-bottomed pot will work. A stainless steel stockpot or even a large nonstick skillet with tall sides will do the job. Just make sure it’s big enough to hold everything without overflowing. I once made this in a cheap $15 pot from the grocery store, and it turned out just as good.
Preparation Method
Let’s get cooking! This comes together faster than you’d think, and the whole process is pretty forgiving. Don’t stress about exact timings—chili is one of those dishes that just gets better the longer it hangs out.
- Prep your vegetables (5 minutes): Dice the onion, bell pepper, and jalapeño (if using). Mince the garlic. Open all your cans and drain and rinse the beans. Having everything ready before you start cooking makes the process smooth and stress-free. Trust me, you don’t want to be chopping onions while your garlic is burning.
- Sauté the aromatics (8 minutes): Heat the olive oil in your large pot over medium heat. Add the diced onion and cook for 4-5 minutes until it’s soft and translucent, stirring occasionally. Add the bell pepper and jalapeño, and cook for another 2 minutes. Finally, add the minced garlic and cook for just 30 seconds until fragrant—don’t let it burn or it’ll get bitter.
- Bloom the spices (1 minute): Add the smoked paprika, cumin, chili powder, oregano, cayenne, salt, and black pepper to the pot. Stir constantly for about 30-60 seconds. This step is crucial—toasting the spices in the oil wakes them up and makes their flavors deeper and more complex. Your kitchen will smell incredible right about now.
- Add the pumpkin and tomatoes (2 minutes): Pour in the pumpkin puree, diced tomatoes (with their juices), and tomato sauce. Stir everything together until the pumpkin is fully incorporated and the mixture is smooth. Don’t worry if it looks a little thick at this point—the broth will loosen it up.
- Add the beans and broth (1 minute): Add the drained black beans, kidney beans, and vegetable broth. Stir well to combine. Bring the chili to a gentle boil over medium-high heat, then reduce the heat to low.
- Simmer the chili (25-30 minutes): Let the chili simmer uncovered, stirring occasionally, for 25-30 minutes. The longer it simmers, the thicker and more flavorful it gets. You’ll know it’s ready when the liquid has reduced slightly and the chili has a thick, hearty consistency. If it gets too thick for your liking, add a splash more broth or water.
- Taste and adjust (2 minutes): Before serving, taste the chili and adjust the seasoning. Does it need more salt? A pinch more smoked paprika? A squeeze of lime? This is your chance to make it perfect for your palate. I almost always add another pinch of salt and a dash of cayenne at this stage.
- Serve and garnish (2 minutes): Ladle the chili into bowls and top with your favorite garnishes. Fresh cilantro, a dollop of sour cream, shredded cheese, diced avocado—go wild. Serve with warm cornbread or tortilla chips for dipping.
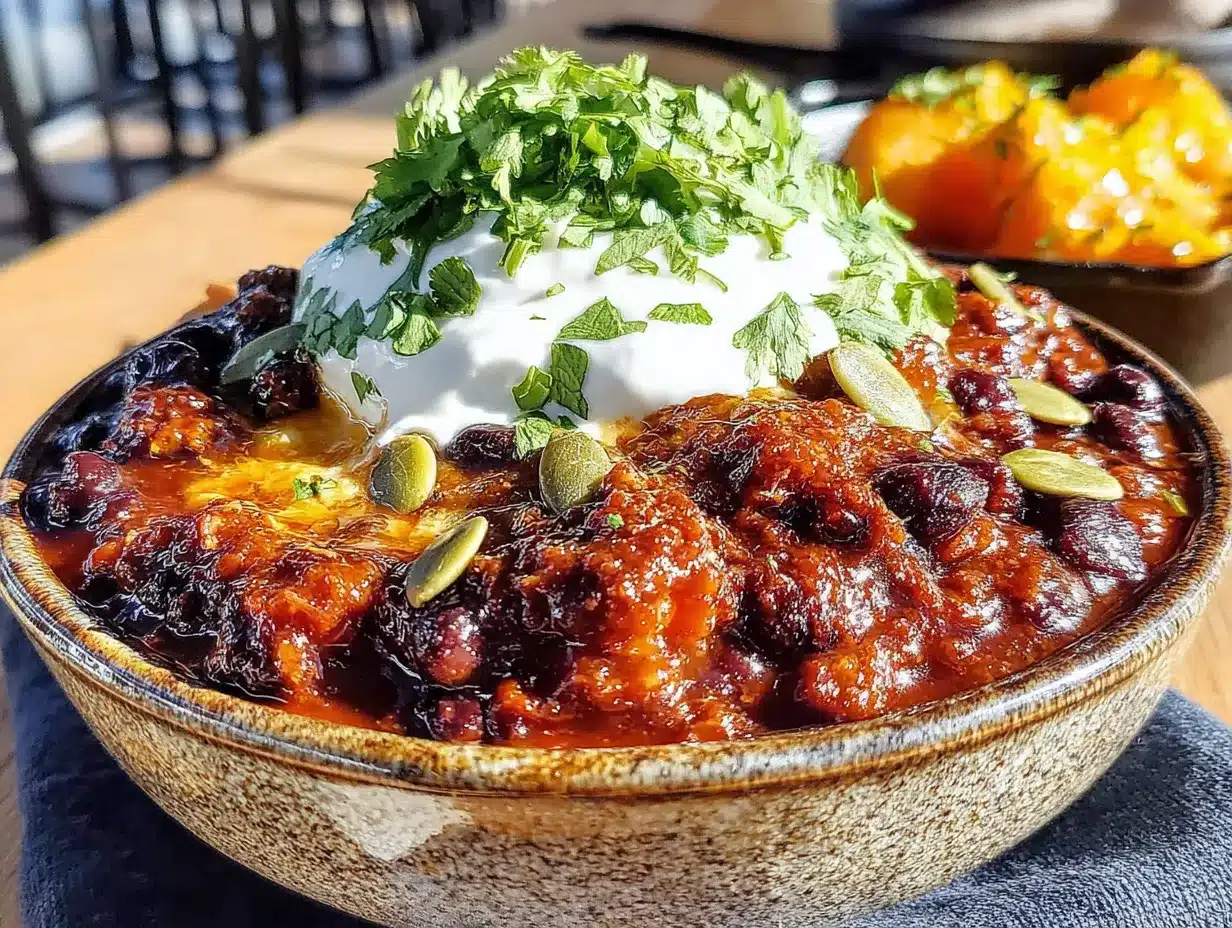
Visual Cue: When the chili is done, it should be thick enough to coat the back of a spoon but still have some liquid. The color will be a deep, rich reddish-orange from the pumpkin and tomatoes. You should be able to see the beans and peppers distributed throughout, not swimming in a thin broth.
Cooking Tips & Techniques
After making this chili more times than I can count, I’ve picked up a few tricks that make a real difference. Here’s what I wish someone had told me the first time around.
Don’t skip blooming the spices. I know it’s tempting to just dump everything in and stir, but that 60 seconds of toasting the spices in hot oil is what gives this chili its deep, smoky flavor. I learned this the hard way when I made a batch that tasted flat and one-dimensional. Now I never skip this step, and the difference is night and day.
Use fire-roasted tomatoes if you can find them. Regular diced tomatoes work fine, but fire-roasted adds another layer of smoky flavor that complements the paprika beautifully. I found a can at my local Aldi for $0.89, and it’s become my go-to. If you can’t find them, just add a tiny pinch of liquid smoke (like, a drop or two) to the pot.
Let it rest before serving. Chili is one of those dishes that actually improves after sitting for 10-15 minutes off the heat. The flavors meld together, the texture thickens up, and everything just comes together. If you can wait that long, your patience will be rewarded. I usually use this time to make a quick batch of cornbread or set out the toppings.
Watch your salt levels. Canned beans and tomatoes already contain sodium, so go easy on the salt at the beginning. I start with just 1 teaspoon and adjust at the end after tasting. You can always add more salt, but you can’t take it out. The same goes for cayenne—start with less and add more heat gradually.
Make it ahead for better flavor. This chili is one of those magical dishes that tastes even better the next day. The flavors have time to marry and deepen overnight in the fridge. I actually prefer making it a day ahead and reheating it for dinner. It’s a great meal prep option for busy weeks—make a big batch on Sunday and enjoy it for lunches all week.
Variations & Adaptations
One of the best things about this chili is how flexible it is. Here are some ways to make it your own, based on what I’ve tried and loved.
Make it meaty: If your family craves meat in their chili, brown 1 pound of ground beef, turkey, or chicken in the pot before adding the onions. Drain any excess fat, then proceed with the recipe. The meat adds extra protein and heartiness. My husband prefers it this way, so I’ll often cook the meat, set half aside for his bowl, and keep the rest vegetarian.
Go gluten-free and dairy-free: This recipe is naturally gluten-free as written (just check your broth label to be sure). For a dairy-free version, skip the cheese and sour cream and use avocado and lime for creaminess instead. Coconut yogurt also works surprisingly well as a sour cream substitute.
Swap the beans: Don’t have black beans or kidney beans? No problem. Canned pinto beans, cannellini beans, or even chickpeas work great. I’ve made this with a mix of pinto and black beans when that’s what I had, and it was just as delicious. The beans add protein and fiber, so feel free to use whatever you have.
Add more veggies: This is a great recipe for cleaning out the fridge. Diced zucchini, corn kernels (fresh or frozen), chopped carrots, or even sweet potatoes would be wonderful additions. Add them when you add the bell pepper so they have time to soften. I once threw in a leftover ear of corn and some wilted spinach, and it was fantastic.
Make it in a slow cooker: For a hands-off approach, sauté the aromatics and bloom the spices on the stovetop, then transfer everything to a slow cooker. Cook on low for 6-8 hours or high for 3-4 hours. The longer cooking time really deepens the flavors. Just be aware that the pumpkin can make the chili slightly thicker, so you might want to add an extra ½ cup of broth.
Turn up the heat: If you like things spicy, add an extra jalapeño (leave the seeds in for more heat), or stir in a chopped chipotle pepper in adobo sauce along with the tomatoes. That smoky heat is incredible with the pumpkin. I did this once for a game day party, and it was a hit with the spice lovers.
Serving & Storage Suggestions
This chili is incredibly versatile when it comes to serving and storing. Here’s how to make the most of it.
Serving Temperature: Serve this chili piping hot, straight from the pot. The warmth brings out the smoky flavors and makes the whole experience cozy and comforting. If you’re serving it at a party, keep it warm in a slow cooker on the “warm” setting.
Presentation Ideas: For a casual family dinner, serve the chili in deep bowls with a side of cornbread or crusty bread for dipping. For a more polished presentation, ladle it into shallow bowls and arrange your toppings in small dishes so everyone can customize their own bowl. A sprinkle of fresh cilantro and a lime wedge on the side makes it look restaurant-worthy.
Complementary Dishes: This chili pairs beautifully with honey cornbread, a simple green salad with lime vinaigrette, or rice (white, brown, or cilantro-lime). For a fun twist, serve it over baked potatoes or sweet potatoes for a loaded potato chili situation. My kids love it with tortilla chips for scooping.
Storage Instructions: Store leftover chili in an airtight container in the refrigerator for up to 5 days. The flavors actually get better as they sit! For longer storage, freeze the chili in freezer-safe containers or zip-top bags for up to 3 months. I like to portion it into individual servings so I can grab one for lunch. Leave a little space at the top of the container because the chili will expand slightly as it freezes.
Reheating Methods: Reheat individual portions in the microwave for 2-3 minutes, stirring halfway through. For larger batches, reheat on the stovetop over medium-low heat, stirring occasionally, until warmed through. If the chili has thickened too much during storage, add a splash of water or broth to loosen it up. The texture will be just as good as the day you made it.
Flavor Development: Here’s a little secret—this chili is even better on day two or three. The smoky, spicy flavors meld together and deepen over time. I actually prefer making it a day ahead and letting it hang out in the fridge overnight. It’s a great dish for meal prep or for making on a Sunday to enjoy throughout the week.
Nutritional Information & Benefits
This chili isn’t just delicious—it’s packed with nutrients that make it a smart choice for your family. Here’s a rough breakdown per serving (based on 6 servings, without toppings):
- Calories: ~280 per serving
- Protein: 14g
- Fiber: 12g
- Fat: 5g
- Carbohydrates: 45g
- Iron: 25% of daily value
- Vitamin A: 150% of daily value (thanks to the pumpkin!)
- Vitamin C: 30% of daily value
Health Benefits: The pumpkin puree is a powerhouse of vitamin A, which supports eye health and immune function. Black beans and kidney beans are loaded with fiber and plant-based protein, keeping you full and satisfied for hours. The smoked paprika contains capsaicin, which has anti-inflammatory properties. And all those vegetables? They’re giving you a solid dose of antioxidants and vitamins with every spoonful.
Dietary Considerations: This recipe is naturally vegetarian, vegan (if you skip the dairy toppings), and gluten-free (check your broth). It’s also nut-free and soy-free, making it a safe choice for many common allergies. If you’re watching your sodium, use low-sodium broth and beans, and go easy on the added salt.
Personal Wellness Perspective: I love that this chili lets me feed my family a hearty, satisfying meal without any guilt. It’s packed with real food—vegetables, beans, and spices—and doesn’t rely on processed ingredients or excessive fat. When my kids ask for seconds, I feel good about saying yes. That’s the kind of win I’ll take any day.
Conclusion
So there you have it—my budget-friendly smoky pumpkin chili that started as a late-night experiment and became a family staple. It’s proof that you don’t need a fancy kitchen, expensive ingredients, or hours of prep time to make something truly special. All you need is a little creativity, a few pantry staples, and the willingness to try something a little different.
I hope you give this recipe a try and make it your own. Maybe you’ll add extra spice, swap in different beans, or serve it over rice with a mountain of cheese. That’s the beauty of chili—it’s forgiving, flexible, and always delicious. And honestly? The fact that it costs under $10 to feed your whole family makes it even better.
I’d love to hear how it turns out for you! Drop a comment below and let me know what variations you tried, or tag me in your photos on social media. Did your picky eater go back for seconds? Did you discover a new favorite topping? Share it all—I read every comment and I’m always looking for new ideas to try. Until next time, happy cooking, and remember: some of the best recipes come from those late-night kitchen adventures.
Frequently Asked Questions
Can I use fresh pumpkin instead of canned?
Absolutely! If you have fresh pumpkin, roast it until tender, then puree it in a food processor or blender. You’ll need about 1 ¾ cups of puree to replace one 15-ounce can. Just make sure it’s a cooking pumpkin (like sugar pie pumpkin), not a carving pumpkin, which is too watery and bland.
Is this chili spicy?
It has a mild warmth from the chili powder and cayenne, but it’s not what I’d call spicy. The smoked paprika adds depth, not heat. If you’re feeding kids or sensitive palates, skip the jalapeño and cayenne. You can always add hot sauce at the table for those who want more kick.
Can I make this in an Instant Pot?
Yes! Use the sauté function to cook the onions and spices, then add all remaining ingredients. Pressure cook on high for 10 minutes, then do a natural release for 10 minutes before quick-releasing the remaining pressure. It’s even faster than the stovetop method!
How do I thicken the chili if it’s too thin?
If your chili is soupier than you’d like, let it simmer uncovered for an extra 10-15 minutes to reduce the liquid. You can also mash some of the beans against the side of the pot with a spoon—the starches will help thicken things up naturally. Alternatively, stir in a tablespoon of tomato paste.
Can I freeze this chili?
Absolutely! This chili freezes beautifully. Let it cool completely, then transfer to freezer-safe containers or zip-top bags. It will keep for up to 3 months. Thaw overnight in the refrigerator and reheat on the stovetop or in the microwave. The texture and flavor remain excellent after freezing.
Pin This Recipe!

Best Budget-Friendly Smoky Pumpkin Black Bean Chili

A hearty, budget-friendly chili made with pumpkin puree, black beans, and kidney beans, featuring a smoky depth from smoked paprika. Perfect for busy weeknights, this velvety, rich chili costs under $10 to make and is a crowd-pleaser.
- Prep Time: 15 minutes
- Cook Time: 30 minutes
- Total Time: 45 minutes
- Yield: 6 servings 1x
- Category: Main Course
- Cuisine: American
Ingredients
- 1 tablespoon olive oil
- 1 large yellow onion, diced (about 1 ½ cups)
- 3 cloves garlic, minced
- 1 red bell pepper, diced
- 1 jalapeño, seeded and minced (optional)
- 2 tablespoons smoked paprika
- 1 tablespoon ground cumin
- 1 teaspoon chili powder
- 1 teaspoon dried oregano
- ½ teaspoon cayenne pepper
- 1 teaspoon salt
- ½ teaspoon black pepper
- 1 can (15 oz / 425g) pumpkin puree (not pumpkin pie filling)
- 1 can (15 oz / 425g) black beans, drained and rinsed
- 1 can (15 oz / 425g) kidney beans, drained and rinsed
- 1 can (15 oz / 425g) diced tomatoes, with their juices (fire-roasted preferred)
- 1 can (15 oz / 425g) tomato sauce
- 2 cups (480ml) vegetable broth (low-sodium preferred)
- Fresh cilantro, chopped (for garnish)
- Sour cream or Greek yogurt (for serving)
- Shredded cheddar cheese (for serving)
- Diced avocado (for serving)
- Lime wedges (for serving)
- Tortilla chips or cornbread (for serving)
Instructions
- Prep your vegetables (5 minutes): Dice the onion, bell pepper, and jalapeño (if using). Mince the garlic. Open all cans and drain and rinse the beans.
- Sauté the aromatics (8 minutes): Heat olive oil in a large pot over medium heat. Add diced onion and cook for 4-5 minutes until soft and translucent. Add bell pepper and jalapeño, cook for 2 minutes. Add minced garlic and cook for 30 seconds until fragrant.
- Bloom the spices (1 minute): Add smoked paprika, cumin, chili powder, oregano, cayenne, salt, and black pepper. Stir constantly for 30-60 seconds until fragrant.
- Add the pumpkin and tomatoes (2 minutes): Pour in pumpkin puree, diced tomatoes (with juices), and tomato sauce. Stir until smooth and fully incorporated.
- Add the beans and broth (1 minute): Add drained black beans, kidney beans, and vegetable broth. Stir well. Bring to a gentle boil over medium-high heat, then reduce heat to low.
- Simmer the chili (25-30 minutes): Let chili simmer uncovered, stirring occasionally, for 25-30 minutes until thickened and flavors meld.
- Taste and adjust (2 minutes): Taste and adjust seasoning with more salt, smoked paprika, or cayenne as needed.
- Serve and garnish (2 minutes): Ladle into bowls and top with desired garnishes like cilantro, sour cream, cheese, avocado, and lime wedges. Serve with cornbread or tortilla chips.
Notes
Don’t skip blooming the spices for deep flavor. Use fire-roasted tomatoes if available. Let chili rest 10-15 minutes before serving for best flavor. Chili tastes even better the next day. For a meaty version, brown 1 lb ground beef before adding onions. For slow cooker, sauté aromatics and spices on stovetop, then transfer to slow cooker and cook on low 6-8 hours or high 3-4 hours. To thicken, simmer longer or mash some beans. Freezes well for up to 3 months.
Nutrition
- Serving Size: 1 serving (about 1.5
- Calories: 280
- Sugar: 8
- Sodium: 800
- Fat: 5
- Saturated Fat: 1
- Carbohydrates: 45
- Fiber: 12
- Protein: 14
Keywords: pumpkin chili, black bean chili, budget-friendly chili, smoky chili, vegetarian chili, easy chili recipe, weeknight dinner