This was supposed to be a simple batch of red velvet cupcakes for my neighbor’s holiday cookie swap. I had the cream cheese frosting ready, the piping bag loaded, and my favorite cupcake pan greased and waiting. But somewhere between answering the door for a package and my toddler asking for the thousandth time if Santa knew our new address, I completely forgot to line the pan with paper liners. The cupcakes baked into the pan like they were glued there. I scraped them out in crumbly, sad-looking chunks, and I stood there staring at a bowl of red velvet rubble, already mentally drafting my apology text.
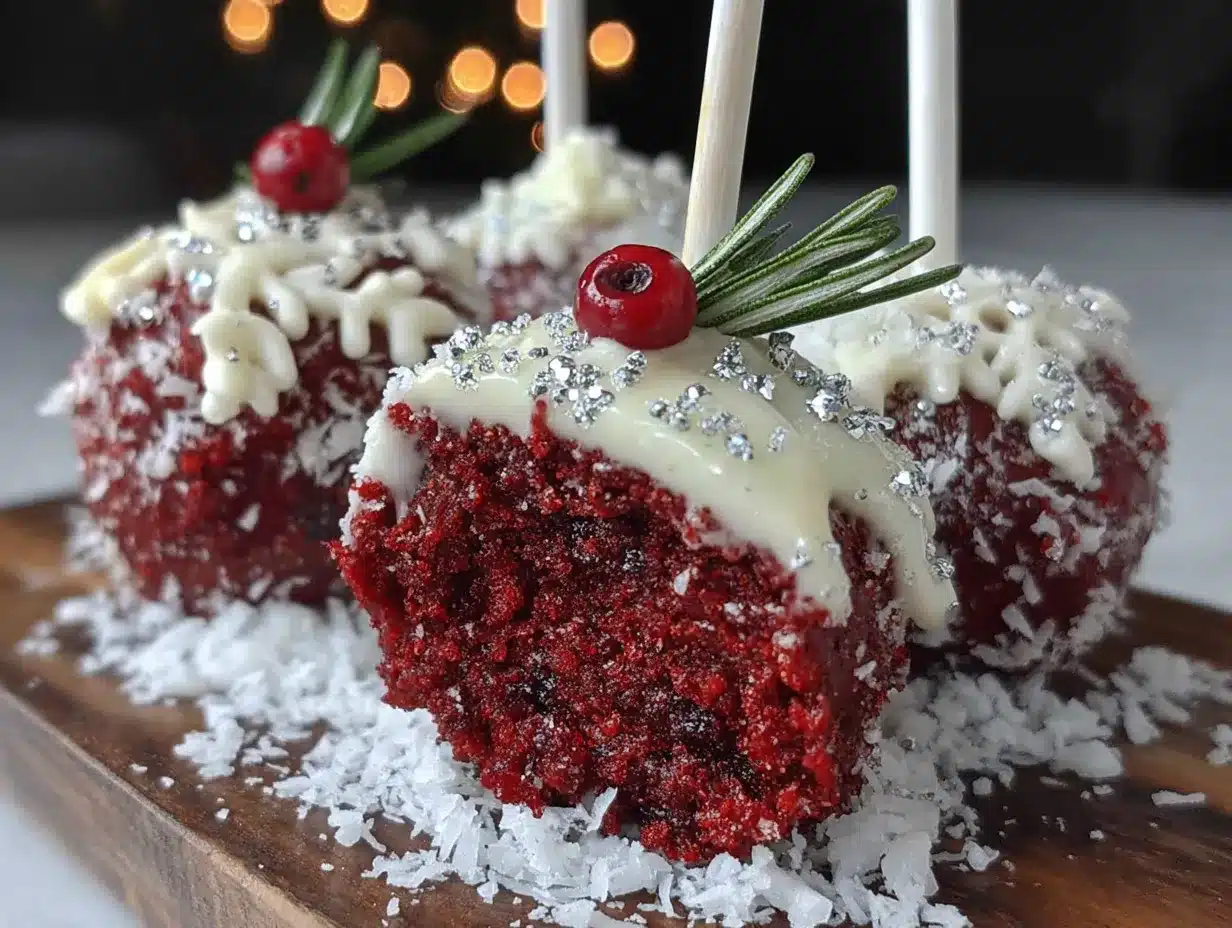
I was about to toss the whole mess when I spotted a bag of lollipop sticks leftover from a failed attempt at homemade caramel apples. Honestly, I don’t know what made me grab them. Maybe desperation. Maybe stubbornness. I crumbled those broken cupcakes into the finest crumbs I could, mixed in a spoonful of leftover frosting, and started rolling little balls between my palms. I stuck a stick in each one, dipped them in white chocolate, and sprinkled red and green sugar on top before the coating set. What came out was nothing like the plan—and better.
Those little red velvet cake pops on a stick disappeared faster than anything else at that swap. People held them by the stick, took a bite, and their eyes went wide. Someone asked if I had a bakery. Someone else asked for the recipe before they’d even finished chewing. I stood there with frosting on my apron, feeling like I’d accidentally won the lottery. That’s the thing about hosting, you know—sometimes the best dishes come from the moments when everything goes wrong. Maybe you’ve been there, staring at a kitchen disaster and wondering how to save face before guests arrive. Trust me, this red velvet Christmas cake pops recipe is the kind of happy accident that makes you look like a genius.
Why You’ll Love This Recipe
Let me tell you why these red velvet Christmas cake pops have become my secret weapon for every holiday gathering. I’ve tested this recipe more times than I can count, tweaking the ratios and the dipping technique until it’s practically foolproof. Even my sister-in-law, who once told me she “doesn’t do cake pops,” asked for the recipe after trying one at our family Christmas dinner.
- Quick & Easy: These come together in about 45 minutes of active time. If you’ve got leftover cake or a box mix, you can cut that in half. Perfect for those last-minute holiday party invites.
- Simple Ingredients: No hunting down specialty baking supplies. You likely have everything in your pantry right now—cake mix, cream cheese, chocolate chips, and sprinkles.
- Perfect for Holiday Parties: These are made for hosting. They’re portable, mess-free, and guests can grab one by the stick and keep mingling. No plates needed.
- Crowd-Pleaser: Kids go crazy for the cake-pop-on-a-stick format. Adults love the nostalgic red velvet flavor. I’ve watched these bridge the gap between generations at every gathering.
- Unbelievably Delicious: The texture is what gets everyone. The outside is snappy from the chocolate coating, and the inside is soft and fudgy with that classic red velvet tang. It’s next-level comfort food in two bites.
What makes this version different from every other cake pop recipe out there? It’s the ratio. Most recipes use too much frosting, making the pops dense and greasy. I spent weeks testing until I found the sweet spot—just enough binder to hold the crumbs together without losing that light, cakey texture. Plus, I’ll show you my trick for getting the chocolate coating perfectly smooth without any of those annoying streaks or lumps. This isn’t just another party dessert. It’s the one people will text you about the next morning.
What Ingredients You Will Need
This red velvet Christmas cake pops recipe uses simple, honest ingredients to deliver that signature flavor and texture. I’ve tested this with both homemade and boxed cake, and honestly, the box version works beautifully for hosting because it saves time without sacrificing taste. Here’s what you’ll need:
For the Cake Base
- 1 box red velvet cake mix (I prefer Duncan Hines or Betty Crocker for consistent results—the color is always vibrant)
- 3 large eggs, room temperature (cold eggs can make the batter lumpy)
- 1 cup whole milk (use buttermilk if you want an extra tangy flavor)
- 1/2 cup vegetable oil (canola or avocado oil works too)
- 1 teaspoon vanilla extract (adds warmth and rounds out the chocolate flavor)
For the Binding Mixture
- 4 ounces cream cheese, softened (full-fat is best—low-fat makes the mixture too loose)
- 2 tablespoons unsalted butter, softened
- 1 cup powdered sugar, sifted (sifting prevents lumps in the binding mixture)
- 1/2 teaspoon vanilla extract
For the Coating and Decoration
- 12 ounces white chocolate melting wafers (I use Ghirardelli—they melt smoothly and set with a nice shine)
- 1 tablespoon coconut oil or shortening (this thins the chocolate for easier dipping)
- Red and green sprinkles (jimmies work best—nonpareils can bleed color into the chocolate)
- 24 lollipop sticks (available at craft stores or online—don’t use paper straws, they get soggy)
- Optional: edible glitter or gold dust (for that extra festive wow factor)
If you’re making these for a crowd, double the coating ingredients. I’ve learned the hard way that running out of white chocolate mid-dip is a special kind of kitchen tragedy. For the cream cheese, look for blocks, not the spreadable tub version—the spread has too much water and will make your binding mixture runny. And if you’re dairy-free, swap the cream cheese for a vegan block-style alternative and use coconut cream instead of the butter.
Equipment Needed
You don’t need a professional bakery setup for these red velvet Christmas cake pops. Here’s what I use and what you can substitute if you’re improvising:
- 9×13-inch baking pan (a standard sheet pan works too—just watch the baking time)
- Large mixing bowls (at least two—one for crumbling, one for dipping)
- Hand mixer or stand mixer (you can mix by hand, but your arm will thank you for the electric option)
- Cookie scoop or melon baller (for uniform cake balls—I use a #40 scoop, about 1.5 tablespoons)
- Parchment-lined baking sheet (for holding the dipped pops while they set)
- Microwave-safe bowl or double boiler (for melting chocolate—microwave is faster, but double boiler gives you more control)
- Styrofoam block or floral foam (for drying the cake pops upright—a cardboard box with holes poked in it works in a pinch)
- Tall drinking glass (for holding the sticks while you dip)
I bought a cheap styrofoam block from the craft store for three dollars, and it’s lasted me through dozens of batches. If you’re on a budget, poke holes in a shoebox lid and fill it with crumpled newspaper for stability. Just make sure whatever you use is heavy enough that the pops don’t tip over while the chocolate sets.
Preparation Method
- Preheat and prep. Preheat your oven to 350°F (175°C). Grease your 9×13-inch pan with butter or nonstick spray. Don’t skip this step—even with a nonstick pan, red velvet has a tendency to stick because of the cocoa powder.
- Mix the cake batter. In a large bowl, combine the red velvet cake mix, eggs, milk, oil, and vanilla extract. Beat on medium speed for 2 minutes until smooth. The batter should be thick and glossy, with that deep red color that makes red velvet so iconic. If the batter looks streaky, keep mixing for another 30 seconds.
- Bake the cake. Pour the batter into the prepared pan and spread it evenly. Bake for 25-30 minutes, or until a toothpick inserted in the center comes out with just a few moist crumbs. The edges should pull away slightly from the pan. Let the cake cool completely in the pan—this is crucial. Warm cake will make the binding mixture too wet.
- Make the binding mixture. While the cake cools, beat the softened cream cheese and butter together until smooth and fluffy. Add the sifted powdered sugar and vanilla, and beat until combined. The mixture should be spreadable but not runny. If it’s too thick, add a teaspoon of milk. If it’s too thin, add another tablespoon of powdered sugar.
- Crumble the cake. Once the cake is completely cool, break it into large chunks and place them in a large bowl. Use your hands to crumble the cake into fine, even crumbs. Get in there—this is the most satisfying part. There shouldn’t be any chunks larger than a pea. I usually spend about 3-4 minutes on this step, really working the cake between my fingers.
- Mix and form the pops. Add the cream cheese mixture to the crumbled cake and mix with a spatula or your hands until everything is evenly moistened. The mixture should hold together when squeezed in your fist. If it’s too dry, add another tablespoon of cream cheese. If it’s too wet, add a handful more cake crumbs. Scoop out portions using your cookie scoop and roll them into smooth balls. Place them on a parchment-lined baking sheet. You should get about 24 balls, each about 1.5 inches in diameter.
- Chill the cake balls. Pop the baking sheet into the refrigerator for at least 30 minutes. This step is non-negotiable—chilled cake balls hold their shape when you dip them. If you’re in a hurry, freeze them for 15 minutes, but don’t skip the chill.
- Melt the coating. Place the white chocolate wafers and coconut oil in a microwave-safe bowl. Microwave in 30-second intervals, stirring after each, until completely smooth. Don’t overheat—white chocolate seizes up if it gets too hot. The mixture should be thin enough to coat the back of a spoon.
- Dip the pops. Remove the cake balls from the fridge. Dip the tip of a lollipop stick into the melted chocolate, then insert it about halfway into a cake ball. This “glue” step keeps the pop from sliding off the stick. Hold the cake pop by the stick and dip it into the melted chocolate, covering it completely. Gently tap the stick against the side of the bowl to let excess chocolate drip off. Don’t shake it—you’ll fling chocolate everywhere.
- Decorate and set. Before the chocolate sets, sprinkle your red and green jimmies over the top. Insert the stick into your styrofoam block and let the pop stand upright until the coating hardens, about 15-20 minutes at room temperature. If you’re in a warm kitchen, pop them in the fridge for 10 minutes to speed things up.
Cooking Tips & Techniques
I’ve made more batches of these red velvet Christmas cake pops than I can count, and I’ve learned a few things the hard way. Let me save you from my mistakes.
Don’t overmix the binding mixture. I once got distracted and kept beating the cream cheese and butter until it was practically whipped. The extra air made the mixture too soft, and my cake balls wouldn’t hold their shape. Mix just until smooth, then stop.
Temperature is everything. If your cake is even slightly warm when you crumble it, the cream cheese will melt and you’ll end up with a greasy mess. I learned this when I tried to rush the cooling process by putting the pan in the freezer. The outside got cold, but the center was still warm, and my first batch of cake pops were a crumbly disaster. Let the cake cool on the counter for at least an hour, or refrigerate it for 30 minutes.
The “glue” step matters. I used to skip dipping the stick in chocolate before inserting it into the cake ball. About half my pops would slide off during dipping, landing in the chocolate with a sad plop. That little bit of melted chocolate acts like cement. Don’t skip it.
Thin your chocolate properly. White chocolate is thicker than dark or milk chocolate, which makes dipping tricky. The coconut oil or shortening is essential—it thins the chocolate without affecting the flavor. I’ve tried using butter instead, and it made the coating greasy and soft. Stick with coconut oil.
Work in small batches. Only take 4-5 cake balls out of the fridge at a time. If they warm up too much, they’ll fall apart in the chocolate. I keep the rest in the fridge while I’m dipping, rotating them out as I go.
Variations & Adaptations
One of the best things about this red velvet Christmas cake pops recipe is how easily it adapts to different tastes and dietary needs. Here are some variations I’ve tried and loved:
Chocolate lovers’ version. Swap the white chocolate coating for dark or milk chocolate. I’ve done this for parties where the crowd leans more toward traditional chocolate flavors. The red cake peeking through dark chocolate is stunning. Use semi-sweet melting wafers and follow the same dipping process.
Gluten-free adaptation. Use a gluten-free red velvet cake mix—King Arthur Flour makes an excellent one. The binding mixture stays the same, and the texture is indistinguishable from the regular version. I tested this for a friend with celiac disease, and she couldn’t believe they were gluten-free.
Peppermint twist. Add 1/2 teaspoon of peppermint extract to the melted white chocolate and crush some candy canes to sprinkle on top instead of the red and green jimmies. The minty crunch pairs beautifully with the red velvet. This version always gets rave reviews at Christmas parties.
Vegan version. Use a vegan red velvet cake mix, flax eggs (1 tablespoon ground flax mixed with 3 tablespoons water per egg), and plant-based milk. For the binding, use vegan cream cheese and vegan butter. The coating can be made with vegan white chocolate chips—Enjoy Life makes a good one. The texture is slightly denser, but the flavor is spot-on.
Mini cake pops. Use a smaller scoop and make bite-sized pops. These are perfect for large gatherings where you want people to try multiple desserts. Just reduce the chilling time to 15 minutes since the smaller balls chill faster.
Serving & Storage Suggestions
These red velvet Christmas cake pops are designed for hosting, and they shine at parties. Here’s how I serve and store them to keep them looking and tasting their best.
Serving temperature. Serve them at room temperature. The coating stays snappy, and the inside is soft and fudgy. If they’ve been in the fridge, let them sit out for about 15 minutes before serving. Cold cake pops can taste a bit dense.
Presentation ideas. Arrange them upright in a styrofoam block covered with festive wrapping paper or tinfoil. For a more elegant look, place them in a tall glass jar or vase with the sticks pointing up. I’ve also stuck them into a large grapefruit or cabbage for a rustic centerpiece—sounds weird, but it looks amazing and keeps the pops stable.
What to serve alongside. These pair beautifully with hot cocoa, eggnog, or a warm spiced cider. If you’re doing a dessert table, they work well next to sugar cookies, brownies, or a classic yule log. The pops add height and visual interest to any spread.
Storage instructions. Store the cake pops in an airtight container in the refrigerator for up to 5 days. Layer them between sheets of parchment paper so the coatings don’t stick together. Don’t store them at room temperature for more than a day—the cream cheese binding needs to stay chilled.
Freezing tips. You can freeze the undipped cake balls for up to 3 months. Roll them, place them on a parchment-lined baking sheet, and freeze until solid. Then transfer them to a freezer bag. When you’re ready to dip, thaw them in the refrigerator overnight and proceed with the dipping steps. I do this every December—make a double batch of cake balls in November, freeze them, and then dip fresh batches throughout the month.
Flavor development. These actually taste better the next day. The flavors meld together overnight, and the texture evens out. If you can resist eating them right away, make them a day ahead of your party.
Nutritional Information & Benefits
Let’s be real—these red velvet Christmas cake pops are a treat, not a health food. But knowing what’s in them helps you enjoy them mindfully. Here’s the estimated nutritional breakdown for one cake pop:
| Nutrient | Amount per Serving |
|---|---|
| Calories | 185 |
| Total Fat | 9g |
| Saturated Fat | 5g |
| Carbohydrates | 24g |
| Sugar | 18g |
| Protein | 2g |
On the plus side, red velvet cake contains cocoa powder, which is rich in antioxidants called flavonoids. The cream cheese adds a small amount of calcium and protein. And because these are portion-controlled on a stick, it’s easier to eat just one or two compared to a slice of cake. I love that I can serve these at parties without anyone feeling like they overindulged.
If you’re watching your sugar intake, you can use a sugar-free cake mix and sugar-free white chocolate. I’ve tested this, and while the texture is slightly different, the pops are still delicious. They’re also naturally nut-free if you use the standard ingredients, making them safe for most school or office parties.
FAQs
Why did my cake pops fall off the stick?
This usually happens for two reasons. Either the cake balls weren’t chilled enough before dipping, or you didn’t dip the stick in melted chocolate before inserting it. Make sure your cake balls are cold and use the “glue” step. If they’re still falling off, try freezing the cake balls for 10 minutes before dipping.
Can I use homemade red velvet cake instead of a box mix?
Absolutely. Any red velvet cake recipe works. Just make sure the cake is fully cooled and crumbled finely. Homemade cake can be a bit more moist than box mix, so you might need to add a little less binding mixture. Start with three-quarters of the cream cheese mixture and add more if needed.
How do I get the chocolate coating perfectly smooth?
The secret is thinning the chocolate with coconut oil or shortening. Also, don’t overheat the chocolate—white chocolate is sensitive. Melt it slowly in 30-second intervals, stirring well each time. If you see any lumps, strain the chocolate through a fine-mesh sieve before dipping.
Can I make these ahead of time for a party?
Yes, and I actually recommend it. You can make the cake balls up to 3 months ahead and freeze them. Or you can fully assemble the cake pops up to 5 days ahead and store them in the fridge. They actually taste better the next day after the flavors have melded together.
My cake pops cracked after dipping. What went wrong?
This happens when the cake balls are too cold. If they’re frozen solid, the sudden temperature change when they hit the warm chocolate causes the coating to crack. Let the cake balls sit at room temperature for 5-10 minutes after taking them out of the fridge before dipping. They should be cold but not rock hard.
Conclusion
These red velvet Christmas cake pops started as a kitchen disaster, but they’ve become my most-requested holiday recipe. There’s something magical about taking a mistake and turning it into the thing everyone asks for year after year. The combination of tender red velvet cake, tangy cream cheese, and that snappy white chocolate coating is just irresistible. And the stick format? It makes them perfect for parties—no plates, no forks, no mess.
I hope you make these for your next holiday gathering and watch them disappear. Don’t be afraid to customize them with different sprinkles, coatings, or flavor twists. That’s the beauty of this recipe—it’s forgiving and adaptable. If I can accidentally invent these while scraping burnt cake out of a pan, you can absolutely nail them on purpose.
Have you tried this recipe? I’d love to hear how they turned out. Drop a comment below and let me know what variations you tried or how they went over at your party. And if you’re looking for more holiday hosting ideas, check out our Christmas dessert recipes for more crowd-pleasing treats. Happy baking, and may your kitchen disasters always turn into something delicious!
Pin This Recipe!

Best Red Velvet Christmas Cake Pops Recipe for Festive Parties
These red velvet Christmas cake pops are a festive, crowd-pleasing treat made from crumbled red velvet cake mixed with cream cheese frosting, dipped in white chocolate, and decorated with red and green sprinkles. Perfect for holiday parties, they’re portable, mess-free, and incredibly delicious.
- Prep Time: 45 minutes
- Cook Time: 30 minutes
- Total Time: 1 hour 15 minutes
- Yield: 24 servings 1x
- Category: Dessert
- Cuisine: American
Ingredients
- 1 box red velvet cake mix (Duncan Hines or Betty Crocker)
- 3 large eggs, room temperature
- 1 cup whole milk (or buttermilk for extra tang)
- 1/2 cup vegetable oil (canola or avocado oil)
- 1 teaspoon vanilla extract
- 4 ounces cream cheese, softened (full-fat, block-style)
- 2 tablespoons unsalted butter, softened
- 1 cup powdered sugar, sifted
- 1/2 teaspoon vanilla extract
- 12 ounces white chocolate melting wafers (Ghirardelli recommended)
- 1 tablespoon coconut oil or shortening
- Red and green sprinkles (jimmies preferred)
- 24 lollipop sticks
- Optional: edible glitter or gold dust
Instructions
- Preheat oven to 350°F (175°C). Grease a 9×13-inch baking pan with butter or nonstick spray.
- In a large bowl, combine red velvet cake mix, eggs, milk, oil, and vanilla extract. Beat on medium speed for 2 minutes until smooth and glossy.
- Pour batter into prepared pan and spread evenly. Bake for 25-30 minutes, until a toothpick inserted in the center comes out with a few moist crumbs. Cool completely in the pan.
- While cake cools, make binding mixture: Beat softened cream cheese and butter until smooth and fluffy. Add sifted powdered sugar and vanilla, beat until combined. Mixture should be spreadable but not runny.
- Once cake is completely cool, crumble it into fine, even crumbs in a large bowl. No chunks larger than a pea.
- Add cream cheese mixture to crumbled cake and mix until evenly moistened. Mixture should hold together when squeezed. Scoop into 1.5-inch balls (about 24) and place on a parchment-lined baking sheet.
- Chill cake balls in refrigerator for at least 30 minutes (or freeze for 15 minutes).
- Melt white chocolate wafers and coconut oil in a microwave-safe bowl in 30-second intervals, stirring after each, until smooth.
- Dip tip of a lollipop stick into melted chocolate, then insert halfway into a cake ball. Dip the cake pop into chocolate, covering completely. Gently tap stick against bowl to remove excess chocolate.
- Before chocolate sets, sprinkle with red and green jimmies. Insert stick into a styrofoam block and let stand until coating hardens, about 15-20 minutes at room temperature (or 10 minutes in fridge).
Notes
For best results, ensure cake is completely cool before crumbling. Chill cake balls thoroughly before dipping. Use the ‘glue’ step (dipping stick in chocolate) to prevent pops from sliding off. Thin white chocolate with coconut oil for smooth coating. Work in small batches, keeping remaining cake balls chilled. These taste even better the next day.
Nutrition
- Serving Size: 1 cake pop
- Calories: 185
- Sugar: 18
- Fat: 9
- Saturated Fat: 5
- Carbohydrates: 24
- Protein: 2
Keywords: red velvet cake pops, Christmas cake pops, holiday dessert, cake pops recipe, red velvet dessert, party dessert, easy cake pops