My brother asked why I couldn’t just press the chocolate kiss into the cookie right when it came out of the oven. I started to explain why that wouldn’t work — something about the dough needing to set, the chocolate melting into a puddle, the structural integrity of a cookie that hadn’t fully cooled. Then I stopped. Honestly, I had no good reason. I’d just always done it the way my grandmother showed me: wait ten minutes, press gently, let the heat do the work. But my brother, who bakes exactly once a year and mostly for the free samples, had a point. What if the heat from the fresh cookie actually helped the kiss meld into the surface without losing its shape?
So I tried it. I pulled a tray of peanut butter blossom cookies out of the oven, let them rest for exactly thirty seconds (because I’m impatient), and pressed a Hershey kiss into the center of one. The chocolate sank slightly, the edges of the cookie cracked in that satisfying way, and the kiss stayed perfectly intact. I stood there staring at it like I’d just discovered fire. My brother walked by, grabbed the cookie, and said, “Told you.” Then he walked away. That was three winters ago, and I haven’t baked them any other way since.
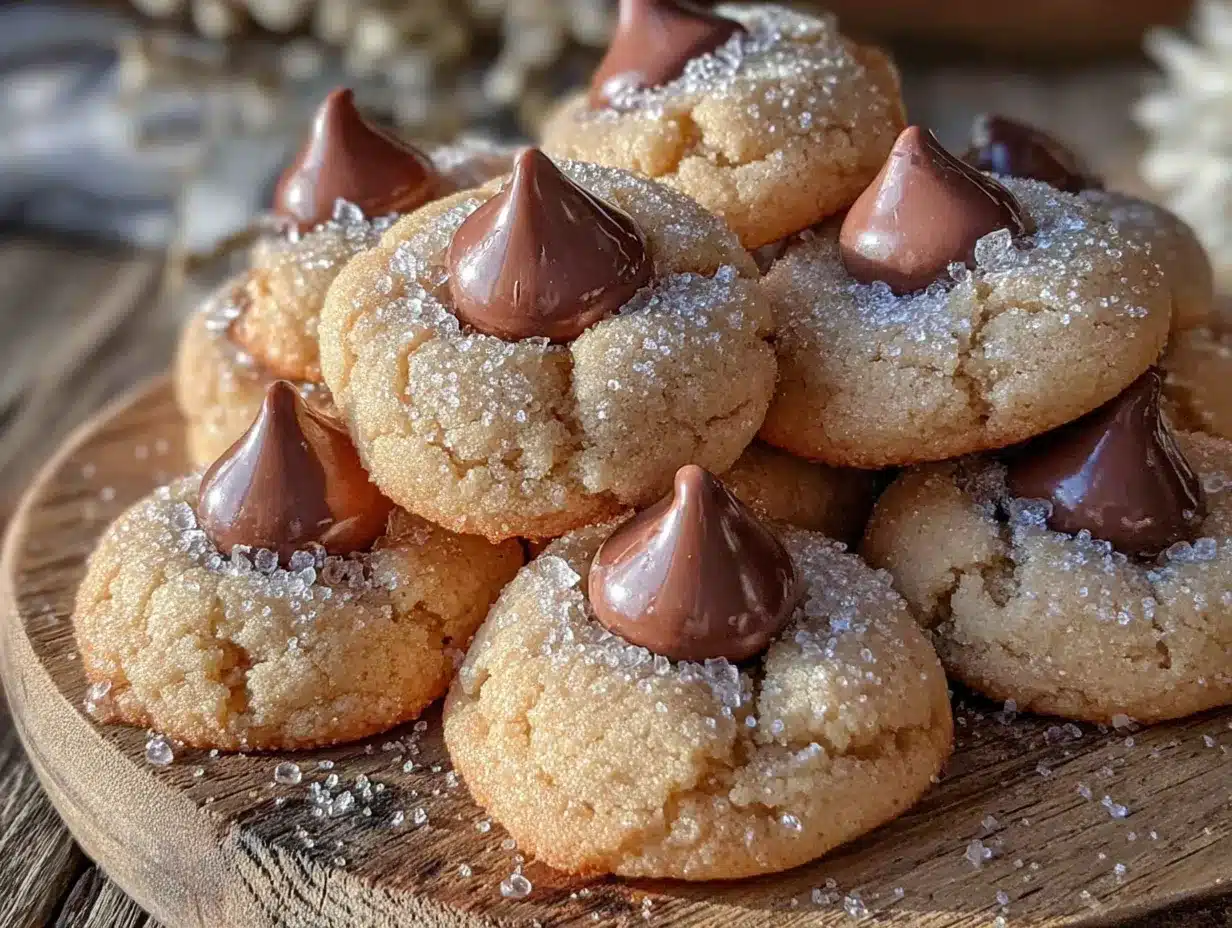
These cozy peanut butter blossom cookies with Hershey kiss are the kind of recipe that feels like coming home. The peanut butter dough is soft, almost pillowy, with that perfect balance of salty and sweet. The chocolate kiss on top isn’t just decoration — it melts slightly from the residual heat, creating this little pocket of creamy chocolate that pairs beautifully with the nutty cookie base. Maybe you’ve been there, standing in your kitchen on a chilly evening, wanting something warm and familiar but not overly complicated. That’s exactly what these are. They’re the cookie equivalent of wrapping your hands around a warm mug.
Why You’ll Love This Recipe
I’ve tested this recipe more times than I care to admit. The first batch was too dry. The second was too flat. The third — well, the third was the one where my brother wandered in and changed everything. What I landed on is a cookie that’s soft in the center, slightly crisp at the edges, and topped with that iconic chocolate kiss that makes everyone smile.
- Quick & Easy: From start to finish, these come together in about 25 minutes. No chilling required, no complicated techniques. Just mix, roll, bake, and press.
- Simple Ingredients: You probably have most of these in your pantry right now. Peanut butter, sugar, butter, flour, eggs — the usual suspects. The Hershey kisses are the only special purchase, and they’re available everywhere.
- Perfect for Cozy Evenings: These are made for cold weather, rainy afternoons, or any time you need a little comfort. The smell alone will make your kitchen feel like a bakery.
- Crowd-Pleaser: I’ve brought these to potlucks, holiday parties, and casual get-togethers. They disappear fast. Kids love them, adults love them, and people who claim they don’t like peanut butter cookies suddenly change their mind.
- Unbelievably Delicious: The texture is what gets me every time. The cookie is tender and slightly crumbly, the chocolate is smooth and creamy, and together they create this perfect bite that’s both nostalgic and satisfying.
What makes this version different from the rest? It’s the technique. Pressing the kiss into the warm cookie — not the cooled cookie — creates a better bond. The chocolate softens just enough to meld with the cookie surface, so when you bite into it, the kiss stays put instead of falling off. It’s a small change, but it makes a big difference. Plus, I’ve dialed in the exact ratio of peanut butter to sugar to flour so the cookie holds its shape without being dry. This isn’t just another peanut butter blossom recipe. It’s the one I keep coming back to.
What Ingredients You Will Need
This recipe uses simple, wholesome ingredients to deliver that classic peanut butter blossom flavor without any fuss. Most of these are pantry staples, which makes these cookies perfect for spontaneous baking sessions.
- All-purpose flour, 1 ½ cups (190g) — provides structure without making the cookie tough. I prefer Gold Medal or King Arthur for consistent results.
- Baking soda, 1 teaspoon — helps the cookies spread slightly and gives them that soft, tender texture.
- Salt, ½ teaspoon — balances the sweetness and enhances the peanut butter flavor. Use fine sea salt for best results.
- Unsalted butter, ½ cup (1 stick, 113g), softened — adds richness and helps create that melt-in-your-mouth texture. If you only have salted butter, reduce the added salt to ¼ teaspoon.
- Creamy peanut butter, ½ cup (130g) — the star of the show. I recommend Skippy or Jif for consistent texture. Natural peanut butter that separates can make the cookies too greasy, so stick with the processed stuff here.
- Granulated sugar, ½ cup (100g) — for sweetness and that slight crispness on the outside of the cookie.
- Brown sugar, ½ cup (100g), packed — adds moisture and a deeper, caramel-like flavor. Light or dark both work, but dark brown sugar gives a richer taste.
- Large egg, 1 — binds everything together and adds structure. Make sure it’s at room temperature so it incorporates smoothly.
- Milk, 2 tablespoons (30ml) — adds a touch of moisture that keeps the cookies soft. Whole milk works best, but any milk will do.
- Vanilla extract, 1 teaspoon — enhances the overall flavor. Pure vanilla extract is worth the splurge here.
- Additional granulated sugar, ¼ cup (50g) — for rolling the dough balls before baking. This gives the cookies that sparkly, slightly crunchy exterior.
- Hershey’s Kisses, 24-30, unwrapped — the classic topping. Milk chocolate is traditional, but dark chocolate or white chocolate kisses work beautifully too.
For the peanut butter, I’ve tested this with both creamy and crunchy. Creamy gives a smoother texture throughout the cookie, but if you like a little crunch, go ahead and use crunchy peanut butter. Just know the texture will be slightly different. For the Hershey kisses, look for the standard size, not the giant ones. The regular kisses fit perfectly on top of the cookie without overwhelming it.
Equipment Needed
You don’t need fancy equipment for these cookies. Here’s what I use every time:
- Mixing bowls — one medium, one large. I prefer glass or stainless steel because they don’t retain odors.
- Electric hand mixer or stand mixer — a hand mixer works perfectly. You can mix by hand, but it takes a bit more elbow grease to get the butter and sugars properly creamed.
- Measuring cups and spoons — accurate measurements matter in baking. Use dry measuring cups for dry ingredients and liquid measuring cups for the milk.
- Baking sheets — 2 standard-sized sheets. I like the ones with a light finish because they promote even browning. Dark sheets can cause the bottoms to brown too quickly.
- Parchment paper or silicone baking mats — prevents sticking and makes cleanup a breeze. Parchment paper is my go-to because it’s disposable.
- Cookie scoop or tablespoon — for portioning the dough evenly. A #40 cookie scoop (about 1.5 tablespoons) gives the perfect size.
- Small bowl — for the rolling sugar.
- Cooling rack — essential for letting the cookies cool properly after baking. If you don’t have one, you can use a clean kitchen towel, but a rack is better for air circulation.
- Timer — because I always forget to check the oven otherwise.
If you don’t have a cookie scoop, a regular tablespoon works fine. Just make sure each portion is roughly the same size so the cookies bake evenly. And if you’re using dark baking sheets, reduce the oven temperature by 25°F to prevent over-browning.
Preparation Method
Step 1: Preheat and Prep
Preheat your oven to 375°F (190°C). Line two baking sheets with parchment paper or silicone mats. This ensures the cookies don’t stick and makes cleanup almost effortless. While the oven heats, unwrap your Hershey kisses and set them aside in a bowl. Trust me, doing this now saves you from frantically unwrapping foil while hot cookies sit on the counter.
Step 2: Mix Dry Ingredients
In a medium bowl, whisk together 1 ½ cups all-purpose flour, 1 teaspoon baking soda, and ½ teaspoon salt. Set this aside. Whisking ensures the baking soda and salt are evenly distributed throughout the flour, which means every cookie will rise and taste the same.
Step 3: Cream Butter and Sugars
In a large bowl, beat together ½ cup softened unsalted butter, ½ cup granulated sugar, and ½ cup packed brown sugar. Use an electric mixer on medium speed for about 2-3 minutes, until the mixture is light and fluffy. Scrape down the sides of the bowl halfway through. This step is important — properly creamed butter and sugar create air pockets that help the cookies rise and stay tender.
Step 4: Add Peanut Butter, Egg, Milk, and Vanilla
Add ½ cup creamy peanut butter, 1 large egg (room temperature), 2 tablespoons milk, and 1 teaspoon vanilla extract to the butter mixture. Beat on medium speed until everything is well combined, about 1 minute. The mixture will look smooth and slightly glossy. If it looks separated or greasy, your peanut butter might be too oily — but don’t worry, it’ll still work.
Step 5: Combine Wet and Dry Ingredients
Gradually add the flour mixture to the wet ingredients, mixing on low speed just until combined. Don’t overmix here. Stop as soon as you no longer see streaks of flour. Overmixing develops gluten, which can make the cookies tough instead of tender. The dough will be soft and slightly sticky — that’s exactly what you want.
Step 6: Shape and Roll
Place ¼ cup granulated sugar in a small bowl. Using a cookie scoop or tablespoon, portion out rounded tablespoonfuls of dough (about 1.5 tablespoons each). Roll each portion into a smooth ball between your palms, then roll the ball in the sugar until evenly coated. Place the sugar-coated dough balls on the prepared baking sheets, spacing them about 2 inches apart. You should get about 24-30 cookies depending on how generous your portions are.
Step 7: Bake
Bake one sheet at a time in the preheated oven for 10-12 minutes. The cookies should look puffed and lightly golden around the edges, but still soft in the center. They will continue to set as they cool, so don’t overbake. At 10 minutes, the centers will look slightly underdone — that’s your cue to pull them out.
Step 8: Press the Kisses
Here’s where my brother’s tip comes in. Let the cookies rest on the baking sheet for about 30 seconds to 1 minute — just long enough so they’re not molten hot. Then, working quickly, press one Hershey kiss into the center of each cookie. Press gently but firmly until the kiss is nestled into the cookie surface. The heat will soften the chocolate just enough to create that perfect bond. If you press too hard, the cookie might crack too much, but a little cracking around the edges is fine — it looks rustic and homemade.
Step 9: Cool Completely
Transfer the cookies to a wire cooling rack and let them cool completely. This takes about 15-20 minutes. The chocolate kisses will firm up as they cool, creating that classic peanut butter blossom look. Resist the urge to eat one immediately — the chocolate will be very soft and might smear. I speak from experience.
Cooking Tips & Techniques
I’ve made more batches of these cookies than I can count, and I’ve learned a few things along the way. Here are the tips that actually matter:
Don’t overbake. This is the number one mistake people make. Peanut butter blossom cookies should be soft and tender, not crunchy. Pull them out when the edges are just barely golden and the centers still look slightly underdone. They’ll continue baking on the hot sheet for another minute or two after you take them out.
Use room temperature ingredients. Cold butter doesn’t cream properly, and a cold egg can cause the batter to seize. Let your butter and egg sit out for about 30 minutes before you start. If you forget, you can warm the egg in a bowl of lukewarm water for 5 minutes, and microwave the butter in 5-second bursts until it’s soft but not melted.
Chill if you need to. The dough is soft and slightly sticky, which makes it easy to roll. But if your kitchen is warm or your dough feels too sticky to handle, pop it in the fridge for 15-20 minutes. Chilled dough is easier to shape and will spread less in the oven.
Press kisses at the right time. Too early and the chocolate melts into a puddle. Too late and the kiss won’t stick. The sweet spot is about 30-60 seconds after the cookies come out of the oven. The cookies should be warm but not hot to the touch. If you’re unsure, test one first.
Keep kisses cold. If your kitchen is warm, the kisses might start to soften while you’re unwrapping them. Keep them in the fridge until you’re ready to use them. Cold kisses hold their shape better when pressed into warm cookies.
Bake one sheet at a time. I know it’s tempting to cram both sheets in the oven, but it affects the heat circulation. The cookies on the bottom rack will brown faster, and the ones on top might not bake evenly. Bake one sheet at a time in the center of the oven for consistent results.
Variations & Adaptations
These cookies are wonderful as-is, but they’re also incredibly versatile. Here are some variations I’ve tried and loved:
Chocolate Peanut Butter Blossoms: Swap ¼ cup of the all-purpose flour with ¼ cup unsweetened cocoa powder. This gives you a chocolate peanut butter cookie base that pairs beautifully with the milk chocolate kiss. The cocoa adds a subtle bitterness that balances the sweetness.
Dark Chocolate Kiss Version: Use dark chocolate Hershey kisses instead of milk chocolate. The darker chocolate has a richer, less sweet flavor that complements the peanut butter beautifully. This is my personal favorite for adult gatherings.
Gluten-Free Adaptation: Substitute the all-purpose flour with a 1:1 gluten-free baking flour blend that contains xanthan gum. I’ve tested this with Bob’s Red Mill 1:1 Baking Flour, and the cookies turned out slightly more tender but still delicious. The texture is a bit more delicate, so handle the dough gently.
Holiday Twist: Use seasonal Hershey kisses — the ones with candy cane stripes for Christmas, pastel colors for Easter, or pumpkin spice for fall. The different flavors add a fun twist without changing the base recipe. For Christmas, I also add ½ teaspoon of peppermint extract to the dough.
Nut-Free Option: Substitute the peanut butter with sunflower seed butter (like SunButter). The cookies will have a slightly different flavor profile — more earthy and less sweet — but they’re still delicious. Note that sunflower seed butter can react with baking soda and turn greenish, but it’s harmless and tastes fine.
Air Fryer Method: Yes, you can make these in an air fryer. Preheat to 325°F (163°C), place the dough balls on a parchment-lined basket, and cook for 6-8 minutes. The cookies won’t spread as much, so they’ll be thicker and puffier. Press the kisses in immediately after cooking.
Serving & Storage Suggestions
These cookies are best served slightly warm, when the chocolate kiss is still soft and the cookie is tender. Let them cool for about 10 minutes after pressing the kisses, then serve. The contrast between the warm cookie and the melting chocolate is absolutely heavenly.
For a cozy presentation, arrange the cookies on a rustic wooden board or a simple white platter. They look beautiful with a dusting of powdered sugar or a drizzle of melted chocolate. Serve them alongside a cold glass of milk, a warm mug of hot cocoa, or a cup of coffee. The combination of peanut butter and chocolate with a hot beverage is pure comfort.
Storage: Store the cookies in an airtight container at room temperature for up to 5 days. Place a piece of bread in the container to keep them soft — the cookies will absorb moisture from the bread, staying tender. Change the bread every day if you’re storing them for multiple days.
Freezing: These cookies freeze beautifully. You can freeze the baked cookies (with kisses pressed in) in a single layer on a baking sheet, then transfer them to a freezer-safe bag or container. They’ll keep for up to 3 months. Thaw at room temperature for about 30 minutes before serving.
Freezing Dough: You can also freeze the unbaked dough balls. Roll them in sugar, place them on a baking sheet, and freeze until solid. Transfer the frozen dough balls to a freezer bag. When you’re ready to bake, place them on a baking sheet and add 2-3 minutes to the baking time. Press the kisses in immediately after baking.
Flavor Development: These cookies actually taste better the next day. The flavors meld together, and the texture becomes even more tender. If you can resist eating them all on day one, you’ll be rewarded on day two.
Nutritional Information & Benefits
Here’s the estimated nutritional breakdown per cookie (based on 24 cookies):
| Nutrient | Amount Per Cookie |
|---|---|
| Calories | 165 |
| Total Fat | 9g |
| Saturated Fat | 4g |
| Cholesterol | 18mg |
| Sodium | 115mg |
| Total Carbohydrates | 20g |
| Dietary Fiber | 1g |
| Sugars | 13g |
| Protein | 3g |
These cookies are a treat, so I’m not going to pretend they’re health food. But they do have some redeeming qualities. Peanut butter provides protein and healthy fats, which help keep you full and satisfied. The small amount of fiber from the flour and peanut butter is a bonus. And honestly, sometimes the mental health benefit of enjoying a warm, homemade cookie is worth more than any nutritional statistic.
For those with dietary concerns: these cookies contain gluten, dairy, eggs, peanuts, and soy (from the chocolate kisses). They are not suitable for vegan or dairy-free diets as written. However, you can try using a vegan butter substitute and a flax egg (1 tablespoon ground flaxseed mixed with 3 tablespoons water) for a plant-based version. The texture will be slightly different, but still enjoyable.
Conclusion
These cozy peanut butter blossom cookies with Hershey kiss are more than just a recipe — they’re a little moment of joy. The soft, peanut buttery cookie paired with that perfect chocolate kiss is a combination that never gets old. Whether you’re baking them for a holiday party, a rainy afternoon, or just because you need something warm and familiar, they always deliver.
I love that this recipe reminds me of my brother’s unexpected wisdom. He walked into my kitchen, questioned a technique I’d never thought to question, and made these cookies better. It’s a good reminder that sometimes the best ideas come from the least expected places. So go ahead — make these cookies. Press the kisses in while they’re warm. Eat one fresh from the oven. Save a few for tomorrow. And if someone in your kitchen suggests something that sounds crazy, maybe give it a try.
I’d love to hear how these turn out for you. Did you try a variation? Did you press the kisses in immediately or wait? Drop a comment below and let me know. And if you share them on social media, tag me — I want to see your beautiful cookies. Happy baking, friends!
Frequently Asked Questions
Can I use natural peanut butter in this recipe?
I don’t recommend it. Natural peanut butter has a higher oil content and can separate, which makes the cookies greasy and causes them to spread too much. Stick with processed peanut butter like Skippy or Jif for the best texture.
Why did my cookies spread too much?
Several things could cause this. Your butter might have been too soft or melted. Your dough might have been too warm. Or you might have used too much sugar. Next time, chill the dough for 15-20 minutes before baking and make sure your butter is softened but not melted.
Can I make these cookies ahead of time?
Absolutely. You can make the dough up to 3 days ahead and keep it in the fridge. Roll and bake when you’re ready. Or freeze the baked cookies for up to 3 months. They thaw beautifully at room temperature.
How do I keep the Hershey kisses from falling off?
The key is pressing them in while the cookies are still warm — about 30-60 seconds after they come out of the oven. The residual heat softens the chocolate just enough to create a bond. If you wait too long, the cookies cool and the kisses won’t stick.
Can I use a different type of chocolate?
Yes! Dark chocolate, white chocolate, or even caramel-filled kisses all work beautifully. Just make sure whatever you use is similar in size to a standard Hershey kiss so it fits on the cookie without overwhelming it.
Pin This Recipe!

Cozy Peanut Butter Blossom Cookies with Hershey Kiss

Soft, pillowy peanut butter cookies topped with a classic Hershey kiss, pressed in while warm for the perfect bond. A cozy, crowd-pleasing treat that’s quick and easy to make.
- Prep Time: 15 minutes
- Cook Time: 10-12 minutes per batch
- Total Time: 25 minutes
- Yield: 24-30 cookies 1x
- Category: Dessert
- Cuisine: American
Ingredients
- 1 ½ cups (190g) all-purpose flour
- 1 teaspoon baking soda
- ½ teaspoon salt
- ½ cup (1 stick, 113g) unsalted butter, softened
- ½ cup (130g) creamy peanut butter (e.g., Skippy or Jif)
- ½ cup (100g) granulated sugar
- ½ cup (100g) packed brown sugar (light or dark)
- 1 large egg, room temperature
- 2 tablespoons (30ml) milk (whole milk preferred)
- 1 teaspoon vanilla extract
- ¼ cup (50g) additional granulated sugar (for rolling)
- 24–30 Hershey’s Kisses, unwrapped
Instructions
- Preheat oven to 375°F (190°C). Line two baking sheets with parchment paper or silicone mats. Unwrap Hershey kisses and set aside.
- In a medium bowl, whisk together flour, baking soda, and salt. Set aside.
- In a large bowl, beat softened butter, ½ cup granulated sugar, and packed brown sugar with an electric mixer on medium speed until light and fluffy, about 2-3 minutes. Scrape down sides as needed.
- Add peanut butter, egg, milk, and vanilla extract to the butter mixture. Beat on medium speed until well combined, about 1 minute.
- Gradually add the flour mixture to the wet ingredients, mixing on low speed just until combined. Do not overmix. Dough will be soft and slightly sticky.
- Place ¼ cup granulated sugar in a small bowl. Using a cookie scoop or tablespoon, portion out rounded tablespoonfuls of dough (about 1.5 tablespoons each). Roll each into a smooth ball, then roll in sugar to coat evenly. Place on prepared baking sheets, spacing 2 inches apart.
- Bake one sheet at a time in the preheated oven for 10-12 minutes, until edges are lightly golden and centers are still soft. Do not overbake.
- Let cookies rest on baking sheet for 30-60 seconds. Working quickly, press one Hershey kiss into the center of each cookie gently but firmly.
- Transfer cookies to a wire cooling rack and cool completely, about 15-20 minutes.
Notes
Press the Hershey kiss into the warm cookie 30-60 seconds after baking for the best bond. Use room temperature ingredients for best results. For a gluten-free version, substitute all-purpose flour with a 1:1 gluten-free baking flour blend. Store in an airtight container at room temperature for up to 5 days; freeze for up to 3 months.
Nutrition
- Serving Size: 1 cookie
- Calories: 165
- Sugar: 13
- Sodium: 115
- Fat: 9
- Saturated Fat: 4
- Carbohydrates: 20
- Fiber: 1
- Protein: 3
Keywords: peanut butter blossom cookies, Hershey kiss cookies, easy cookie recipe, holiday cookies, peanut butter and chocolate