My friend Jen wasn’t trying to impress me. Honestly, I don’t think she even remembers I was coming over that Thursday afternoon. I’d stopped by to borrow a drill bit of all things, and the smell hit me before I even got past her screen door. It was this warm, spiced, almost-buttery scent that stopped me mid-step. I just stood there on her porch for a second, breathing it in, trying to figure out if I was smelling a candle or something real.
It was real. She had two little ramekins sitting on her counter, and she was sliding them into the oven like it was nothing. “Oh, that?” she said when I asked, barely looking up from wiping a smear of flour off her jeans. “Just some apples I needed to use up.” Just some apples. Let me tell you, it was the most humble brag I’ve ever witnessed in a kitchen. She didn’t have a fancy recipe card out, no measuring spoons lined up in a row. She just… knew what she was doing. That casual confidence is something I’ve been chasing in my own cooking ever since.
That day, I learned that the best desserts aren’t the ones you plan for weeks. They’re the ones you throw together on a random Thursday because you have some apples that are starting to get a little soft and a half-empty jug of apple cider in the fridge. Maybe you’ve been there, staring at a few apples and wondering what to do that feels special but doesn’t require a trip to the store? This cozy apple cider caramel crisp for two is that answer. It’s the recipe that stayed with me because it proved you don’t need a big occasion or a big budget to make something that feels like a warm hug.
Why You’ll Love This Recipe
This isn’t just another apple crisp. I’ve tested this one about six times in my own kitchen to get the topping just right—crispy on top, buttery underneath, and not so sweet that it masks the apples. I wanted it to feel like something you’d pay twelve bucks for at a cute little cafe, but for a fraction of the cost. And honestly, it works.
- Budget-Friendly Ingredients: You likely have most of this in your pantry right now. Apples, oats, flour, butter, sugar, and apple cider. No expensive extracts or specialty flours needed.
- Perfect for Two: No leftovers that get soggy in the fridge. This is made for a quiet night in, a date night at home, or just treating yourself without the temptation of a whole pan.
- Quick & Easy: From start to table in about 35 minutes. The hardest part is peeling the apples, and that takes maybe five minutes.
- Crowd-Pleaser: I’ve served this to my picky kids and to adult friends, and both groups went quiet while eating it. That’s the highest compliment, right?
- Unbelievably Delicious: The apple cider caramel sauce is the star here. It’s not a complicated caramel—it’s a cheat, honestly—but it tastes like you spent hours on it.
What makes this different from every other apple crisp recipe out there is the cider reduction. Instead of just pouring plain apple cider over the apples, you simmer it down until it’s syrupy and almost jammy. That little step adds a depth of flavor that makes you close your eyes after the first bite. It’s comfort food reimagined—faster, simpler, but with the same soul-soothing satisfaction. Perfect for impressing your spouse on a Tuesday night without any stress.
What Ingredients You Will Need
This recipe uses simple, wholesome ingredients that you probably already have in your kitchen, especially if you’ve been apple picking or have a jug of cider in the fridge. The magic is in how they come together, not in fancy ingredients.
- For the Apple Filling:
- 2 medium apples (I use Honeycrisp or Granny Smith for a nice balance of sweet and tart)
- 1/2 cup apple cider (unfiltered is best, but any kind works)
- 1 tablespoon brown sugar (light or dark, both work fine)
- 1/2 teaspoon ground cinnamon
- 1/4 teaspoon ground nutmeg (freshly grated if you have it, but pre-ground is totally fine)
- 1 teaspoon lemon juice (keeps the apples from browning and adds a little brightness)
- Pinch of salt
- For the Caramel Sauce (the cheat version):
- 1/4 cup brown sugar (packed)
- 2 tablespoons salted butter
- 2 tablespoons apple cider
- 1/4 teaspoon vanilla extract
- For the Crisp Topping:
- 1/4 cup all-purpose flour
- 1/4 cup old-fashioned rolled oats (not quick oats, they get mushy)
- 1/4 cup brown sugar (packed)
- 3 tablespoons cold salted butter (cut into small cubes)
- 1/4 teaspoon ground cinnamon
- Pinch of salt
I recommend using a good quality butter here—it really makes a difference in the topping. I usually grab Land O’Lakes or Kerrygold when it’s on sale. For the apples, look for ones that are firm and not mealy. If you’re using a sweeter apple like Fuji or Gala, you can cut back on the brown sugar just a tad. And if you don’t have apple cider, you can use apple juice, but the flavor won’t be quite as rich. Trust me on this one—the cider is worth it.
Equipment Needed
You don’t need a fancy kitchen for this recipe. I’ve made it in my tiny rental kitchen with mismatched bowls and it came out perfect every time.
- Two 8-ounce ramekins or small oven-safe dishes (if you don’t have ramekins, you can use a small baking dish or even a clean tin can—seriously, I’ve done it)
- A small saucepan (for the cider reduction and caramel)
- A mixing bowl (medium-sized)
- A paring knife or vegetable peeler
- A measuring cup and spoons
- A fork or pastry cutter (for mixing the topping)
- A baking sheet (to catch any drips in the oven)
If you don’t have ramekins, you can use a 6-inch cast iron skillet or a small casserole dish. Just adjust the baking time slightly since the surface area will be different. I’ve also used oven-safe coffee mugs in a pinch! The key is making sure the dish is small enough that the crisp gets nice and thick.
Preparation Method
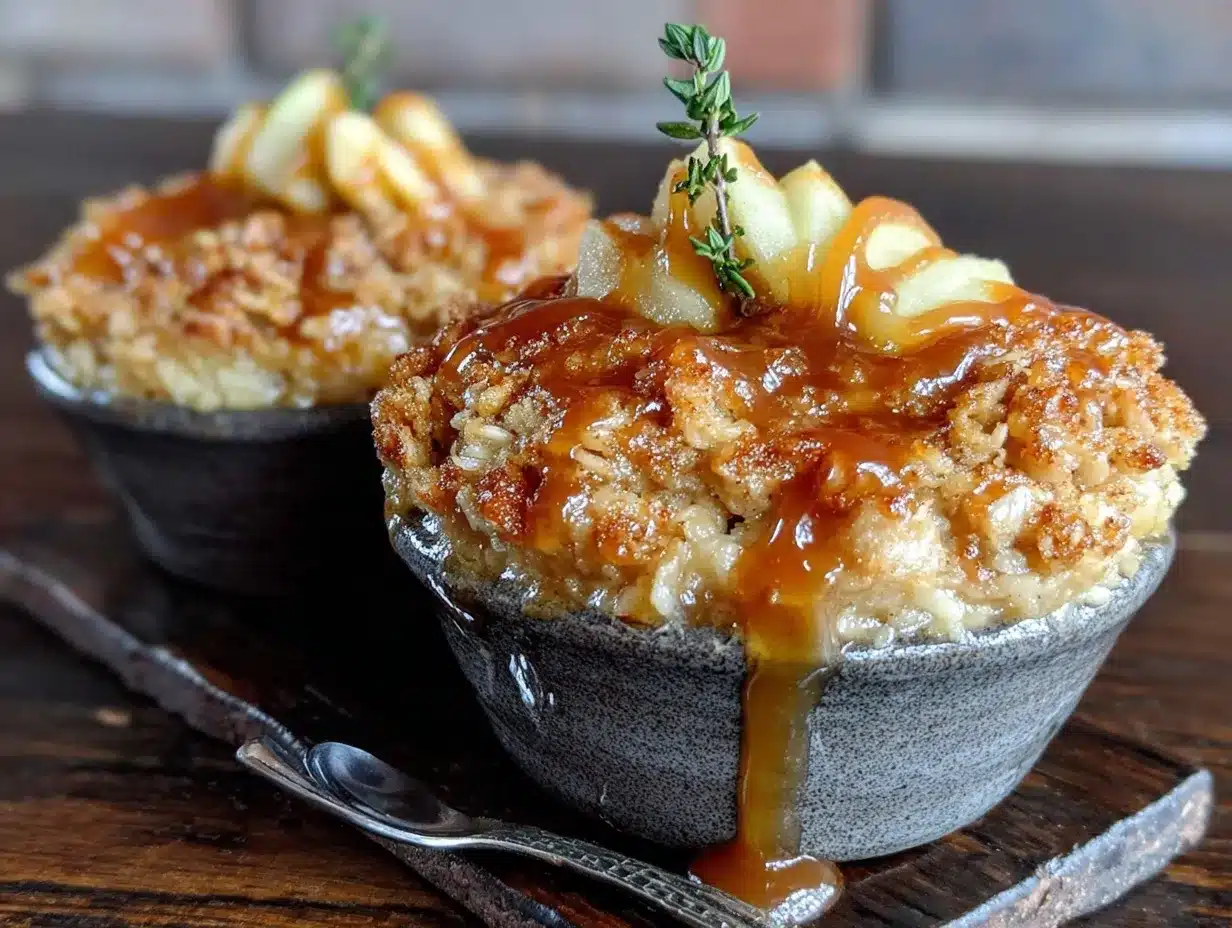
Alright, let’s get cooking. Preheat your oven to 375°F (190°C) and get your ramekins set on a baking sheet. This catches any caramel that bubbles over—trust me, it will happen, and you don’t want to scrub your oven later.
- Make the cider reduction: Pour the 1/2 cup of apple cider into your small saucepan. Bring it to a boil over medium-high heat, then turn it down to a simmer. Let it bubble away for about 8-10 minutes, stirring occasionally, until it reduces by about half and gets syrupy. You’re looking for it to coat the back of a spoon. Don’t walk away from this—it can burn quickly at the end. Set it aside when it’s done.
- Prep the apples: While the cider is reducing, peel, core, and chop your apples into 1/2-inch chunks. You want them bite-sized but not too small or they’ll turn to mush. I like to leave the peel on one of the apples sometimes for a little texture and color, but that’s totally up to you. Toss the apple chunks in a bowl with the brown sugar, cinnamon, nutmeg, lemon juice, and that pinch of salt. Pour the cider reduction over the top and stir everything together. Let it sit while you make the topping—this gives the apples time to soak up all that good flavor.
- Make the crisp topping: In a separate bowl, combine the flour, oats, brown sugar, cinnamon, and salt. Add the cold butter cubes. Using a fork or your fingers (I use my hands—it’s faster and you can feel when it’s right), work the butter into the dry ingredients until it looks like coarse crumbs with some pea-sized butter pieces still visible. Don’t overmix it. You want those little butter pockets—they melt in the oven and create those crispy, buttery clusters.
- Assemble the crisps: Divide the apple mixture evenly between your two ramekins. The apples should be mounded up a little—they’ll shrink as they bake. Sprinkle the topping evenly over each ramekin, pressing it down gently so it sticks to the apples. Don’t pack it too tight, just a gentle press.
- Make the caramel sauce: In the same saucepan you used for the cider (no need to wash it), combine the brown sugar, butter, and apple cider for the caramel. Cook over medium heat, stirring constantly, until the butter melts and the sugar dissolves. Let it bubble for about 2 minutes until it thickens slightly. Remove from heat and stir in the vanilla. Drizzle this over the tops of the crisps—it will soak into the topping and the apples a bit, creating that gooey caramel layer.
- Bake: Place the baking sheet with the ramekins in the preheated oven. Bake for 20-25 minutes, until the topping is golden brown and the filling is bubbling up around the edges. The smell at this point will be absolutely ridiculous—like fall in a cup. Let them cool for at least 5 minutes before serving. The filling is lava-hot straight out of the oven.
One thing I’ve learned the hard way: don’t skip the cooling time. I burned my tongue on the first batch because I was too impatient. The apples hold heat like crazy. Five minutes is all you need.
Cooking Tips & Techniques
I’ve made this recipe enough times to have a few tricks up my sleeve. Here’s what I’ve learned from my own kitchen failures:
- Don’t rush the cider reduction: I know it’s tempting to just pour the cider straight over the apples and call it a day. But that reduction step is what makes this recipe special. It concentrates the apple flavor and gives you that almost-caramel consistency without needing to stand over a pot of hot sugar. If you’re short on time, you can skip it, but you’ll lose a lot of depth.
- Cold butter is your friend: For the topping, the butter needs to be cold. If it’s soft, you’ll end up with a paste instead of crumbly clusters. I pop my butter in the freezer for 10 minutes before I start if I forgot to keep it chilled. It makes a noticeable difference in the texture.
- Watch for over-browning: Every oven runs a little differently. If your topping is getting too dark before the apples are bubbly, tent the ramekins loosely with foil for the last 5 minutes. My old oven ran hot, and I learned this one after a few burnt tops.
- Let the apples speak: Don’t over-season the filling. The cinnamon and nutmeg are there to support the apples, not overpower them. I use a light hand with the spices—you can always add more, but you can’t take it out.
Variations & Adaptations
This recipe is forgiving, so feel free to play around with it based on what you have or what you’re craving.
- Gluten-Free Version: Swap the all-purpose flour for a 1:1 gluten-free flour blend, and make sure your oats are certified gluten-free. I’ve tested this with Bob’s Red Mill gluten-free flour and it worked perfectly. The topping might be a little more crumbly, but it still tastes amazing.
- Vegan Adaptation: Use vegan butter (I like Miyoko’s or Earth Balance) and swap the butter in the caramel for coconut oil. The texture will be slightly different—a little less crispy on top—but the flavor is still there. I made this for a friend who’s vegan and she asked for the recipe immediately.
- Add Some Crunch: Toss a handful of chopped pecans or walnuts into the topping mixture. Toast them first for extra flavor. I do this when I’m feeling fancy or when I have nuts leftover from another recipe.
- Change the Fruit: You can use pears instead of apples, or a mix of both. In the summer, I’ve used peaches and nectarines with great success. Just adjust the sugar slightly based on the sweetness of your fruit.
- Spice It Up: Add a pinch of cardamom or ginger to the filling for a different flavor profile. I tried this once with a little bit of Chinese five-spice powder and it was surprisingly good—not traditional, but delicious.
Serving & Storage Suggestions
This crisp is best served warm, straight from the oven. The contrast between the hot, bubbly apples and the cold topping is everything. I like to let it sit for about 5-10 minutes so it sets up a little, but it’s still warm when we dig in.
- What to serve with it: A scoop of vanilla ice cream is the classic choice, and for good reason. The cold creaminess against the warm, spiced apples is heavenly. If you don’t have ice cream, a dollop of whipped cream or a drizzle of heavy cream works too. For a dairy-free option, try coconut whipped cream.
- Drink pairings: A hot cup of coffee or a mug of spiced tea is perfect. If you’re feeling indulgent, a glass of bourbon or a hot toddy pairs beautifully with the apple and caramel flavors.
- Storage: If you have leftovers (unlikely, but possible), cover the ramekins with foil or plastic wrap and store them in the refrigerator for up to 2 days. The topping will lose some of its crunch, but the flavor will still be there.
- Reheating: Pop the ramekins in a 350°F oven for about 10 minutes, or microwave them for 30-45 seconds. The microwave is faster, but the oven helps the topping crisp back up a little. Honestly, I’ve eaten it cold straight from the fridge and it’s still good—kind of like apple pie filling.
- Flavor development: The flavors actually get better after a day in the fridge. The apples soak up more of the caramel and spice, so day-old crisp is a treat in its own right. Just don’t expect the topping to be as crispy.
Nutritional Information & Benefits
This is a treat, so I’m not going to pretend it’s health food. But it does have some redeeming qualities worth mentioning.
- Estimated per serving (one ramekin): Approximately 380 calories, 15g fat (9g saturated), 60g carbohydrates, 4g fiber, 40g sugar, 3g protein. These are rough estimates—your numbers will vary based on the exact ingredients you use.
- Health benefits: Apples are a good source of fiber and vitamin C. The oats in the topping provide some whole grains and soluble fiber, which is good for heart health. The cinnamon has anti-inflammatory properties, so there’s that.
- Dietary considerations: This recipe can be made gluten-free (see variations) and vegan (see variations). It contains dairy and gluten in its standard form. If you’re watching your sugar intake, you can reduce the brown sugar by a tablespoon or two, but it will affect the texture of the topping and the caramel.
- My personal take: I believe in balance. This crisp is a dessert, and it’s meant to be enjoyed. It uses real, whole ingredients, and it’s portion-controlled since it’s made for two. That’s a win in my book. I’d rather have a small serving of something truly satisfying than a giant bowl of something that tastes like cardboard.
Conclusion
This cozy apple cider caramel crisp for two is one of those recipes that proves you don’t need a lot of money or a lot of time to make something that feels special. It’s the kind of dessert that turns an ordinary Tuesday into a little moment of joy. The smell alone is worth making it—your whole kitchen will smell like fall, and everyone who walks in will ask what you’re baking.
I love this recipe because it reminds me of that afternoon at Jen’s house, where something so simple made me stop in my tracks. It’s proof that the best recipes aren’t complicated or expensive. They’re just made with a little bit of care and the right ingredients. And honestly? This one is forgiving enough that even if you mess up a step, it’ll still be delicious.
So go ahead and give it a try. Use whatever apples you have, don’t stress about the measurements, and enjoy every warm, caramel-y bite. And if you come up with your own twist—like adding some bourbon to the caramel or mixing in some cranberries—I’d love to hear about it. Drop a comment below and let me know how it turned out!
Frequently Asked Questions
Can I make this in advance?
You can assemble the crisps up to a day ahead. Just keep the topping and filling separate, then combine and bake when you’re ready. The topping will stay crumbly if you keep it in the fridge. If you’ve already baked it, it’s still good for a day or two—just expect the topping to soften.
Can I use a different type of apple?
Absolutely. I prefer Honeycrisp or Granny Smith for their texture and flavor balance, but you can use any apple you have. Softer apples like McIntosh will break down more and give you a saucier filling, while firmer apples like Fuji will hold their shape better. Both are delicious, just different.
What if I don’t have apple cider?
You can use apple juice in a pinch, but the flavor won’t be as rich. If you have apple cider concentrate, you can mix it with a little water. Honestly, I’ve even used a splash of apple juice mixed with a tiny bit of apple cider vinegar to mimic the tang. It’s not perfect, but it works.
Can I double this recipe?
Yes! This recipe scales up beautifully. Just double all the ingredients and use a larger baking dish, or divide it into four ramekins. The baking time might increase by 5-10 minutes if you’re using a single dish, so keep an eye on it.
Why is my topping not crispy?
There are a few reasons this might happen. Your butter might have been too warm when you mixed it, or you might have overmixed the topping. Also, if you covered the crisps while they were cooling, the steam would have softened the topping. Next time, make sure your butter is cold and don’t pack the topping down too much. And let them cool uncovered.
Pin This Recipe!

Easy Apple Cider Caramel Crisp For Two

A cozy apple cider caramel crisp for two, made with simple ingredients and a cheat caramel sauce. Perfect for a quiet night in or a date night at home.
- Prep Time: 15 minutes
- Cook Time: 25 minutes
- Total Time: 40 minutes
- Yield: 2 servings 1x
- Category: Dessert
- Cuisine: American
Ingredients
- 2 medium apples (Honeycrisp or Granny Smith)
- 1/2 cup apple cider (unfiltered preferred)
- 1 tablespoon brown sugar
- 1/2 teaspoon ground cinnamon
- 1/4 teaspoon ground nutmeg
- 1 teaspoon lemon juice
- Pinch of salt
- 1/4 cup brown sugar (packed, for caramel)
- 2 tablespoons salted butter (for caramel)
- 2 tablespoons apple cider (for caramel)
- 1/4 teaspoon vanilla extract (for caramel)
- 1/4 cup all-purpose flour
- 1/4 cup old-fashioned rolled oats
- 1/4 cup brown sugar (packed, for topping)
- 3 tablespoons cold salted butter (cut into small cubes, for topping)
- 1/4 teaspoon ground cinnamon (for topping)
- Pinch of salt (for topping)
Instructions
- Preheat oven to 375°F (190°C). Place two 8-ounce ramekins on a baking sheet.
- Make the cider reduction: In a small saucepan, bring 1/2 cup apple cider to a boil over medium-high heat, then reduce to a simmer. Cook for 8-10 minutes, stirring occasionally, until reduced by half and syrupy. Set aside.
- Prep the apples: Peel, core, and chop apples into 1/2-inch chunks. Toss with 1 tablespoon brown sugar, 1/2 teaspoon cinnamon, 1/4 teaspoon nutmeg, 1 teaspoon lemon juice, and a pinch of salt. Pour cider reduction over apples and stir. Let sit while making topping.
- Make the crisp topping: In a bowl, combine 1/4 cup flour, 1/4 cup oats, 1/4 cup brown sugar, 1/4 teaspoon cinnamon, and a pinch of salt. Add cold butter cubes. Use a fork or fingers to work butter into dry ingredients until mixture resembles coarse crumbs with some pea-sized butter pieces.
- Assemble the crisps: Divide apple mixture evenly between ramekins. Sprinkle topping evenly over apples, pressing down gently.
- Make the caramel sauce: In the same saucepan, combine 1/4 cup brown sugar, 2 tablespoons butter, and 2 tablespoons apple cider. Cook over medium heat, stirring constantly, until butter melts and sugar dissolves. Let bubble for 2 minutes until thickened. Remove from heat and stir in 1/4 teaspoon vanilla. Drizzle over crisps.
- Bake for 20-25 minutes, until topping is golden brown and filling is bubbling. Let cool for at least 5 minutes before serving.
Notes
Don’t skip the cooling time—the filling is lava-hot straight out of the oven. For a gluten-free version, use a 1:1 gluten-free flour blend and certified gluten-free oats. For a vegan version, use vegan butter and coconut oil instead of butter in the caramel.
Nutrition
- Serving Size: 1 ramekin
- Calories: 380
- Sugar: 40
- Sodium: 150
- Fat: 15
- Saturated Fat: 9
- Carbohydrates: 60
- Fiber: 4
- Protein: 3
Keywords: apple crisp, apple cider caramel, dessert for two, easy apple dessert, fall dessert