This was supposed to be a proper charcuterie board. You know, one of those gorgeous, sprawling platters you see on Instagram—the kind with cascading salami roses, perfectly placed cheese triangles, and little piles of olives that look almost too pretty to eat. I had it all planned out for our annual Christmas Eve get-together. I’d spent a small fortune at the fancy grocery store on prosciutto, three different kinds of cheese, and these adorable little cornichons. But then, about an hour before everyone was supposed to arrive, I realized I didn’t have a single board big enough. Not one. My largest cutting board was maybe the size of a sheet of paper, and my wooden serving platter was currently holding a mountain of mail I’d forgotten about. I stood there in my kitchen, surrounded by beautiful ingredients and absolutely no plan, feeling that familiar pinch of panic. I mean, you’ve been there, right? That moment when a simple oversight threatens to derail your whole hosting vibe?
So I did what any reasonable person would do when faced with a hosting crisis: I grabbed a stack of clear plastic cups from the pantry. Honestly, it felt a little desperate at first. I started layering ingredients—a few slices of salami at the bottom, then some cheese cubes, a handful of almonds, a couple of olives, and a sprig of rosemary sticking out the top for flair. I made about a dozen of them in a frantic ten minutes, just praying they’d look intentional and not like a last-ditch effort. When my guests arrived and saw these little cups lined up on the counter, I expected a polite “oh, how cute” and then a quick pivot to the wine. But the reaction was totally different. People grabbed them immediately. They were holding their drink in one hand and their charcuterie cup in the other, mingling and snacking without needing a plate or a napkin. No one was hovering awkwardly around the kitchen island trying to balance a plate of cheese and a glass of eggnog. It was a revelation.
That accidental solution turned into my go-to party trick. These Christmas charcuterie cups are now the thing I’m asked to bring to every holiday gathering, and honestly, I love making them. They take the stress out of hosting because you can assemble them hours ahead of time, and they give every guest their own perfectly portioned, beautifully curated little snack. No fighting over the last piece of brie, no one double-dipping, and absolutely zero cleanup. It’s the kind of happy accident that makes you wonder why you ever did it the hard way. And that’s why I keep coming back to this recipe—it’s less about the food itself and more about the freedom it gives you to actually enjoy your own party. Let me show you how easy it is.
Why You’ll Love This Recipe
If you’re hosting a holiday gathering this year, these Christmas charcuterie cups are about to become your new best friend. I’ve tested this concept at everything from casual cookie swaps to formal Christmas dinners, and it works every single time. Here’s why this recipe stands out from the crowd:
- Perfect for Parties : Each guest gets their own personal cup, which means no crowding around a single board and no awkward reaching across the table. It’s the ultimate mingling food—people can grab a cup and chat without needing a plate or a fork.
- Stress-Free Prep : You can assemble these cups up to 24 hours in advance. Just cover them with plastic wrap and pop them in the fridge. When guests arrive, you simply set them out and watch them disappear. No last-minute arranging, no frantic slicing.
- No Special Equipment : Forget about hunting for a giant wooden board or a slate platter. All you need are some clear plastic or glass cups. It’s a game-changer for anyone with limited serving space or a mismatched collection of platters.
- Endlessly Customizable : This is a choose-your-own-adventure recipe. Swap in your family’s favorite meats, cheeses, and extras. It’s easy to make a few dairy-free or gluten-free versions without complicating the whole spread.
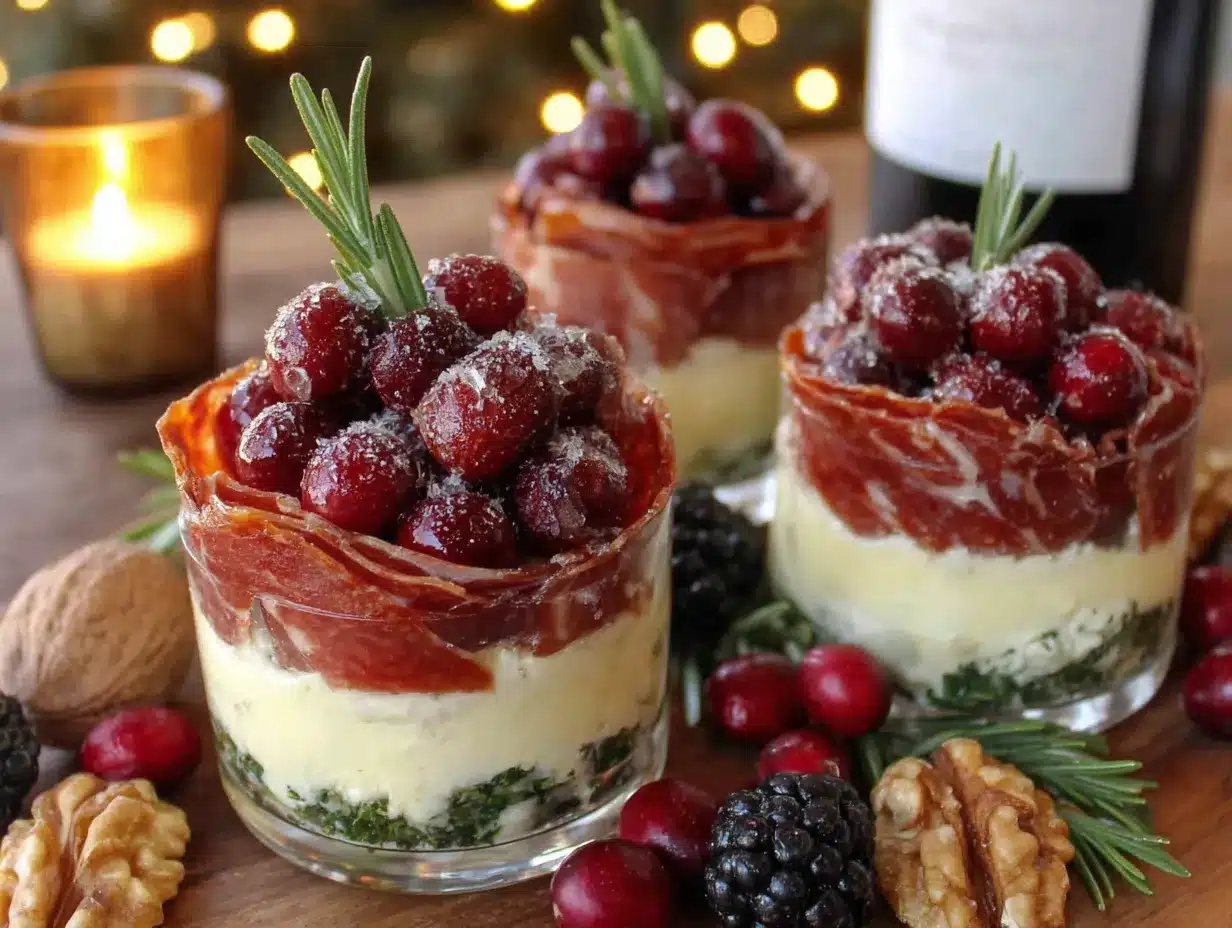
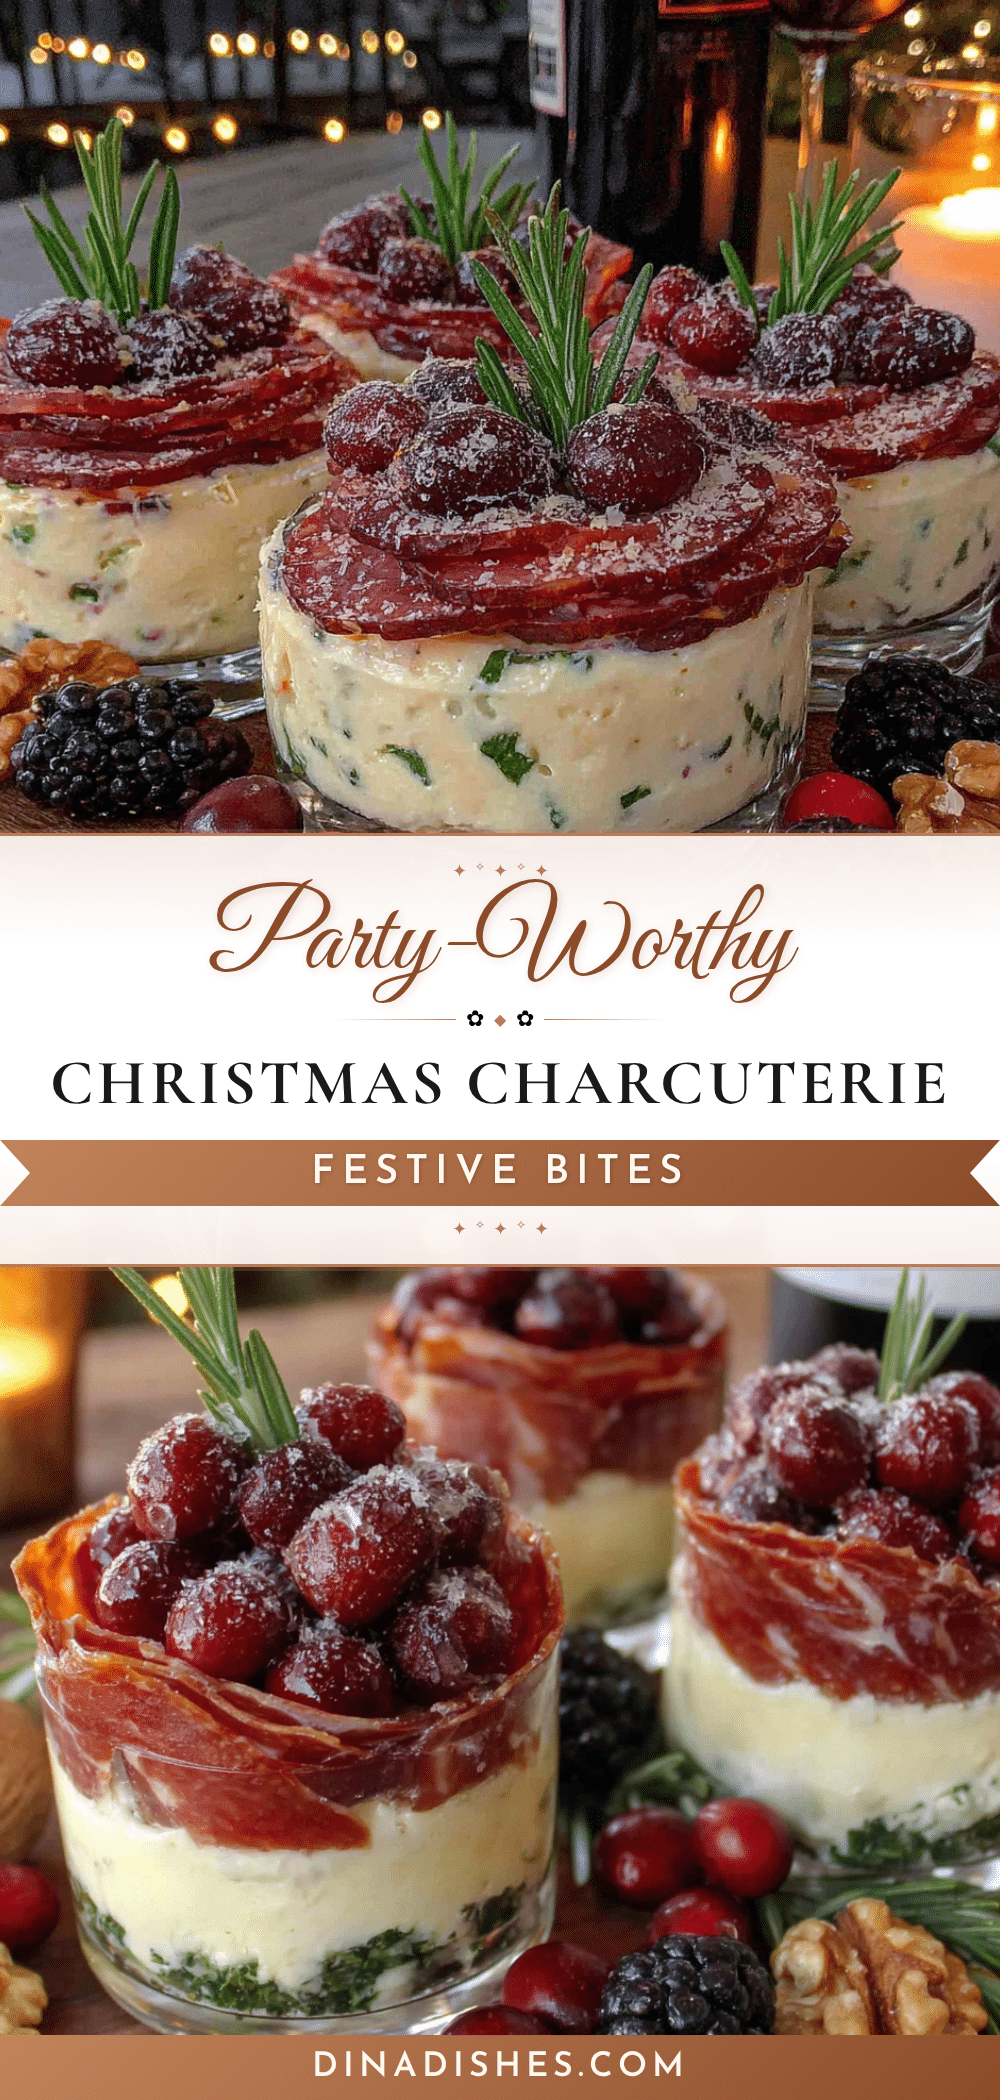
- Visually Stunning : The layered ingredients create a beautiful, festive look that screams “holiday party.” The clear cup shows off all the colors—red salami, white cheese, green rosemary—making it as pretty as any charcuterie board.
What makes this recipe different from the hundreds of other charcuterie ideas out there is the sheer practicality. It’s not just about making food look pretty; it’s about creating a serving solution that actually works for a party. You can scale it up or down in minutes, and it travels like a dream if you’re bringing it to someone else’s house. The first time I made these for a friend’s potluck, I walked in with a tray of cups and people literally clapped. I’m not kidding. It’s that kind of recipe—the one that makes you look like a hosting genius with almost no effort.
What Ingredients You Will Need
This recipe uses simple, store-bought ingredients that you can find at any grocery store. The beauty of these cups is that you can mix and match based on what you love or what’s on sale. Here’s what I typically use for a classic Christmas version:
For the Meat Layer
- 6 ounces sliced salami (I prefer Genoa salami for its rich, slightly spicy flavor. Look for pre-sliced packs to save time.)
- 4 ounces prosciutto (the thin, delicate slices add a touch of elegance. You can also use soppressata or capicola.)
- 4 ounces pepperoni (optional, but it adds a nice pop of color and a little heat. I like the smaller stick-style pepperoni for easy layering.)
For the Cheese Layer
- 4 ounces sharp cheddar cheese (cut into ½-inch cubes. I recommend Tillamook or Cabot for consistent quality.)
- 4 ounces mozzarella pearls (those little fresh mozzarella balls are perfect for cups. They’re bite-sized and add a creamy, mild contrast to the salty meats.)
- 4 ounces gouda or brie (cut into small wedges or cubes. Gouda has a lovely smoky note that works beautifully with holiday flavors.)
For the Crunch and Brine
- ½ cup roasted almonds (unsalted or lightly salted. You can also use pecans, walnuts, or Marcona almonds for a fancier touch.)
- ¼ cup green olives (stuffed with pimentos or garlic. Drain them well so they don’t make the cups watery.)
- ¼ cup cornichons or small pickles (these little tart bites cut through the richness of the cheese and meat. I use the brand Maille.)
For the Garnish
- Fresh rosemary sprigs (a small sprig in each cup looks like a tiny Christmas tree. Wash and dry them well.)
- Optional: dried cranberries, fig jam, or honey (add a sweet pop of color or a drizzle of sweetness. A small dollop of jam at the bottom of the cup is a lovely surprise.)
When selecting your ingredients, go for quality over quantity. Since you’re using just a few items, each one needs to shine. I always buy my cheese from a block and cut it myself rather than buying pre-shredded or pre-cubed options—they taste better and hold their shape in the cup. For the meat, ask your deli counter to slice it a little thicker than usual so it doesn’t tear when you fold it. And don’t skip the fresh rosemary; it’s what makes these cups look undeniably festive. If rosemary isn’t your thing, small sprigs of thyme or even a cinnamon stick work beautifully too.
Equipment Needed
The equipment list for this recipe is almost embarrassingly short. You probably already have everything you need sitting in your kitchen cabinets right now.
- Clear plastic or glass cups (I use 9-ounce clear plastic cups for parties because they’re lightweight and disposable. For a more elegant look, use small glass tumblers or mason jars. You’ll need about 12 cups for this recipe.)
- Cutting board and sharp knife (for cubing the cheese and slicing any larger meats. A good chef’s knife makes quick work of this.)
- Small spoon or melon baller (for dolloping jam or honey at the bottom of the cups. A melon baller is perfect for getting a neat portion.)
- Tray or platter (for transporting and serving the cups. A large baking sheet works great in a pinch.)
- Plastic wrap (if you’re making these ahead of time, cover the tray tightly to keep everything fresh.)
One tip I learned the hard way: don’t use cups that are too tall or too narrow. A cup that’s about 3 to 4 inches tall and 2.5 inches wide is ideal. Short, squat cups make it hard to see the layers, and tall skinny cups tip over too easily. I found a pack of 50 clear plastic cups at the dollar store for a few bucks, and they’ve lasted me through three holiday seasons. Budget-friendly and effective!
Preparation Method
Making these Christmas charcuterie cups is incredibly straightforward. I’ve broken it down into simple steps so you can follow along without any stress. The whole process takes about 20 minutes from start to finish.
-
Prep your ingredients (5 minutes) : Start by cubing your cheddar and gouda into ½-inch pieces. You want them small enough to fit easily in the cup but big enough to be a satisfying bite. Drain your olives and cornichons and pat them dry with a paper towel. If your prosciutto slices are long, cut them in half crosswise. Set everything out in small bowls so you can assemble efficiently.
-
Layer the bottom (2 minutes) : Place a small dollop of fig jam or honey at the bottom of each cup if you’re using it. This adds a sweet surprise at the end. Then add a small handful of almonds—about 5 to 6 almonds per cup. The almonds create a stable base and add crunch.
-
Add the meat (5 minutes) : Fold each slice of salami in half, then in half again to create a small wedge shape. Tuck 2 to 3 folded salami slices into each cup, pressing them gently against the sides so they stay upright. For the prosciutto, gently bunch it up into a loose ribbon and place it on top of the salami. The key here is to create visual layers—you want to see the different meats through the clear cup.
-
Add the cheese (5 minutes) : Drop in 3 to 4 cubes of cheddar, 2 to 3 mozzarella pearls, and 2 to 3 small wedges of gouda or brie. Distribute them evenly so each cup has a nice mix. Don’t just dump them all in one spot; arrange them so they peek out between the meat layers.
-
Add the briny bits (3 minutes) : Tuck in 2 to 3 olives and 2 to 3 cornichons per cup. Nestle them into the gaps between the cheese and meat. This is where the cups start to look really full and abundant.
-
Garnish and finish (2 minutes) : Take a small sprig of fresh rosemary and gently press it into the side of each cup so it stands upright like a little Christmas tree. If you want extra color, add a few dried cranberries on top. The rosemary is mostly decorative, but it also adds a lovely aroma when someone reaches for their cup.
-
Chill or serve immediately : If you’re serving right away, arrange the cups on a tray and set them out. If you’re making them ahead, cover the tray tightly with plastic wrap and refrigerate for up to 24 hours. Take them out about 15 minutes before serving to let the cheese come to room temperature for the best flavor.
A few sensory cues to watch for: the cups should look full but not overflowing. You want to see distinct layers of meat, cheese, and garnishes through the clear cup. The rosemary should stand tall without flopping over. If your cup looks a little sparse, add another cube of cheese or an extra olive. Trust your eyes—you’ll know when it looks right.
Cooking Tips & Techniques
Over the years, I’ve made a few mistakes with these cups so you don’t have to. Here are my best tips for getting them perfect every time.
Don’t overfill the cups. I know it’s tempting to pack them full, but guests need to be able to reach in and grab items without everything spilling out. Aim for each cup to be about three-quarters full. Leave a little room at the top so the ingredients aren’t squished.
Keep the meat and cheese separate within the cup. If you just toss everything in randomly, it all blends together and looks like a sad snack mix. Take an extra 30 seconds per cup to arrange the ingredients in visible layers. The visual payoff is huge.
Use a variety of textures. The best cups have a mix of soft (brie, prosciutto), firm (cheddar, salami), crunchy (almonds), and briny (olives, cornichons). If you’re using only soft ingredients, the cup feels one-note. Variety keeps each bite interesting.
Make extra cups. I always make 2 to 3 more cups than I think I’ll need. People go back for seconds, and it’s better to have leftovers than to run out. Plus, they’re perfect for snacking on the next day while you’re cleaning up.
Watch out for wet ingredients. If you’re using marinated olives or pickles, make sure to drain them thoroughly. Any excess liquid will pool at the bottom of the cup and make everything soggy. I pat mine dry with a paper towel before adding them.
One of my biggest failures: I once tried to make these cups with pre-shredded cheese and pre-sliced meat from a value pack. The cheese was dry and crumbly, and the meat was too thin to hold its shape. It looked like a mess. Now I always buy block cheese and thicker-sliced meat from the deli counter. It makes a world of difference.
Variations & Adaptations
These cups are incredibly flexible. Here are a few ways to change them up for different tastes or dietary needs.
Mediterranean Variation : Swap the salami and cheddar for pepperoni, feta cheese, and kalamata olives. Add a few sun-dried tomatoes and a drizzle of balsamic glaze. This version is perfect if you’re serving a crowd that loves bold, tangy flavors.
Sweet and Spicy Variation : Use spicy soppressata instead of salami, add cubes of pepper jack cheese, and include a few candied pecans. A drizzle of hot honey over the top adds a fantastic sweet-heat combo that everyone raves about.
Dairy-Free Version : Skip the cheese entirely and double up on the meats. Add roasted red pepper strips, marinated artichoke hearts, and a handful of olives. The texture and flavor are still fantastic without any dairy. I’ve served this to dairy-free friends and they loved it.
Breakfast Charcuterie Cups : For a brunch party, use mini pancake cups or waffle pieces as the base, add cooked sausage links or bacon strips, and include cubes of sharp cheddar. A dollop of maple syrup at the bottom is a sweet surprise. These are a hit at Christmas morning brunches.
Dessert Charcuterie Cups : Yes, you can do a sweet version too! Layer in chocolate-covered pretzels, mini marshmallows, dried apricots, and cubes of white cheddar or brie. Add a few fresh raspberries and a sprig of mint for color. It’s like a dessert board in a cup.
My personal favorite variation is the Mediterranean one. I tried it last year for a friend’s holiday party, and I ended up making a second batch because the first one disappeared in 20 minutes. The feta and sun-dried tomatoes bring such a bright, festive flavor that feels different from the usual heavy holiday fare.
Serving & Storage Suggestions
These cups are designed to be served at room temperature, so take them out of the fridge about 15 to 20 minutes before your guests arrive. The cheese will be softer and more flavorful, and the meats will be easier to pull apart. Arrange the cups on a large tray or platter, spacing them out so people can easily grab one without knocking over their neighbors.
For a really beautiful presentation, I like to scatter a few extra rosemary sprigs and dried cranberries around the tray. It fills in any empty spaces and makes the whole thing look lush and intentional. You can also add a small bowl of extra almonds or olives in the center for refills.
These cups pair beautifully with a crisp white wine like Sauvignon Blanc or a light red like Pinot Noir. For a non-alcoholic option, sparkling water with a splash of cranberry juice and a rosemary sprig is a gorgeous match. If you’re serving them as part of a larger spread, they go well with a simple green salad or a bowl of roasted winter vegetables.
Storage: If you have leftovers (which is rare, but possible), you can store the cups in the refrigerator for up to 2 days. Cover them tightly with plastic wrap to prevent the ingredients from drying out. The almonds might lose a little crunch, but the flavors will still be great. I don’t recommend freezing these cups—the texture of the cheese and meat will suffer.
One thing I love about these cups is that the flavors actually meld together a bit after a few hours in the fridge. The prosciutto softens slightly, and the cheese absorbs a hint of the rosemary. They’re still delicious the next day, though I prefer them fresh.
Nutritional Information & Benefits
These cups are a balanced snack with protein, healthy fats, and a bit of fiber from the nuts. Here’s an approximate breakdown per cup (based on using the ingredients listed above):
- Calories: 250-300
- Protein: 15-18 grams
- Fat: 20-25 grams
- Carbohydrates: 4-6 grams
- Fiber: 1-2 grams
The protein from the meat and cheese will keep your guests satisfied without weighing them down. Almonds are a great source of vitamin E and healthy monounsaturated fats. Olives provide antioxidants and heart-healthy fats. And the fresh rosemary adds a touch of anti-inflammatory compounds. It’s a snack that feels indulgent but is actually pretty balanced.
If you’re watching your sodium intake, you can use low-sodium meats and unsalted nuts. For a lower-fat option, swap some of the cheese for extra vegetables like roasted red peppers or cucumber slices. And if you’re serving guests with nut allergies, simply replace the almonds with seeds like pumpkin seeds or sunflower seeds.
Conclusion
These Christmas charcuterie cups are proof that the best party ideas often come from happy accidents. What started as a frantic, last-minute solution to a missing serving board has become my most-requested holiday recipe. They’re easy to make, beautiful to look at, and they let your guests snack and socialize without any fuss. Whether you’re hosting a big family gathering, a cozy friends’ night, or a work holiday party, these cups will make you look like a pro.
I love this recipe because it takes the pressure off. You don’t need a fancy board or a perfectly arranged platter. You just need a few good ingredients, some clear cups, and 20 minutes. The rest takes care of itself. So go ahead and make a batch—or two. Play with the ingredients, make them your own, and watch how happy they make your guests. And when someone asks for the recipe, just smile and tell them it was a happy accident.
I’d love to hear how yours turn out! Drop a comment below and let me know what variations you tried. Did you go sweet or savory? Did anyone ask for seconds? Share your photos and tag me on social media—I can’t wait to see your beautiful cups. Happy holidays, and happy snacking!
Frequently Asked Questions
Can I make these cups ahead of time?
Yes! You can assemble them up to 24 hours in advance. Cover the tray tightly with plastic wrap and refrigerate. Take them out 15 minutes before serving to let the cheese come to room temperature.
What size cups should I use?
I recommend 9-ounce clear plastic cups or small glass tumblers. They should be about 3 to 4 inches tall and 2.5 inches wide. Avoid cups that are too tall or too narrow, as they tend to tip over.
Can I make these dairy-free or gluten-free?
Absolutely. For dairy-free, skip the cheese and double up on meats, olives, and roasted vegetables. For gluten-free, all the ingredients listed are naturally gluten-free—just double-check your deli meats and pickles for any additives.
How many cups does this recipe make?
This recipe makes about 12 cups, depending on how full you fill them. I always make a few extra because they go fast. You can easily double or triple the recipe for larger parties.
What if I don’t have fresh rosemary?
No problem! You can use small sprigs of fresh thyme, a cinnamon stick, or even a small star anise for a festive look. If you don’t have any fresh herbs, a few dried cranberries or a dusting of paprika on top adds color.
Pin This Recipe!
Easy Christmas Charcuterie Cups for Holiday Parties
These Christmas charcuterie cups are the perfect party snack—each guest gets their own personal cup filled with meats, cheeses, nuts, and olives. They’re easy to make ahead, require no special equipment, and are endlessly customizable.
- Prep Time: 20 minutes
- Cook Time: 0 minutes
- Total Time: 20 minutes
- Yield: 12 servings 1x
- Category: Appetizer
- Cuisine: American
Ingredients
- 6 ounces sliced salami (Genoa salami preferred)
- 4 ounces prosciutto
- 4 ounces pepperoni (optional)
- 4 ounces sharp cheddar cheese, cut into ½-inch cubes
- 4 ounces mozzarella pearls
- 4 ounces gouda or brie, cut into small wedges or cubes
- ½ cup roasted almonds (unsalted or lightly salted)
- ¼ cup green olives (stuffed with pimentos or garlic)
- ¼ cup cornichons or small pickles
- Fresh rosemary sprigs for garnish
- Optional: dried cranberries, fig jam, or honey
Instructions
- Prep your ingredients: Cube cheddar and gouda into ½-inch pieces. Drain olives and cornichons and pat dry. If prosciutto slices are long, cut in half crosswise. Set everything out in small bowls.
- Layer the bottom: Place a small dollop of fig jam or honey at the bottom of each cup (if using). Add about 5-6 almonds per cup to create a stable base.
- Add the meat: Fold each salami slice in half, then in half again to create a small wedge. Tuck 2-3 folded salami slices into each cup, pressing gently against the sides. For prosciutto, gently bunch it into a loose ribbon and place on top of the salami.
- Add the cheese: Drop in 3-4 cubes of cheddar, 2-3 mozzarella pearls, and 2-3 small wedges of gouda or brie per cup. Distribute evenly so they peek out between the meat layers.
- Add the briny bits: Tuck in 2-3 olives and 2-3 cornichons per cup, nestling them into the gaps between cheese and meat.
- Garnish and finish: Press a small sprig of fresh rosemary into the side of each cup so it stands upright. Add a few dried cranberries on top if desired.
- Chill or serve immediately: If serving right away, arrange cups on a tray. If making ahead, cover tray tightly with plastic wrap and refrigerate for up to 24 hours. Remove from fridge 15 minutes before serving.
Notes
Don’t overfill cups—aim for three-quarters full. Keep meat and cheese in visible layers. Use a variety of textures (soft, firm, crunchy, briny). Make 2-3 extra cups. Drain wet ingredients thoroughly to avoid sogginess. For best results, buy block cheese and thicker-sliced meat from the deli counter.
Nutrition
- Serving Size: 1 cup
- Calories: 275
- Sugar: 2
- Sodium: 650
- Fat: 22
- Saturated Fat: 8
- Carbohydrates: 5
- Fiber: 1.5
- Protein: 16
Keywords: charcuterie cups, Christmas appetizer, holiday party snack, easy charcuterie, personal charcuterie cups


