I wasn’t expecting baking advice from my accountant, but there I was, hunched over my spreadsheets during tax season, listening to Mr. Henderson describe exactly how to make cranberry orange scones. The man who usually talked about depreciation schedules and quarterly estimates was suddenly animated, waving his hands around, telling me about the “secret” to getting that perfect flaky texture. Honestly, I thought he was going to tell me about a deduction I’d missed, not a breakfast pastry that would become my weeknight hero.
It was a Tuesday evening in early March, and I was emotionally drained from sorting through receipts. Mr. Henderson, who I’d always assumed lived on black coffee and pure efficiency, started describing the scent of orange zest mixing with cold butter. “The trick,” he said, leaning forward, “is not to overthink it. You want them to be a little rustic. Imperfect.” He told me his wife had been making these for their Sunday morning reading group for twenty years, and she’d scribbled the recipe on the back of an envelope. I must have looked skeptical, because he just smiled and said, “Try them. You’ll see.”
So I did. That very weekend, I found myself in my kitchen at 9 PM on a Sunday, which is usually my “I have no energy for anything” time. But I had a bag of cranberries in the freezer and an orange that was about to turn. I followed his scribbled instructions, getting flour on my favorite sweater and accidentally zesting my knuckle (ouch). When they came out of the oven, golden and fragrant, I understood. These weren’t just scones. They were a little pocket of calm in a chaotic week. Maybe you’ve been there—needing something simple to bake that feels like a hug but doesn’t require a culinary degree. These cranberry orange scones are exactly that. I’ve been making them ever since, and they’ve saved more rushed mornings than I can count.
Why You’ll Love This Recipe
Let’s be real for a second. Weeknight baking can feel like a chore you don’t have time for. But these cranberry orange scones are different. They’ve been tested in my own chaotic kitchen (with a toddler tugging at my apron and a phone ringing off the hook), and they deliver every single time. Here’s why they work so well for busy people like us:
- Quick & Easy: From start to finish, these scones are on your table in about 30 minutes. No resting the dough overnight, no complicated folds. Just mix, shape, bake, and eat.
- Simple Ingredients: You probably have most of these in your pantry right now. Butter, flour, sugar, an orange—nothing fancy required. The cranberries can be fresh or frozen, whichever you have on hand.
- Perfect for Busy Mornings: Make them the night before, and you’ve got a grab-and-go breakfast that feels special. They’re great for when you need to impress houseguests without waking up at dawn.
- Crowd-Pleaser: I’ve brought these to potlucks, book club meetings, and even a PTA bake sale. They disappear fast. Kids love the sweet glaze, and adults appreciate that they’re not cloyingly sugary.
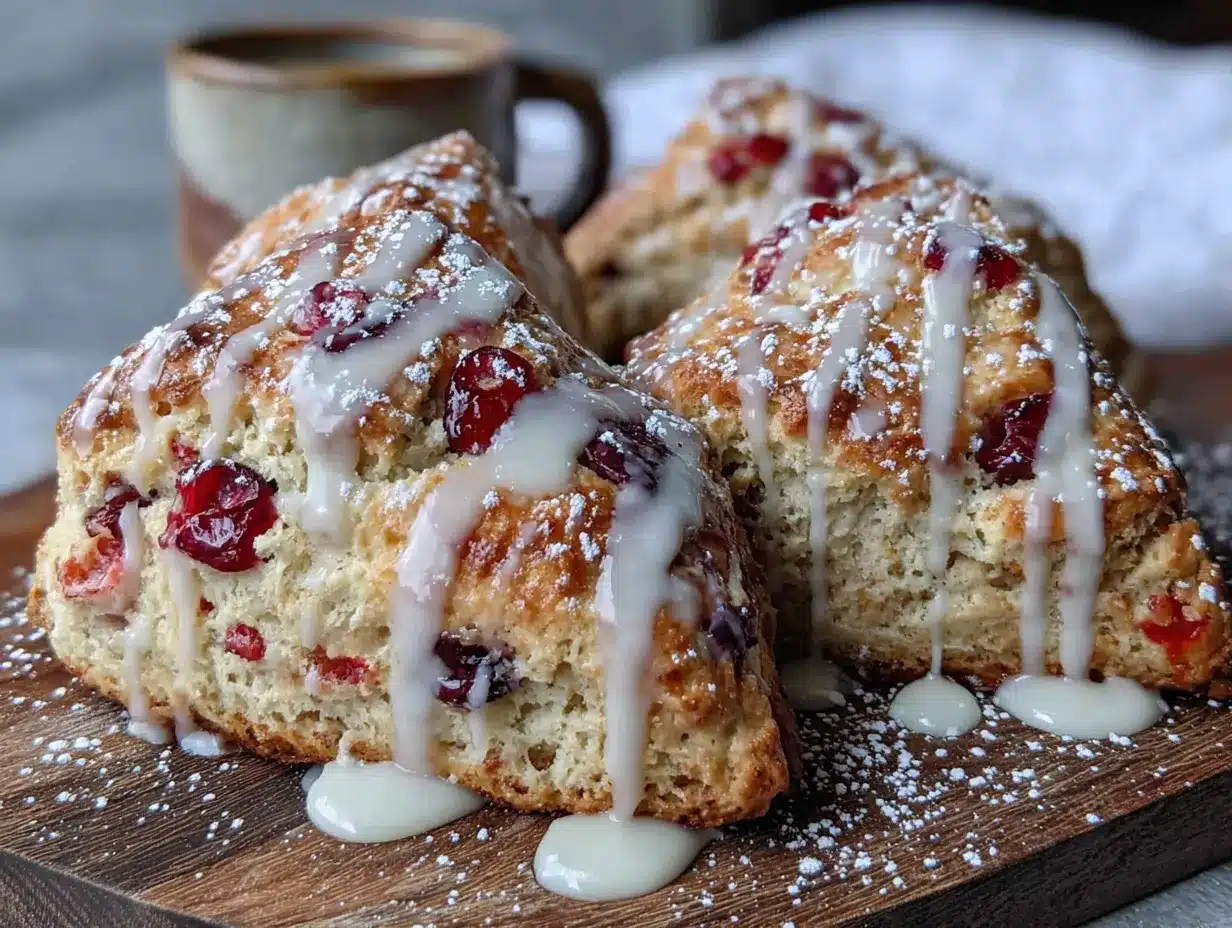
- Unbelievably Delicious: The combination of tart cranberries and bright orange zest is a classic for a reason. And that vanilla bean glaze? It’s the kind of topping that makes you close your eyes after the first bite.
What sets this recipe apart is the technique. Instead of overworking the dough (which makes scones tough), we use a method that keeps everything cold and handles the dough gently. The result is a scone that’s tender on the inside with those beautiful flaky layers on the outside. It’s comfort food that feels a little bit fancy but takes almost no effort. Perfect for turning a regular Tuesday morning into something memorable.
What Ingredients You Will Need
This recipe uses simple, wholesome ingredients to deliver bold flavor and satisfying texture without any fuss. Most of these are pantry staples, which makes this a great last-minute baking project.
- All-purpose flour: 2 cups (260 grams). This gives the scones their structure. I usually use Gold Medal or King Arthur, but any standard brand works fine.
- Granulated sugar: 1/3 cup (70 grams). Just enough to sweeten the scones without making them taste like cookies. You can reduce this to 1/4 cup if you prefer a less sweet scone.
- Baking powder: 1 tablespoon. Make sure it’s fresh! This is what gives the scones their lift. If your baking powder is more than six months old, it might be time for a new can.
- Salt: 1/2 teaspoon. Don’t skip this—it balances the sweetness and enhances the other flavors.
- Unsalted butter: 1/2 cup (113 grams), very cold and cut into small cubes. This is the most important ingredient. The cold butter creates steam pockets as it bakes, which gives you those flaky layers. I pop my butter in the freezer for 10 minutes before I start.
- Heavy cream: 1/2 cup (120 ml), plus more for brushing. The high fat content makes the scones tender and rich. If you only have whole milk, it’ll work, but the texture won’t be quite as luxurious.
- Fresh cranberries: 1 cup (about 100 grams), roughly chopped. If using frozen, don’t thaw them first—just chop them while they’re still frozen to prevent the dough from turning purple.
- Orange zest: 2 tablespoons from 1-2 large oranges. This is where the bright flavor comes from. Make sure to only zest the orange part, not the white pith, which is bitter.
- Vanilla extract: 1 teaspoon. A good-quality vanilla makes a difference here. I’m partial to Nielsen-Massey, but use what you have.
For the Vanilla Bean Glaze:
- Powdered sugar: 1 cup (120 grams), sifted. Sifting prevents lumps in your glaze.
- Vanilla bean: 1/2 a vanilla bean, or 1 teaspoon vanilla bean paste. This gives those beautiful little black specks that make the glaze look so elegant. If you don’t have a vanilla bean, use 1 1/2 teaspoons of good vanilla extract instead.
- Heavy cream or milk: 2-3 tablespoons. Add slowly until you reach a drizzling consistency. You want it thick enough to coat the back of a spoon but thin enough to drip.
Substitution Notes: For a dairy-free version, use cold coconut oil instead of butter and full-fat coconut cream instead of heavy cream. The texture will be slightly different but still delicious. If you can’t find fresh cranberries, dried cranberries work in a pinch—just reduce the sugar to 1/4 cup since dried cranberries are already sweetened.
Equipment Needed
You don’t need a fancy bakery setup for these scones. Here’s what you’ll actually use:
- Large mixing bowl: Any bowl will do. I use a ceramic one because it stays cool, but glass or metal is fine.
- Pastry cutter or two forks: For cutting the butter into the flour. I’ve used both, and honestly, a pastry cutter is faster and makes less of a mess. But forks work perfectly if that’s what you have.
- Box grater or microplane: For zesting the orange. A microplane is my go-to—it’s quick and gives you fine zest without the bitter pith.
- Chef’s knife and cutting board: For chopping the cranberries. A sharp knife makes this easier.
- Baking sheet: Line it with parchment paper for easy cleanup. I’ve forgotten the parchment before, and let me tell you, scraping scone residue off a pan is not fun.
- Pastry brush: For brushing cream on top before baking. If you don’t have one, use the back of a spoon.
- Cooling rack: Essential for letting the glaze set properly. If you glaze them on a hot baking sheet, the glaze will just melt right off.
- Small whisk or fork: For making the glaze. A fork works surprisingly well.
That’s it. No stand mixer required (though you can use one if you want). No special scone pans. Just basic kitchen tools you probably already own.
Preparation Method
Alright, let’s get to the good part. Here’s how to make these cranberry orange scones step by step. I’ve included all the little details I wish someone had told me the first time I made them.
- Preheat your oven to 400°F (200°C). Line a baking sheet with parchment paper. Getting the oven hot before you start mixing is key—you want the scones to hit that heat immediately for maximum rise.
- Prep your ingredients. Cube your cold butter and put it back in the fridge. Chop your cranberries (if using frozen, keep them in the freezer). Zest your orange. Measure out your flour and sugar. Having everything ready makes the process so much smoother, especially if you’re short on time.
- Mix the dry ingredients. In your large bowl, whisk together the flour, sugar, baking powder, and salt. Make sure the baking powder is evenly distributed—nobody wants a bite of pure baking powder.
- Cut in the butter. Add the cold butter cubes to the flour mixture. Using your pastry cutter or two forks, cut the butter into the flour until the mixture looks like coarse meal with some pea-sized butter pieces remaining. This is where the magic happens. Those little chunks of butter will melt in the oven and create steam pockets, giving you those flaky layers. Don’t overdo it—you want to see some butter pieces. I once got too enthusiastic and ended up with dough that was more like paste. The scones were dense and sad. Learn from my mistake.
- Add the wet ingredients. In a small bowl or measuring cup, whisk together the heavy cream, vanilla extract, and orange zest. Pour this into the flour-butter mixture. Add the chopped cranberries on top. Stir everything together with a fork or spatula until just combined. The dough will look shaggy and a bit dry—that’s exactly what you want. If it looks too dry to come together, add another tablespoon of cream. If it looks wet and sticky, you’ve added too much liquid.
- Bring the dough together. Turn the dough out onto a lightly floured surface. Use your hands to gently bring it together into a ball. Knead it just 2-3 times—any more and you’ll develop gluten, which makes scones tough. The dough should be cohesive but still a little rough-looking.
- Shape the scones. Pat the dough into a circle about 3/4-inch thick. Don’t roll it with a rolling pin—just use your hands. Using a sharp knife or bench scraper, cut the circle into 8 wedges like you’re cutting a pizza. Place the wedges on your prepared baking sheet, spacing them about 2 inches apart. They’ll spread a little as they bake.
- Brush with cream. Brush the tops of the scones with a little extra heavy cream. This helps them brown beautifully in the oven. If you want a little crunch, sprinkle some coarse sugar on top now.
- Bake. Pop them in the oven and bake for 14-18 minutes, until the scones are golden brown on the bottom and lightly golden on top. The timing depends on your oven and how thick you shaped them. Start checking at 14 minutes—you want them to be firm to the touch but not hard.
- Cool completely. Transfer the scones to a cooling rack and let them cool completely before glazing. I know it’s tempting to glaze them while they’re warm, but the glaze will just slide right off and pool on your rack. Trust me, I’ve been there. It’s a mess.
- Make the glaze. While the scones are cooling, make the glaze. Sift the powdered sugar into a small bowl. Split the vanilla bean lengthwise and scrape the seeds into the sugar. Add 2 tablespoons of cream and whisk until smooth. If it’s too thick, add another teaspoon of cream. If it’s too thin, add a little more powdered sugar. You want it to be thick enough to coat the back of a spoon but thin enough to drizzle.
- Glaze and serve. Once the scones are completely cool, drizzle the glaze over the top using a spoon or a piping bag with the tip cut off. Let the glaze set for about 10 minutes before serving. The scones are best eaten the day they’re made, but they’re still good the next day.
Cooking Tips & Techniques
After making these scones more times than I can count (and messing them up plenty of times), I’ve picked up a few tricks that make a real difference.
Keep everything cold. This is the number one rule of scone-making. Cold butter creates steam as it bakes, and that steam is what gives you light, flaky layers. If your butter softens while you’re working, pop the dough in the fridge for 10 minutes before baking. I once made the mistake of using room-temperature butter because I was in a hurry, and the scones came out flat and greasy. Not my finest baking moment.
Don’t overmix the dough. I cannot stress this enough. Mix until the dough just comes together. It should look a little shaggy and imperfect. Overmixing develops gluten, which makes scones tough and dense instead of tender and flaky. If you see streaks of flour, that’s okay. They’ll bake out.
Use a sharp knife to cut the scones. A dull knife will squish the edges together, which prevents them from rising properly. A sharp, clean cut gives the scones room to expand in the oven. I use a bench scraper, which works beautifully.
Freeze the scones before baking if you have time. This is a pro tip I learned from a pastry chef friend. After shaping the scones, pop them in the freezer for 15-20 minutes before baking. This firms up the butter even more, which means even flakier scones. It also helps them hold their shape better.
Bake from frozen for make-ahead convenience. You can freeze the shaped, unbaked scones on a baking sheet, then transfer them to a freezer bag once they’re solid. When you want fresh scones, just bake them straight from the freezer, adding 2-3 minutes to the baking time. This is a game-changer for busy mornings.
Watch the edges for doneness. The scones are done when the bottoms are golden brown and the edges look set. The tops should be lightly golden. If the tops are browning too quickly but the scones aren’t done yet, tent them loosely with foil for the last few minutes.
Let the glaze set before storing. If you’re stacking the scones or storing them in a container, make sure the glaze is completely set first. Otherwise, you’ll end up with a sticky, glazed mess. I learned this the hard way when I packed warm scones for a road trip and ended up with what looked like a vanilla bean crime scene.
Variations & Adaptations
One of the best things about this recipe is how easy it is to adapt. Here are some variations I’ve tried and loved:
Blueberry Lemon Scones: Swap the cranberries for fresh or frozen blueberries and use lemon zest instead of orange zest. The lemon-blueberry combo is classic for a reason. If using frozen blueberries, don’t thaw them—add them frozen to prevent the dough from turning blue.
White Chocolate Raspberry Scones: Add 1/2 cup of white chocolate chips along with the cranberries, and swap the orange zest for lemon zest. The sweetness of the white chocolate balances the tartness of the raspberries (or cranberries) beautifully. This version is a huge hit with kids.
Gluten-Free Version: Substitute the all-purpose flour with a good gluten-free baking blend that contains xanthan gum. I’ve had good results with Bob’s Red Mill 1-to-1 Baking Flour. The texture will be slightly more crumbly, but the flavor is still excellent. Add an extra tablespoon of cream to help the dough come together.
Vegan Version: Use cold coconut oil or vegan butter instead of dairy butter, and use full-fat coconut cream instead of heavy cream. For the glaze, use a vegan creamer or plant-based milk. The scones won’t be quite as flaky, but they’ll still be delicious and tender.
Savory-Sweet Twist: Reduce the sugar to 2 tablespoons, omit the vanilla extract, and add 1/2 cup of sharp cheddar cheese (shredded) along with the cranberries. The combination of sharp cheese and tart cranberries is surprisingly good. Serve these with soup or chili for a cozy meal.
Spiced Cranberry Orange: Add 1 teaspoon of cinnamon and 1/4 teaspoon of nutmeg to the dry ingredients. The warm spices complement the orange and cranberry flavors perfectly, making these scones feel extra cozy for fall and winter mornings.
My personal favorite variation? I add a handful of toasted pecans (about 1/3 cup, chopped) to the dough along with the cranberries. The crunch adds a lovely texture contrast, and the nutty flavor pairs beautifully with the orange and vanilla.
Serving & Storage Suggestions
These scones are best enjoyed warm, but they’re still wonderful at room temperature. Here’s how to serve and store them for the best experience.
Serving Temperature: If you’re serving them fresh from the oven, let them cool for at least 10 minutes before glazing. The glaze needs a dry surface to stick to. If you’re reheating day-old scones, pop them in a 300°F oven for 5 minutes to refresh them. The microwave works in a pinch, but it can make them a little chewy.
Presentation Ideas: Arrange the glazed scones on a pretty plate or cake stand. Sprinkle a little extra orange zest on top of the wet glaze for a pop of color. Serve with a side of clotted cream, mascarpone, or even a dollop of Greek yogurt. They’re also wonderful alongside a cup of hot tea or coffee.
Complementary Dishes: These scones are perfect for brunch. Serve them with a frittata or scrambled eggs, fresh fruit, and maybe some crispy bacon or sausage. For a lighter option, pair them with a simple arugula salad dressed with lemon vinaigrette. The peppery greens balance the sweetness of the scones beautifully.
Beverage Pairings: A cup of Earl Grey tea is my personal favorite with these scones. The bergamot in the tea echoes the orange flavor. A latte with oat milk is also lovely. For a special occasion, try them with a glass of sparkling wine or a mimosa.
Storage Instructions: Store unglazed scones in an airtight container at room temperature for up to 3 days. If you’ve already glazed them, store them in a single layer in an airtight container (or layer them with parchment paper between layers) at room temperature for up to 2 days. The glaze can get a little sticky if the scones are stored in a humid environment.
Freezing Instructions: You can freeze baked, unglazed scones for up to 3 months. Wrap them individually in plastic wrap, then place them in a freezer bag. To serve, thaw at room temperature, then refresh in a 300°F oven for 5 minutes. Glaze after reheating. You can also freeze the shaped, unbaked scones as I mentioned earlier, which is my preferred method for make-ahead convenience.
Flavor Development: These scones are actually best on the day they’re baked. The texture is at its peak—crisp on the outside, tender on the inside. By day two, the exterior softens a bit. That said, the flavors meld together nicely overnight, so day-old scones still taste wonderful, especially if you toast them lightly.
Nutritional Information & Benefits
Let’s be honest—scones are a treat, not a health food. But that doesn’t mean they can’t fit into a balanced diet. Here’s the nutritional breakdown for one scone (with glaze):
| Nutrient | Amount per Scone |
|---|---|
| Calories | ~320 |
| Total Fat | 16g |
| Saturated Fat | 10g |
| Carbohydrates | 42g |
| Sugar | 22g |
| Protein | 4g |
| Fiber | 1g |
| Sodium | 280mg |
While these aren’t low-calorie, they do offer some nutritional benefits. Cranberries are packed with antioxidants and vitamin C, which support immune health. Oranges are also an excellent source of vitamin C, and the zest contains beneficial plant compounds called flavonoids. The butter and cream provide a small amount of vitamin A and calcium.
Dietary Considerations: This recipe contains gluten, dairy, and eggs (if you use an egg wash). For a gluten-free version, see the variations above. For a dairy-free version, use coconut oil and coconut cream. The scones are nut-free as written, making them a safe option for school bake sales or nut-free households.
From a personal wellness perspective, I believe in enjoying treats in moderation. These scones are a wonderful occasional indulgence—perfect for a weekend brunch or a special holiday breakfast. They’re made with real, recognizable ingredients, which I love. No preservatives, no artificial flavors, just simple food made with love.
Conclusion
These cranberry orange scones have become a staple in my kitchen for good reason. They’re quick enough for a weekday morning but special enough for a holiday brunch. The combination of tart cranberries, bright orange zest, and that luscious vanilla bean glaze is simply irresistible. And honestly, the fact that they come together in about 30 minutes with minimal cleanup? That’s the kind of baking I can get behind.
I love that this recipe is forgiving. If you forget to chill the butter or you overmix a little, they’ll still taste amazing. They’re not finicky or fussy—they’re just good, honest scones that make any morning feel a little more special. Mr. Henderson was right. Sometimes the best recipes come from the most unexpected places.
I’d love to hear how these turn out for you! Did you try any of the variations? Did you add your own twist? Drop a comment below and let me know. And if you share them on social media, tag me—I love seeing your baking adventures. Happy baking, friends!
Frequently Asked Questions
Can I use dried cranberries instead of fresh?
Yes, you can! Dried cranberries are sweeter than fresh, so I recommend reducing the sugar in the recipe to 1/4 cup. Also, dried cranberries won’t release as much moisture during baking, so the texture of the scones will be slightly different—a bit more dense. If using dried, you might want to rehydrate them in warm water or orange juice for 10 minutes, then drain them well before adding to the dough.
Why did my scones turn out flat?
Flat scones usually happen for one of three reasons: your butter was too warm, your baking powder was old, or you overmixed the dough. Make sure your butter is very cold (pop it in the freezer for 10 minutes before using), check that your baking powder is fresh (less than 6 months old), and mix the dough only until it just comes together. If your kitchen is warm, you can also chill the shaped scones for 15-20 minutes before baking.
Can I make the dough ahead of time?
Absolutely! You can prepare the dough, shape the scones, and refrigerate them on a baking sheet for up to 24 hours before baking. Just cover them loosely with plastic wrap. You can also freeze the shaped, unbaked scones for up to 3 months. Bake from frozen, adding 2-3 minutes to the baking time. This is my favorite way to have fresh scones on busy mornings.
How do I get the glaze to look so smooth?
The key to a smooth glaze is sifting your powdered sugar before mixing. Lumps in the sugar create lumps in the glaze. Also, add the liquid slowly—start with 2 tablespoons and add more a teaspoon at a time until you reach the right consistency. Whisk vigorously until the glaze is smooth and glossy. If you’re using vanilla bean, make sure to scrape the seeds evenly into the sugar and whisk well to distribute them.
Can I make these scones without a pastry cutter?
Definitely! You can use two forks to cut the butter into the flour, or you can use your fingertips (just work quickly so the butter doesn’t warm up). Some people even use a food processor—just pulse the dry ingredients with the butter until the mixture looks like coarse meal, then transfer to a bowl and add the wet ingredients. Just be careful not to over-process if using a food processor. A few pulses is all you need.
Pin This Recipe!

Easy Cranberry Orange Scones with Vanilla Glaze

These tender, flaky cranberry orange scones are quick to make in about 30 minutes with simple ingredients. Topped with a luscious vanilla bean glaze, they’re perfect for busy mornings or special brunches.
- Prep Time: 15 minutes
- Cook Time: 16 minutes
- Total Time: 31 minutes
- Yield: 8 servings 1x
- Category: Breakfast
- Cuisine: American
Ingredients
- 2 cups (260 grams) all-purpose flour
- 1/3 cup (70 grams) granulated sugar
- 1 tablespoon baking powder
- 1/2 teaspoon salt
- 1/2 cup (113 grams) unsalted butter, very cold and cut into small cubes
- 1/2 cup (120 ml) heavy cream, plus more for brushing
- 1 cup (about 100 grams) fresh cranberries, roughly chopped
- 2 tablespoons orange zest (from 1–2 large oranges)
- 1 teaspoon vanilla extract
- 1 cup (120 grams) powdered sugar, sifted
- 1/2 vanilla bean (or 1 teaspoon vanilla bean paste)
- 2–3 tablespoons heavy cream or milk (for glaze)
Instructions
- Preheat your oven to 400°F (200°C). Line a baking sheet with parchment paper.
- Prep your ingredients: cube the cold butter and return it to the fridge; chop the cranberries (if frozen, keep them frozen); zest the orange; measure out flour and sugar.
- In a large bowl, whisk together the flour, sugar, baking powder, and salt until evenly combined.
- Add the cold butter cubes to the flour mixture. Using a pastry cutter or two forks, cut the butter into the flour until the mixture resembles coarse meal with some pea-sized butter pieces remaining.
- In a small bowl or measuring cup, whisk together the heavy cream, vanilla extract, and orange zest. Pour this into the flour-butter mixture. Add the chopped cranberries on top. Stir with a fork or spatula until just combined. The dough will look shaggy and slightly dry.
- Turn the dough out onto a lightly floured surface. Gently bring it together into a ball with your hands, kneading just 2-3 times. The dough should be cohesive but still rough-looking.
- Pat the dough into a circle about 3/4-inch thick. Using a sharp knife or bench scraper, cut the circle into 8 wedges. Place the wedges on the prepared baking sheet, spacing them about 2 inches apart.
- Brush the tops of the scones with a little extra heavy cream. If desired, sprinkle with coarse sugar.
- Bake for 14-18 minutes, until the scones are golden brown on the bottom and lightly golden on top. Start checking at 14 minutes.
- Transfer the scones to a cooling rack and let them cool completely before glazing.
- While the scones cool, make the glaze: Sift the powdered sugar into a small bowl. Split the vanilla bean lengthwise and scrape the seeds into the sugar. Add 2 tablespoons of cream and whisk until smooth. If too thick, add another teaspoon of cream; if too thin, add more powdered sugar.
- Once the scones are completely cool, drizzle the glaze over the top. Let the glaze set for about 10 minutes before serving.
Notes
Keep all ingredients cold for flaky layers. Do not overmix the dough. For make-ahead convenience, freeze shaped unbaked scones and bake from frozen, adding 2-3 minutes to the baking time. Scones are best eaten the day they are made.
Nutrition
- Serving Size: 1 scone
- Calories: 320
- Sugar: 22
- Sodium: 280
- Fat: 16
- Saturated Fat: 10
- Carbohydrates: 42
- Fiber: 1
- Protein: 4
Keywords: cranberry orange scones, easy scone recipe, vanilla glaze, breakfast pastry, brunch recipe, homemade scones