I was supposed to be making a proper chocolate mousse that Halloween. You know, the fancy kind with egg whites and all that careful folding. My niece was coming over in her tiny unicorn costume, and I had this whole vision of elegant little glasses with perfect layers and maybe even some gold sprinkles. Honestly, I don’t know what I was thinking. I grabbed the wrong pudding mix from the pantry — instant chocolate instead of the cook-and-serve stuff I needed for the real mousse. The power was flickering from a storm outside, my phone kept buzzing with costume emergency texts, and I was already running late from a work call that ran way too long.
So there I was, standing in a messy kitchen with instant pudding that was never going to whip into that elegant mousse. I almost scraped the whole thing. But then I remembered my nephew’s birthday party last year, where the kids went absolutely crazy for those store-bought dirt cups. And I thought — well, I’ve got the chocolate part. I’ve got some Oreos in the pantry that are probably getting stale. And I definitely have those gummy worms I bought as a joke for my desk drawer. The universe was practically telling me to stop trying so hard.
What came out of that frustrated, distracted moment was nothing like the plan. And it was better. Way better. These Easy Halloween Dirt Cups with Gummy Worms are now the thing I’m actually known for at every fall gathering. They take ten minutes — I mean it, ten minutes — and they disappear faster than anything else on the dessert table. Maybe you’ve been there, staring at a failed kitchen project and wondering if you should just order pizza. Let me tell you, sometimes the best recipes come from the messiest moments. This one stuck with me because it taught me something: not every dessert needs to be fancy to be unforgettable.
Why You Will Love This Recipe
These dirt cups aren’t just cute — they are genuinely the easiest Halloween dessert you will ever make. I have tested this with three different pudding brands, two types of cookies, and even a dairy-free version that my lactose-intolerant friend begged me to make again. After all that trial and error, I can tell you with full confidence that this version is the one. It’s the kind of recipe that makes you look like a Halloween hero with almost zero effort.
- Quick and Easy: From start to finish, these come together in under ten minutes. Seriously. If you can stir pudding and crush cookies, you can make these. Perfect for those last-minute Halloween parties or when the kids suddenly announce they need treats for school tomorrow.
- Simple Ingredients: You probably have most of this stuff in your kitchen right now. No special trips to fancy baking stores. No weird ingredients you will never use again. Just pudding, cookies, cream, and gummy worms.
- Perfect for Halloween: These are the ultimate crowd-pleaser for Halloween parties, classroom celebrations, or spooky movie nights. Kids go absolutely wild for them, and adults secretly love them too — I’ve caught more than a few parents sneaking seconds.
- Crowd-Pleaser: I have yet to meet a single person who doesn’t smile when they see these little cups of chocolate dirt with worms poking out. It’s pure nostalgia in a cup, and everyone wants one.
- Unbelievably Delicious: Forget the boxed pudding taste you remember from childhood. With a few simple tricks — like using whole milk and letting the pudding set properly — these taste rich, creamy, and completely satisfying. The crushed cookies add that perfect crunch, and the gummy worms are just pure fun.
What makes this recipe different from all the other dirt cup recipes out there is the texture. I experimented with different cookie-to-pudding ratios until I found the sweet spot where every bite has both creamy and crunchy elements. Plus, I figured out a trick for making the “dirt” look genuinely realistic — you will see that in the tips section. This isn’t just another version of a Halloween classic. It is my best version, tested and perfected over many batches.
This recipe is the kind that makes you close your eyes after the first bite. It is comfort food reimagined — a little bit nostalgic, a little bit playful, and completely satisfying. Perfect for impressing your kids’ friends without stress, or turning a simple Tuesday night into something memorable. And honestly, it makes you feel good about serving something that comes together so fast.
What Ingredients You Will Need
This recipe uses simple, everyday ingredients to create something that feels special. The beauty of these Easy Halloween Dirt Cups with Gummy Worms is that everything is probably already in your pantry or fridge. Here is what you will need, broken down so you know exactly what each part does.
For the Pudding Layer
- 2 (3.9 oz) boxes instant chocolate pudding mix — I prefer Jell-O brand for the creamiest texture, but store brands work fine too. Make sure it is instant, not cook-and-serve, or the texture will be wrong.
- 3 cups cold whole milk — Whole milk gives the richest, creamiest pudding. You can use 2% in a pinch, but avoid skim milk — the pudding won’t set as firmly and will be watery. For a dairy-free version, use full-fat oat milk or canned coconut milk (the kind in a carton, not the can).
- 1 teaspoon vanilla extract — This is optional but adds a lovely depth of flavor that makes the pudding taste more homemade. Pure vanilla is best, but imitation works fine.
For the Dirt Layer
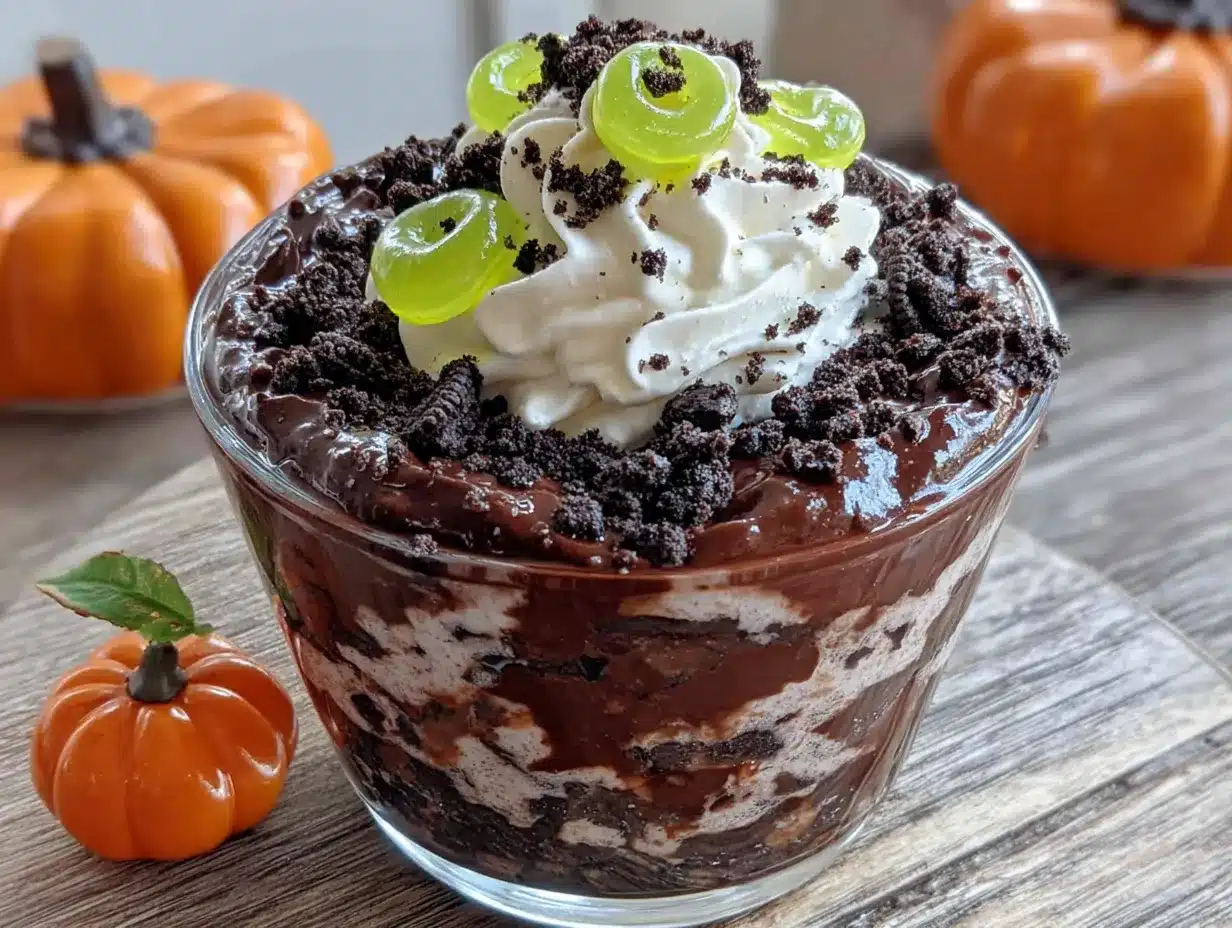
- 1 (14.3 oz) package chocolate sandwich cookies — Oreos are the classic choice, and I recommend them for the best flavor and texture. The generic versions work, but they tend to be a little less chocolatey. You will need about 20 cookies total.
- 2 tablespoons melted butter — This is my secret trick for making the dirt look and taste more realistic. It helps the crushed cookies clump together slightly, mimicking real soil texture. Use salted butter for a nice contrast with the sweet pudding.
For the Decoration
- 1 cup gummy worms — Get the colorful sour kind for the most visual impact. I like the Trolli brand because they are bright and hold their shape well. You can also use gummy bugs or spiders for variety.
- Optional: ½ cup crushed graham crackers — Mix this with the Oreo crumbs for a more varied “dirt” texture. It adds a subtle sweetness and makes the dirt look even more realistic.
- Optional: Green food coloring — A drop mixed into a little coconut flakes makes cute “grass” if you want to get fancy. Totally optional, but kids love it.
For Serving
- 6 (8 oz) clear plastic cups or small glass jars — Clear cups are essential so you can see the layers. I use the plastic cups from the party supply store because they are cheap and disposable. For a more eco-friendly option, use small mason jars or repurposed jelly jars.
- 6 small paper tags or stickers — Optional, but fun for labeling each cup with a spooky name like “Worm Habitat” or “Dirt Pudding.”
Ingredient Selection Tips: When choosing your pudding mix, look for boxes that aren’t dented or expired. I once used an old box and the pudding never set properly — it was a soupy mess. For the cookies, check that the package is sealed tightly. Stale cookies won’t crush into nice crumbs; they will turn into dusty powder. And for the gummy worms, buy them fresh — stale gummy worms get hard and chewy in a bad way.
Substitution Guidance: If you are gluten-free, use gluten-free chocolate sandwich cookies (Kinnikinnick makes a good one) and check that your pudding mix is certified gluten-free. For a lower-sugar version, use sugar-free pudding mix and sugar-free cookies. The texture will be slightly different, but still delicious. And if you don’t have gummy worms, any gummy candy works — I have used gummy frogs and even gummy brains for a different look.
Equipment Needed
One of the best things about this recipe is that you don’t need any fancy equipment. Here is what you will need to make these Easy Halloween Dirt Cups with Gummy Worms:
- Large mixing bowl — For making the pudding. Any large bowl works, but a glass or ceramic bowl is best because it doesn’t retain odors.
- Whisk — For mixing the pudding. A balloon whisk works great, but a fork will do in a pinch if you whisk vigorously.
- Food processor or zip-top bag and rolling pin — For crushing the cookies. A food processor makes the finest, most even crumbs. But if you don’t have one, just put the cookies in a zip-top bag and smash them with a rolling pin. It is oddly satisfying and a great way to let kids help.
- Small bowl — For mixing the crushed cookies with melted butter.
- Measuring cups and spoons — For accurate measurements. I cannot stress this enough — pudding is finicky about liquid ratios.
- 6 clear cups or jars — For serving. Clear is non-negotiable if you want the layers to show.
- Spatula — For scraping every last bit of pudding into the cups. Waste not, want not.
- Refrigerator — For setting the pudding. You will need space for the cups to sit undisturbed for at least 30 minutes.
Budget-Friendly Options: Skip the food processor and use the bag-and-rolling-pin method — it is free and works perfectly. Use repurposed glass jars from pasta sauce or jam instead of buying new cups. And if you don’t have a whisk, two forks held together work surprisingly well for mixing pudding.
Personal Experience: I used to make these with a hand mixer because I thought it would make the pudding fluffier. Turns out, overmixing instant pudding makes it thin and runny. A simple whisk is all you need. Also, I learned the hard way that using a metal bowl for the pudding can leave a slight metallic taste if you let it sit too long. Stick with glass or ceramic.
Preparation Method
Follow these steps carefully, and you will have perfect Easy Halloween Dirt Cups with Gummy Worms in about ten minutes of active work. The hardest part is waiting for the pudding to set.
- Make the pudding: In a large mixing bowl, combine the two boxes of instant chocolate pudding mix with 3 cups of cold whole milk. Whisk vigorously for about 2 minutes, until the mixture starts to thicken. You will feel it getting heavier as you whisk. Add the vanilla extract and whisk for another 30 seconds. The pudding should be thick enough to coat the back of a spoon but still pourable. If it seems too thin, let it sit for 2 minutes and whisk again — it will continue to thicken as it sits.
- Crush the cookies: While the pudding is resting, prepare the dirt layer. Place the chocolate sandwich cookies (cream filling and all) into a food processor. Pulse about 10 times, until the cookies are broken into fine crumbs with a few slightly larger pieces for texture. If you are using the bag method, put the cookies in a zip-top bag, seal it, and smash them with a rolling pin until you have a mix of fine crumbs and small chunks. You want about 2 cups of crumbs total.
- Add the butter: Transfer the cookie crumbs to a small bowl. Pour the melted butter over the crumbs and stir with a fork until the butter is evenly distributed. The crumbs should look slightly damp and clump together when pressed. This is what makes the dirt look so realistic — the butter gives it that slightly moist, earthy appearance. Set aside.
- Layer the cups: Take your six clear cups and start building. Spoon about 2 tablespoons of the cookie crumbs into the bottom of each cup. Press down lightly with the back of the spoon to create an even base layer. This bottom layer keeps the pudding from making the dirt soggy.
- Add the pudding: Divide the pudding evenly among the six cups, spooning it over the cookie base. Use about ⅓ cup of pudding per cup. Tap each cup gently on the counter to settle the pudding and remove any air bubbles. The pudding should come about halfway up the cup.
- Top with dirt: Sprinkle the remaining cookie crumbs over the pudding, covering it completely. Use about 2 to 3 tablespoons per cup. You want a thick layer that completely hides the chocolate pudding underneath. This is the “dirt” that the worms will poke through.
- Add the worms: Take two or three gummy worms per cup. Gently push them into the dirt layer so that part of the worm is buried and part is sticking out. Arrange them at different angles for a more natural look — some worms crawling out, some diving in. If you want to get creative, have one worm draped over the edge of the cup.
- Chill: Place the cups in the refrigerator for at least 30 minutes, or up to 24 hours. The chilling time allows the pudding to set completely and the flavors to meld together. The longer they sit, the better they taste — the cookie crumbs soften slightly and absorb some of the pudding’s moisture, which makes the texture even more like real dirt.
- Serve: Take the cups out of the fridge about 5 minutes before serving. This takes the chill off and makes the pudding creamier. Add any optional decorations like green coconut grass or extra gummy worms on top. Serve with a small spoon and watch everyone’s face light up.
Sensory Cues: When the pudding is ready, it should look thick and glossy, like dark chocolate sauce that has started to set. The cookie crumbs should look like rich, dark soil — slightly clumpy and damp. When you push a gummy worm in, you should feel a little resistance from the dirt layer, and the worm should stay put without falling over.
Troubleshooting: If your pudding doesn’t thicken, you might have used warm milk or the wrong type of pudding mix. Instant pudding needs cold milk to set properly. If it is still runny after 5 minutes, whisk in an extra tablespoon of pudding mix. If your cookie crumbs are too powdery, you over-processed them. Next time, pulse less. If they are too chunky, put them back in the bag and smash them a bit more.
Cooking Tips and Techniques
After making these Easy Halloween Dirt Cups with Gummy Worms at least twenty times (I am not exaggerating), I have picked up some tricks that make a real difference. Here is what I have learned the hard way so you don’t have to.
The Milk Temperature Matters: This is the most important tip I can give you. The milk must be cold — straight from the refrigerator cold. If the milk is even slightly warm, the pudding will not set properly. I learned this the hard way when I left the milk out while crushing the cookies, and the pudding turned into chocolate soup. If you forget to put the milk in the fridge beforehand, pour it into a bowl and set it in the freezer for 10 minutes before using.
Don’t Overmix the Pudding: Instant pudding is not like homemade pudding. You do not need to beat it until it is fluffy. Overmixing incorporates too much air and breaks down the thickening agents, resulting in thin, watery pudding. Whisk just until the powder is dissolved and the mixture starts to thicken — about 2 minutes. Stop as soon as you see it holding soft peaks.
The Butter Trick for Realistic Dirt: This is the tip that takes these from good to great. Adding melted butter to the crushed cookies does two things. First, it makes the crumbs clump together slightly, which looks exactly like real soil. Second, it adds a subtle richness that balances the sweetness of the pudding. Do not skip this step — it is what makes people ask, “How did you get the dirt to look so real?”
Layer Strategically: The order of layers matters more than you think. The bottom cookie layer acts as a barrier that prevents the pudding from making the top dirt soggy. If you skip this bottom layer, the worms will sink into the pudding and the dirt will turn into a muddy mess. Trust me on this one — I learned it after making a batch that looked like chocolate swamp water.
Timing is Everything: These are best made at least an hour before serving, but no more than 24 hours ahead. If you make them too far in advance, the gummy worms will start to dissolve and the cookie crumbs will get too soft. If you serve them immediately, the pudding won’t be set enough and the layers will slide around. That sweet spot of 1 to 24 hours in the fridge is where the magic happens.
Let Kids Help: This is the perfect recipe for getting little hands involved. Let them crush the cookies in the bag (supervised, of course), spoon the crumbs into the cups, and push the gummy worms into the dirt. The mess is part of the fun, and they will be so proud of their creations. I have made these with kids as young as three, and they always have a blast.
Variations and Adaptations
One of the best things about these Easy Halloween Dirt Cups with Gummy Worms is how easily they adapt to different tastes and dietary needs. Here are some variations I have tried and loved.
Peanut Butter Dirt Cups: Add ¼ cup of creamy peanut butter to the pudding mix along with the milk. Whisk until smooth. The peanut butter adds a rich, savory note that pairs beautifully with the chocolate. Use Reese’s Pieces instead of gummy worms for a peanut butter cup vibe. My husband says this version is his favorite, and he requests it for every Halloween party.
Vegan Dirt Cups: Use full-fat oat milk or canned coconut milk for the pudding. I like Oatly brand because it is creamy and doesn’t have a strong flavor. Use vegan chocolate sandwich cookies (like Oreos, which are accidentally vegan) and vegan butter. For the gummy worms, look for vegan options made without gelatin — they are widely available at health food stores. The texture is slightly different but still delicious.
Gluten-Free Dirt Cups: Use gluten-free chocolate sandwich cookies and double-check that your pudding mix is certified gluten-free. Most instant pudding mixes are gluten-free, but some brands use wheat starch as a thickener. Kinnikinnick makes excellent gluten-free Oreo-style cookies that work perfectly. Everything else in the recipe is naturally gluten-free.
Pumpkin Spice Dirt Cups: For a fall twist, use vanilla pudding instead of chocolate and add ½ cup of pumpkin puree and 1 teaspoon of pumpkin pie spice to the pudding mix. Use crushed graham crackers for the dirt instead of Oreos. Top with candy corn instead of gummy worms. This version is perfect for Thanksgiving or fall harvest parties.
Low-Sugar Dirt Cups: Use sugar-free chocolate pudding mix and sugar-free chocolate sandwich cookies. The texture will be slightly less creamy, but the overall effect is the same. I have made this version for friends who are watching their sugar intake, and they were thrilled to have a Halloween treat that fit their diet.
Individual Trifle Version: For a more elegant presentation, layer the ingredients in a large glass trifle bowl instead of individual cups. Double the recipe, and alternate layers of cookie crumbs, pudding, and more cookie crumbs. Top with extra gummy worms and a few chocolate shavings. This is great for parties where you want a showstopper centerpiece.
Serving and Storage Suggestions
These Easy Halloween Dirt Cups with Gummy Worms are best served cold, straight from the refrigerator. The contrast between the cold, creamy pudding and the slightly crunchy dirt is what makes them so satisfying. Here is everything you need to know about serving and storing them.
Serving Temperature: Take the cups out of the fridge about 5 to 10 minutes before serving. This takes the chill off the pudding and allows the flavors to open up. If they are too cold, the pudding will taste flat. If they sit out too long (more than 30 minutes), the cookie crumbs will start to get soggy and the gummy worms will soften.
Presentation Ideas: Arrange the cups on a platter or tray and garnish with extra gummy worms around the base. You can also add little plastic spiders or Halloween-themed picks for extra spookiness. For a party, label each cup with a small tag — “Worm Habitat,” “Dirt Pudding,” “Spooky Treat.” Kids love reading the names and choosing their favorite.
Complementary Dishes: These dirt cups pair perfectly with other Halloween treats. Serve them alongside pumpkin-shaped sugar cookies, caramel apples, or a bowl of popcorn balls. For drinks, offer apple cider, hot chocolate, or a spooky punch made with lime sherbet and ginger ale. The combination of flavors and textures makes for a memorable dessert spread.
Storage Instructions: Store any leftover dirt cups in the refrigerator, covered with plastic wrap or with their lids on. They will keep for up to 3 days, but they are best within the first 24 hours. After that, the cookie crumbs start to soften and the gummy worms begin to dissolve. If you need to make them further in advance, prepare the pudding and cookie crumbs separately and assemble the cups no more than 24 hours before serving.
Freezing: I do not recommend freezing these dirt cups. The pudding will separate when thawed, and the texture will be watery and unpleasant. If you have leftover components, freeze the crushed cookies in a zip-top bag for up to 3 months, and freeze the gummy worms in their original packaging. The pudding does not freeze well at all.
Reheating: These are meant to be served cold, so no reheating is needed. If you accidentally leave them out and they get too warm, just pop them back in the fridge for 30 minutes to firm up again. The texture won’t be quite as good, but they will still be tasty.
Flavor Development: Interestingly, these dirt cups taste better after a few hours in the fridge. The cookie crumbs absorb a little moisture from the pudding, which softens them and makes the texture more cohesive. The flavors meld together, and the chocolate becomes richer. If you can wait, make them the morning of your party for the best results.
Nutritional Information and Benefits
While these Easy Halloween Dirt Cups with Gummy Worms are definitely a treat, they can be part of a balanced approach to eating. Here is what you need to know about their nutritional profile.
Estimated Nutritional Values (per serving, based on 6 servings):
- Calories: 380
- Total Fat: 16g
- Saturated Fat: 8g
- Cholesterol: 25mg
- Sodium: 520mg
- Total Carbohydrates: 56g
- Dietary Fiber: 2g
- Sugars: 38g
- Protein: 7g
Health Benefits of Key Ingredients: Chocolate pudding made with milk provides calcium and vitamin D, which are important for bone health. The cocoa in the pudding mix contains antioxidants called flavonoids, which may support heart health. Gummy worms are mostly sugar, but they do provide a small amount of gelatin, which is a source of protein. The cookies offer a small amount of iron from the enriched flour.
Dietary Considerations: This recipe can be adapted for several dietary needs. For a gluten-free version, use gluten-free cookies and check your pudding mix. For a dairy-free version, use plant-based milk and vegan butter. For a lower-sugar version, use sugar-free pudding and cookies. However, the standard recipe contains dairy and gluten, and it is not suitable for vegans without modifications.
Potential Allergens: This recipe contains milk (in the pudding), wheat (in the cookies), and soy (in the cookies and some pudding mixes). Gummy worms may contain gelatin, which is derived from animal products. Always check labels if you are serving someone with allergies.
Personal Wellness Perspective: I believe in balance when it comes to treats like these. They are not an everyday food, but they are perfect for special occasions like Halloween parties and family gatherings. The portion size is controlled — one small cup per person — which makes it easier to enjoy without overindulging. And honestly, the joy they bring is worth every calorie. Food is about more than nutrition; it is about connection, celebration, and making memories. These dirt cups deliver on all three.
Conclusion
These Easy Halloween Dirt Cups with Gummy Worms started as a failed attempt at something fancy, and they turned into one of my most-requested recipes. That is the thing about cooking — sometimes the best dishes come from the moments when everything goes wrong. You grab the wrong ingredient, you get distracted, you give up on the original plan. And then something better emerges from the chaos.
I love this recipe because it is proof that you don’t need complicated techniques or rare ingredients to make something memorable. Ten minutes, six ingredients, and a little bit of creativity — that is all it takes to create a Halloween dessert that kids and adults will fight over. The creamy chocolate pudding, the crunchy cookie dirt, the silly gummy worms poking out — it is pure joy in a cup.
I encourage you to make these your own. Add peanut butter if you love that combination. Use vanilla pudding for a different look. Let your kids go wild with the decorations. The beauty of this recipe is that it is forgiving and flexible. There is no wrong way to make it.
Have you made these dirt cups before? Do you have a favorite variation I should try? I would love to hear about your creations in the comments below. Share your photos, your tips, and your own happy accidents. And if you try this recipe, let me know how it turns out. Happy Halloween, and happy cooking!
Frequently Asked Questions
Can I use homemade pudding instead of instant?
You can, but the texture will be different. Homemade pudding is softer and less firm than instant pudding, so the layers may not hold as well. If you want to use homemade, cook it until it is very thick and let it cool completely before layering. The result will be creamier but less structured.
How far in advance can I make these dirt cups?
You can make them up to 24 hours in advance. Any longer than that, and the cookie crumbs will get too soft and the gummy worms will start to dissolve. For the best texture, assemble them the morning of your party or event.
Can I use a different type of cookie for the dirt?
Absolutely. Chocolate wafer cookies, graham crackers, or even chocolate chip cookies work well. Each gives a slightly different flavor and texture. Chocolate wafers make a darker, more intense dirt, while graham crackers create a lighter, sweeter version. Feel free to experiment.
What if I don’t have clear cups?
You can use any small cups or bowls, but clear cups are best because they show off the layers. If you use opaque cups, the surprise of the dirt and worms is still there, but the visual effect is less dramatic. Small mason jars or repurposed jelly jars work great if you want a reusable option.
Can I make these without dairy?
Yes. Use full-fat oat milk or canned coconut milk for the pudding, and use vegan butter or coconut oil for the cookie crumbs. Most chocolate sandwich cookies are accidentally vegan, so check the label. The texture will be slightly different, but they are still delicious and perfect for anyone avoiding dairy.
PrintEasy Halloween Dirt Cups with Gummy Worms: Best 10-Minute Dessert
These Easy Halloween Dirt Cups with Gummy Worms are the ultimate 10-minute dessert for spooky celebrations. With creamy chocolate pudding, crunchy Oreo dirt, and playful gummy worms, they’re a crowd-pleasing treat that kids and adults love.
- Prep Time: 10 minutes
- Cook Time: 0 minutes
- Total Time: 40 minutes (including chilling)
- Yield: 6 servings 1x
- Category: Dessert
- Cuisine: American
Ingredients
- 2 (3.9 oz) boxes instant chocolate pudding mix
- 3 cups cold whole milk
- 1 teaspoon vanilla extract
- 1 (14.3 oz) package chocolate sandwich cookies (e.g., Oreos, about 20 cookies)
- 2 tablespoons melted butter
- 1 cup gummy worms
- Optional: ½ cup crushed graham crackers
- Optional: Green food coloring
- Optional: 6 small paper tags or stickers
Instructions
- In a large mixing bowl, combine the two boxes of instant chocolate pudding mix with 3 cups of cold whole milk. Whisk vigorously for about 2 minutes, until the mixture starts to thicken. Add the vanilla extract and whisk for another 30 seconds. The pudding should be thick enough to coat the back of a spoon but still pourable.
- While the pudding is resting, prepare the dirt layer. Place the chocolate sandwich cookies (cream filling and all) into a food processor. Pulse about 10 times, until the cookies are broken into fine crumbs with a few slightly larger pieces for texture. Alternatively, put the cookies in a zip-top bag and smash them with a rolling pin until you have a mix of fine crumbs and small chunks. You want about 2 cups of crumbs total.
- Transfer the cookie crumbs to a small bowl. Pour the melted butter over the crumbs and stir with a fork until the butter is evenly distributed. The crumbs should look slightly damp and clump together when pressed. Set aside.
- Take six clear cups and start building. Spoon about 2 tablespoons of the cookie crumbs into the bottom of each cup. Press down lightly with the back of the spoon to create an even base layer.
- Divide the pudding evenly among the six cups, spooning it over the cookie base. Use about ⅓ cup of pudding per cup. Tap each cup gently on the counter to settle the pudding and remove any air bubbles. The pudding should come about halfway up the cup.
- Sprinkle the remaining cookie crumbs over the pudding, covering it completely. Use about 2 to 3 tablespoons per cup. You want a thick layer that completely hides the chocolate pudding underneath.
- Take two or three gummy worms per cup. Gently push them into the dirt layer so that part of the worm is buried and part is sticking out. Arrange them at different angles for a more natural look.
- Place the cups in the refrigerator for at least 30 minutes, or up to 24 hours. The chilling time allows the pudding to set completely and the flavors to meld together.
- Take the cups out of the fridge about 5 minutes before serving. Add any optional decorations like green coconut grass or extra gummy worms on top. Serve with a small spoon.
Notes
Use cold milk for the pudding to set properly. Don’t overmix the pudding. The butter trick makes the dirt look realistic. Layer strategically with a bottom cookie layer to prevent sogginess. Best made 1 to 24 hours ahead. Let kids help crush cookies and add worms.
Nutrition
- Serving Size: 1 cup
- Calories: 380
- Sugar: 38
- Sodium: 520
- Fat: 16
- Saturated Fat: 8
- Carbohydrates: 56
- Fiber: 2
- Protein: 7
Keywords: Halloween dessert, dirt cups, gummy worms, chocolate pudding, easy dessert, no-bake, kid-friendly, spooky treat