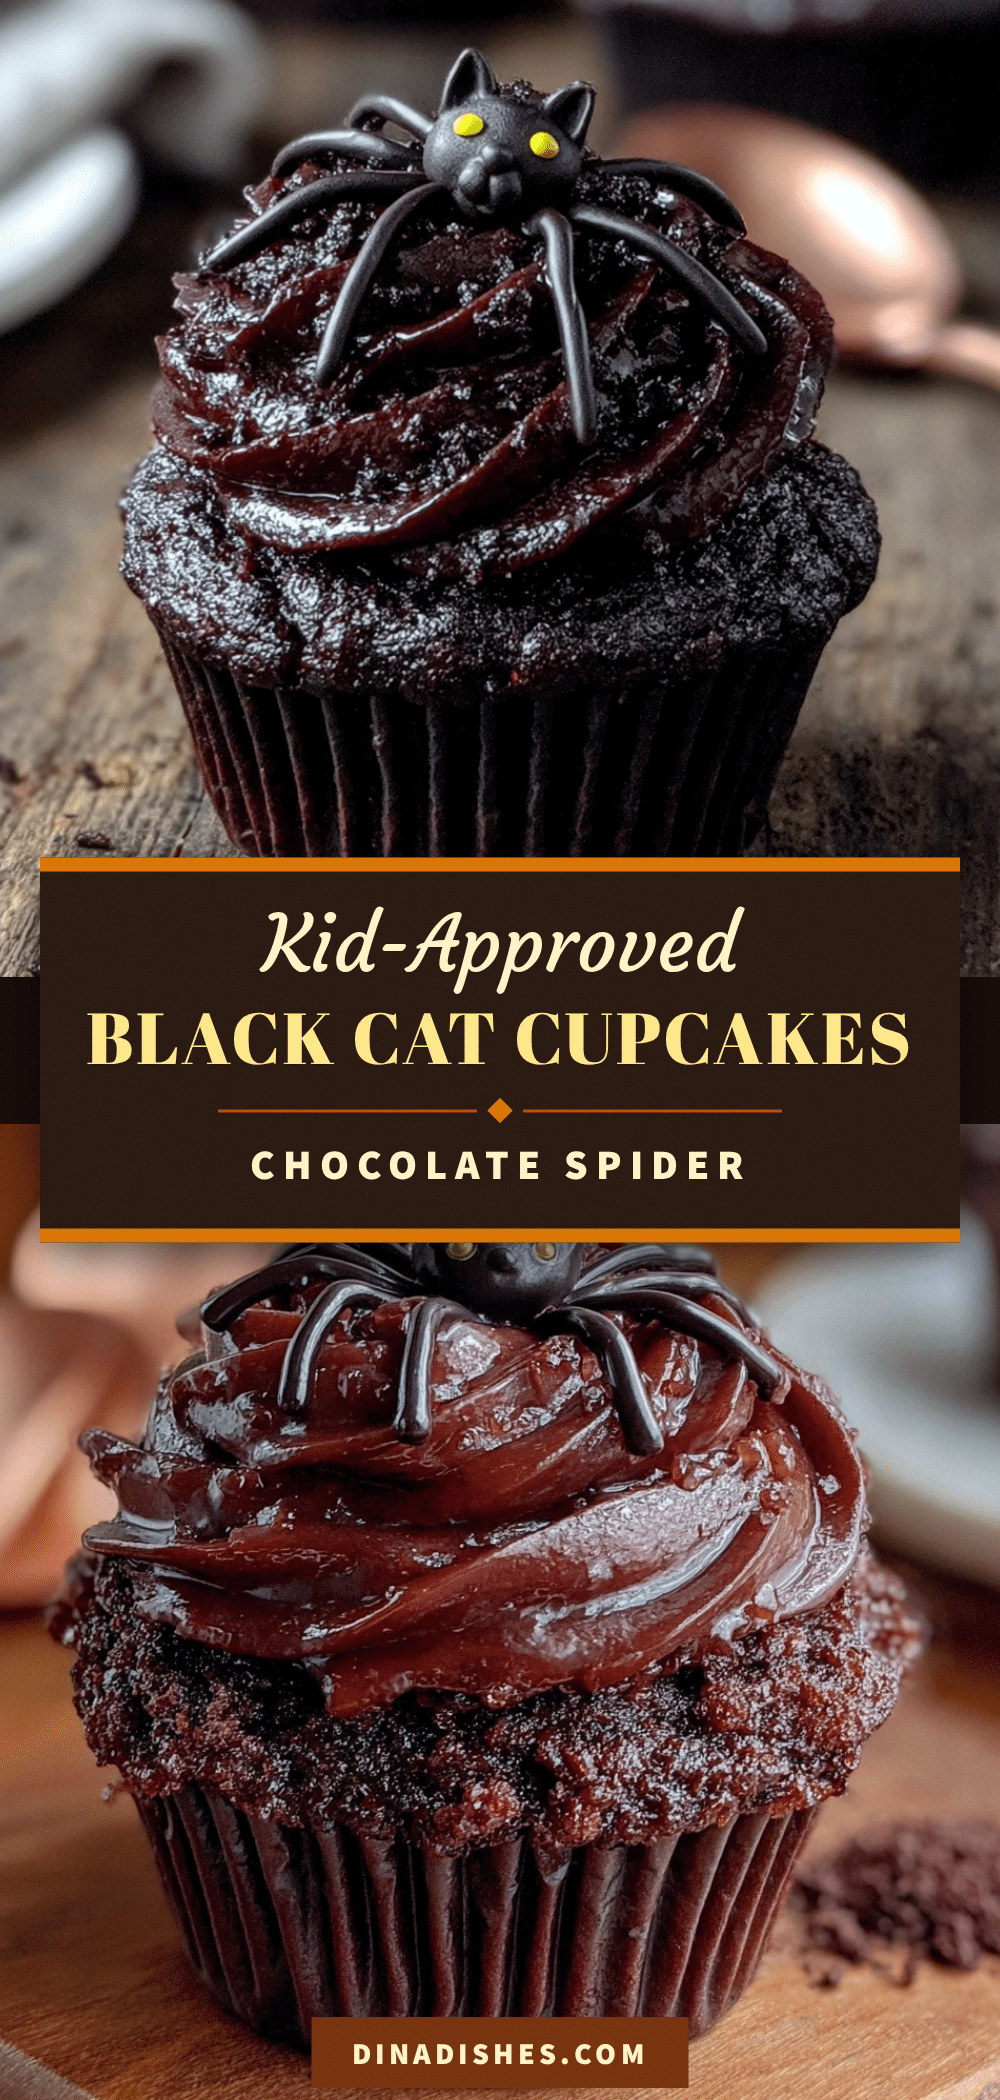
This was supposed to be a batch of perfectly respectable chocolate cupcakes for the school bake sale. I had the recipe memorized, the butter was softening on the counter, and I was feeling pretty good about myself. Then my three-year-old decided to “help” by dumping an entire jar of black food coloring into the batter while I was answering the phone. I stared at this murky, swamp-colored bowl, and honestly, I wanted to cry. The cupcakes were already in the oven before I realized I had no plan B. What came out of that oven was nothing like the plan — and better. They weren’t ruined. They were the beginning of our annual Halloween tradition. Those dark, almost-black cakes became the bodies of little spiders, and my kids decorated them with pretzel legs and candy eyes. The bake sale called them “spider cupcakes,” and they sold out in ten minutes. Maybe you’ve been there — a kitchen disaster that turns into the best thing you’ve ever made. That’s this recipe. It’s the happy accident I keep on purpose now, every single October.
Why You’ll Love This Recipe
These aren’t just cute cupcakes. They are the kind of treat that makes kids’ eyes go wide and adults pretend they’re too old for them while sneaking a second one. I’ve tested this recipe with my own children, my niece’s classroom, and a very skeptical group of neighbors at a block party. It passed every test.
- Kid-Friendly from Start to Finish: The decorating part is half the fun. My kids have been making these since they were old enough to poke pretzel legs into frosting without crying. It’s a perfect Halloween activity.
- Simple Ingredients: You probably have everything for the cupcakes in your pantry right now. No weird extracts or specialty flours. The black color comes from a mix of cocoa powder and a little black food coloring — no charcoal powder required.
- Perfect for Halloween Parties: Whether it’s a school party, a trunk-or-treat event, or just a spooky movie night at home, these cupcakes are the star. They look impressive but take almost no special skill to pull off.
- Crowd-Pleaser: I’ve watched kids who swore they didn’t like chocolate cake devour two of these. The frosting is light and not too sweet, which is a trick I learned after making too many sickly-sweet buttercreams.
- Unbelievably Delicious: Forget the gimmick for a second. These are genuinely good chocolate cupcakes. The texture is soft and tender, and the frosting has a hint of vanilla that balances the rich cocoa. It’s not just a pretty face.
What makes this recipe different from every other spider cupcake out there? It’s the frosting. I use a whipped chocolate buttercream that’s airy and creamy, not dense and greasy. It pipes beautifully and holds its shape for the spider legs without being stiff. This recipe isn’t just good — it is the kind that makes you close your eyes after the first bite, even if you’re wearing a witch hat.
What Ingredients You Will Need
This recipe uses simple, wholesome ingredients to deliver bold chocolate flavor and a soft, tender crumb. Most of these are pantry staples, which makes it easy to whip up on a whim.
For the Chocolate Cupcakes
- All-purpose flour, 1 ½ cups (190g) – Spoon and level it for the best texture. I use Gold Medal, but any brand works.
- Granulated sugar, 1 cup (200g) – Adds sweetness and helps with a tender crumb.
- Unsweetened cocoa powder, ½ cup (50g) – I prefer Hershey’s Special Dark for a richer chocolate flavor, but regular works fine.
- Baking soda, 1 teaspoon – Helps the cupcakes rise and stay fluffy.
- Baking powder, ½ teaspoon – Adds extra lift.
- Salt, ½ teaspoon – Balances the sweetness and enhances the chocolate.
- Large eggs, 2, room temperature – Room temperature eggs mix in more evenly. If you forget to set them out, place them in a bowl of warm water for 5 minutes.
- Whole milk, 1 cup (240ml), room temperature – Whole milk gives the richest crumb, but 2% works too.
- Vegetable oil, ½ cup (120ml) – Keeps the cupcakes moist for days. I’ve used canola oil too.
- Vanilla extract, 2 teaspoons – Pure vanilla is best, but imitation works in a pinch.
- Hot water or hot coffee, 1 cup (240ml) – This is the secret to a deep chocolate flavor. Coffee enhances the cocoa without making the cupcakes taste like coffee. Use hot water if you’re serving kids who are sensitive to caffeine.
- Black gel food coloring, 1-2 teaspoons – Gel coloring is much more concentrated than liquid. I use Americolor Super Black. Start with 1 teaspoon and add more if needed.
For the Chocolate Buttercream Frosting
- Unsalted butter, 1 cup (226g), softened – Let it sit out for at least 30 minutes. It should be soft but not melty.
- Powdered sugar, 3 cups (360g) – Sift it if it’s lumpy. I don’t always sift, and it’s fine.
- Unsweetened cocoa powder, ½ cup (50g) – Sift it to avoid cocoa lumps in the frosting.
- Heavy cream, 3-4 tablespoons (45-60ml) – Heavy cream makes the frosting light and fluffy. Milk works, but the frosting will be a bit denser.
- Vanilla extract, 1 teaspoon – Adds warmth and depth.
- Salt, a pinch – Balances the sweetness.
- Black gel food coloring, 1-2 teaspoons – Same brand as above.
For Decorating the Spider Cupcakes
- Pretzel sticks, 48 (about 2 cups) – These become the spider legs. I use Snyder’s of Hanover. Break them in half for shorter legs if you prefer.
- Candy eyes, 24 pairs – Wilton makes these. You can find them at any craft store or online.
- Black licorice strings or black decorating gel, optional – For making spiderwebs on the plate or for extra detail.
Equipment Needed
You don’t need a professional bakery setup for these. I’ve made them with basic tools and they turned out great.
- Muffin tin, 12-cup standard size – A non-stick pan works best. If yours is older, use paper liners.
- Paper cupcake liners – I like black or orange liners for Halloween. White works too and shows off the spider better.
- Mixing bowls, large and medium – Glass or stainless steel is fine.
- Whisk and rubber spatula – A spatula is essential for scraping down the sides of the bowl.
- Electric hand mixer or stand mixer – A hand mixer is perfectly fine for the frosting. You can also whisk by hand, but your arm will get tired.
- Piping bag with a large round tip – A Wilton 1A tip works well. No piping bag? Use a zip-top bag with the corner snipped off.
- Cooling rack – Wire racks let air circulate so the cupcakes don’t get soggy bottoms.
- Small offset spatula (optional) – Helpful for smoothing frosting, but not necessary.
Preparation Method
Make the Cupcakes
- Preheat your oven to 350°F (175°C). Line your muffin tin with paper liners. This recipe makes exactly 12 cupcakes, so don’t try to stretch it.
- Mix the dry ingredients. In a large bowl, whisk together the flour, sugar, cocoa powder, baking soda, baking powder, and salt. Make sure there are no lumps. I use a whisk for this — it’s faster than sifting.
- Combine the wet ingredients. In a separate medium bowl, whisk together the eggs, milk, vegetable oil, and vanilla extract until smooth. The mixture will look slightly separated, and that’s okay.
- Add the wet to the dry. Pour the wet ingredients into the dry ingredients. Mix with a rubber spatula or whisk until just combined. Do not overmix. A few small lumps are fine. Overmixing makes tough cupcakes.
- Add the hot water and food coloring. Pour in the hot water (or coffee) and the black gel food coloring. Stir gently until the batter is smooth and uniformly dark. It will be very thin — thinner than pancake batter. Don’t panic. This is what makes the cupcakes moist.
- Fill the liners. Use a ¼-cup measuring cup or a cookie scoop to divide the batter evenly among the 12 liners. Fill each about ⅔ full. The batter is runny, so pour carefully.
- Bake. Place the pan in the center rack of the oven. Bake for 18-22 minutes. The cupcakes are done when a toothpick inserted into the center comes out clean or with a few moist crumbs. The tops should spring back when lightly touched. Start checking at 18 minutes — ovens vary.
- Cool completely. Let the cupcakes cool in the pan for 5 minutes. Then transfer them to a wire rack to cool completely before frosting. This is crucial. If they’re even slightly warm, the frosting will melt into a puddle. I learned this the hard way.
Make the Chocolate Buttercream Frosting
- Cream the butter. In a large bowl, beat the softened butter with an electric mixer on medium speed until smooth and creamy, about 2 minutes. It should look pale and fluffy.
- Add the dry ingredients. In a separate bowl, sift together the powdered sugar and cocoa powder. (Yes, sift this time. Cocoa powder loves to clump.) Add the dry mixture to the butter in two additions, mixing on low speed after each addition. Scrape down the sides of the bowl.
- Add the liquid. Add the heavy cream, vanilla extract, and a pinch of salt. Beat on medium speed for 2-3 minutes until the frosting is light, fluffy, and spreadable. If it’s too thick, add another tablespoon of cream. If it’s too thin, add a little more powdered sugar.
- Color the frosting. Add the black gel food coloring, 1 teaspoon at a time, and mix until you reach your desired shade. I usually use about 2 teaspoons for a deep black. The color will deepen slightly as it sits.
Assemble the Spider Cupcakes
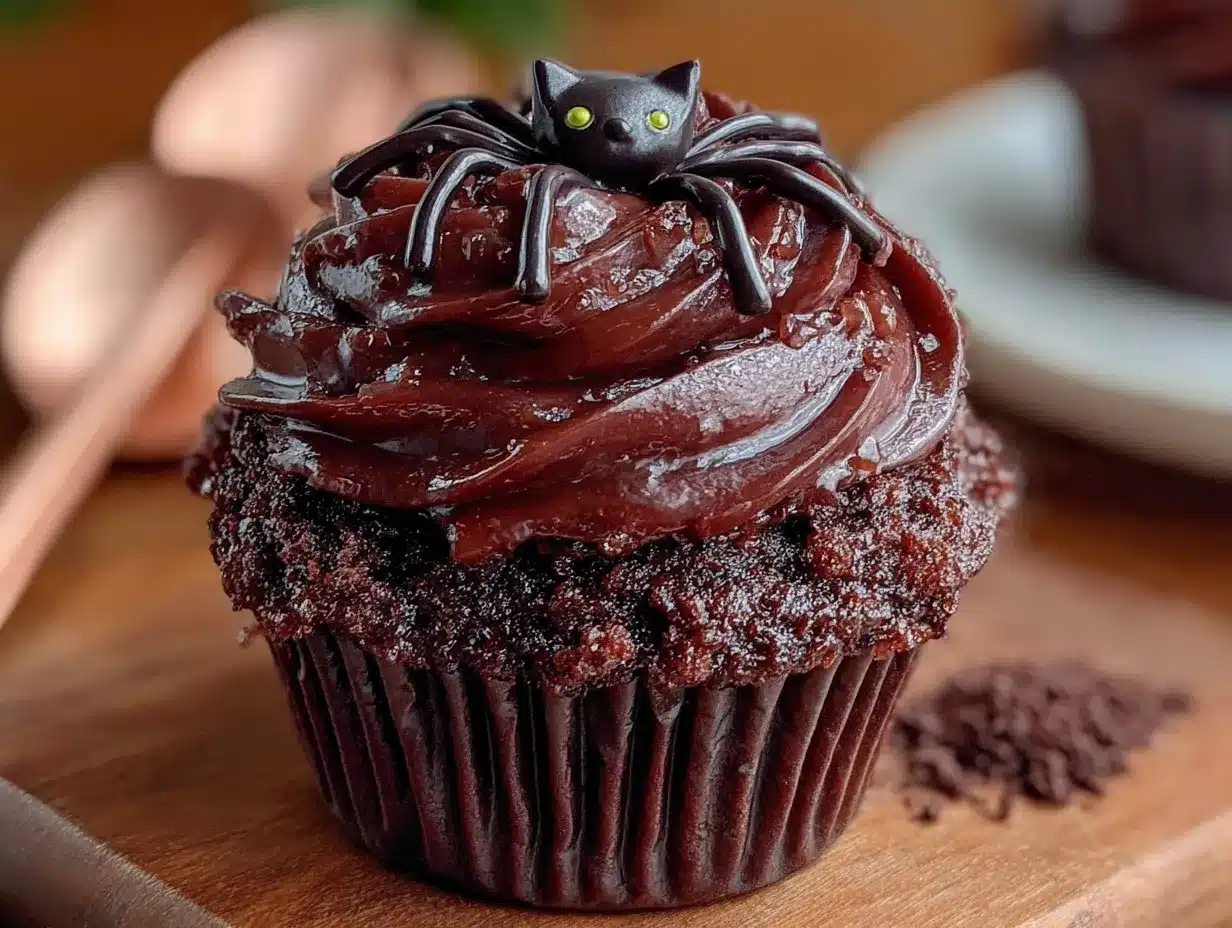
- Frost the cupcakes. Fit a piping bag with a large round tip and fill it with the black frosting. Pipe a generous swirl on each cooled cupcake. Alternatively, use a small offset spatula to spread the frosting in a smooth dome. Either way, leave a little room around the edge for the legs.
- Add the spider legs. Take the pretzel sticks and gently push 8 of them into the frosting on each cupcake — 4 on each side. They should angle slightly upward, like a spider’s legs. Work carefully so the pretzels don’t break. If they do, just eat the evidence and grab another one.
- Add the eyes. Place two candy eyes near the top center of each cupcake, pressing them lightly into the frosting. They will stick on their own. If you want a silly spider, put the eyes close together. For a slightly less cute spider, space them farther apart.
- Serve immediately or store. These are best eaten the same day, but they hold up well for a day or two.
Cooking Tips & Techniques
Over the years, I’ve made plenty of mistakes with these cupcakes. Here’s what I learned so you don’t have to.
- Don’t skip the hot water. The hot liquid helps bloom the cocoa powder, which gives the cupcakes a deeper, more complex chocolate flavor. Cold water won’t do the same thing. I once tried it when I was in a hurry, and the cupcakes tasted flat.
- Room temperature ingredients matter. If your eggs and milk are cold, the batter will be lumpy and the cupcakes won’t rise as well. Set them out 30 minutes before you start. It’s the most annoying baking rule, but it works.
- Color the frosting gradually. Black gel food coloring is potent. Start with 1 teaspoon, mix, and then decide if you need more. You can always add, but you can’t take away. I once added too much and the frosting had a faint chemical taste. Not ideal.
- Break the pretzels carefully. If you want shorter legs, break the pretzel sticks in half before inserting them. Do this over a bowl to catch the crumbs. My kids love snacking on the broken pieces.
- Pipe the frosting in a spiral. Start from the outside edge and work your way inward, then pull up at the center. This creates a nice swirl shape that looks professional. If you mess up, just smooth it over with a spatula. No one will know.
Variations & Adaptations
These cupcakes are forgiving. Here are some ways to make them your own.
- Gluten-Free Version: Substitute the all-purpose flour with a 1:1 gluten-free baking flour blend. I’ve used Bob’s Red Mill with good results. Add 1 teaspoon of xanthan gum if your blend doesn’t include it.
- Dairy-Free Version: Use a plant-based milk (like oat or almond milk) and a dairy-free butter substitute for the frosting. Miyoko’s Creamery makes a great vegan butter. The cupcakes will be slightly less tender, but still delicious.
- Peanut Butter Spider: Add ⅓ cup of creamy peanut butter to the frosting and reduce the heavy cream by 1 tablespoon. It adds a salty-sweet contrast that kids love.
- White Chocolate Ghost Cupcakes: Skip the black food coloring and make a white chocolate buttercream instead. Use white candy melts for ghost shapes on top. Same base recipe, completely different vibe.
- Mini Spider Cupcakes: Use a mini muffin tin and bake for 10-12 minutes. You’ll get about 24 mini spiders. Perfect for classroom parties where you need smaller portions.
Serving & Storage Suggestions
These cupcakes are best served at room temperature. The frosting is soft and the cake is tender. If you’ve refrigerated them, let them sit out for 15-20 minutes before serving.
- Presentation idea: Arrange the cupcakes on a black platter or a Halloween-themed cake stand. Add a few fake spiderwebs and plastic spiders around the base for a spooky effect. My kids love helping with this part.
- What to serve with them: A glass of cold milk is the classic pairing. For adults, a hot cup of coffee or a pumpkin spice latte works beautifully. The chocolate and coffee flavors complement each other.
- Storage: Store unfrosted cupcakes in an airtight container at room temperature for up to 3 days. Frosted cupcakes should be stored in the refrigerator, but bring them to room temperature before serving. The pretzel legs will soften slightly after a day, so these are best eaten within 24 hours of decorating.
- Freezing: You can freeze the unfrosted cupcakes for up to 2 months. Wrap each one individually in plastic wrap, then place them in a freezer bag. Thaw at room temperature, then frost and decorate. The frosting does not freeze well, so make it fresh.
Nutritional Information & Benefits
Let’s be honest — these are a treat, not a health food. But they’re made with real ingredients, and that counts for something.
- Estimated per cupcake (with frosting): 380 calories, 18g fat, 52g carbohydrates, 4g protein, 2g fiber, 35g sugar.
- Healthier swap: Use whole wheat pastry flour for half the all-purpose flour. It adds fiber and a subtle nutty flavor. My kids didn’t notice the difference.
- Allergen note: Contains dairy, gluten, and eggs. The pretzels may contain wheat. Check labels if you have sensitivities.
- Why homemade is better: Store-bought cupcakes often have preservatives and artificial flavors. These are made with butter, real cocoa, and love. You control the sugar and the quality of every ingredient.
Conclusion
These Kid-Approved Black Cat Chocolate Spider Cupcakes are more than a Halloween dessert. They’re a memory in the making. I still think about that first batch, the one born from a toddler’s “help” and a moment of panic. Now, my kids ask for them every October, and I’m happy to oblige. The recipe is simple enough for a weeknight and impressive enough for a party. I hope you make them with your family, and I hope they become a tradition in your home too. If you try this recipe, leave a comment below and let me know how it went. Did your kids help with the decorating? Did they eat too many pretzel legs before they made it onto the cupcakes? I’d love to hear your story. Happy Halloween, and happy baking!
Frequently Asked Questions
Can I use a boxed cake mix instead of making the cupcakes from scratch?
Yes, you can. Use a dark chocolate cake mix and add 1-2 teaspoons of black gel food coloring to the batter. Follow the box instructions for the eggs, oil, and water. The frosting recipe above still works perfectly. The cupcakes won’t be quite as moist, but they’ll still taste great.
How do I make the frosting black without using artificial food coloring?
You can use black cocoa powder instead of regular cocoa powder. Black cocoa is heavily alkalized and naturally dark. Combine it with a small amount of natural cocoa powder for depth. The frosting will be a dark gray-black rather than jet black, but it looks very cool. I’ve used this method for kids with sensitive stomachs.
My cupcakes came out dry. What went wrong?
Overbaking is the most common culprit. Check your cupcakes at 18 minutes. If your oven runs hot, reduce the temperature to 325°F (160°C). Also, make sure you measured the flour correctly — spoon it into the measuring cup and level it off. Scooping directly from the bag packs too much flour into the cup.
Can I make these cupcakes ahead of time for a party?
Absolutely. Bake the cupcakes up to 2 days in advance and store them unfrosted in an airtight container. Make the frosting the day of the party and decorate them. The pretzel legs stay crunchier this way. If you need to decorate a day ahead, store the finished cupcakes in the refrigerator and add the pretzels just before serving.
My frosting is too runny. How do I fix it?
Add more powdered sugar, ¼ cup at a time, and beat on medium speed until it thickens. If the frosting is warm (from your hands or a warm kitchen), chill it in the refrigerator for 10 minutes before trying again. Buttercream stiffens as it cools. I’ve saved many a runny batch this way.
Pin This Recipe!
Kid-Approved Black Cat Spider Cupcakes: Easy Halloween Treat
These dark, almost-black chocolate cupcakes become the bodies of little spiders, decorated with pretzel legs and candy eyes. A happy accident that turned into a beloved Halloween tradition, these are the kind of treat that makes kids’ eyes go wide and adults sneak a second one.
- Prep Time: 30 minutes
- Cook Time: 20 minutes
- Total Time: 50 minutes
- Yield: 12 servings
- Category: Dessert
- Cuisine: American
Ingredients
- All-purpose flour, 1 ½ cups (190g)
- Granulated sugar, 1 cup (200g)
- Unsweetened cocoa powder, ½ cup (50g)
- Baking soda, 1 teaspoon
- Baking powder, ½ teaspoon
- Salt, ½ teaspoon
- Large eggs, 2, room temperature
- Whole milk, 1 cup (240ml), room temperature
- Vegetable oil, ½ cup (120ml)
- Vanilla extract, 2 teaspoons
- Hot water or hot coffee, 1 cup (240ml)
- Black gel food coloring, 1-2 teaspoons
- Unsalted butter, 1 cup (226g), softened
- Powdered sugar, 3 cups (360g)
- Unsweetened cocoa powder, ½ cup (50g) (for frosting)
- Heavy cream, 3-4 tablespoons (45-60ml)
- Vanilla extract, 1 teaspoon (for frosting)
- Salt, a pinch (for frosting)
- Black gel food coloring, 1-2 teaspoons (for frosting)
- Pretzel sticks, 48 (about 2 cups)
- Candy eyes, 24 pairs
- Black licorice strings or black decorating gel (optional)
Instructions
- Preheat your oven to 350°F (175°C). Line your muffin tin with paper liners.
- In a large bowl, whisk together the flour, sugar, cocoa powder, baking soda, baking powder, and salt.
- In a separate medium bowl, whisk together the eggs, milk, vegetable oil, and vanilla extract until smooth.
- Pour the wet ingredients into the dry ingredients. Mix with a rubber spatula or whisk until just combined.
- Pour in the hot water (or coffee) and the black gel food coloring. Stir gently until the batter is smooth and uniformly dark.
- Use a ¼-cup measuring cup or a cookie scoop to divide the batter evenly among the 12 liners. Fill each about ⅔ full.
- Bake for 18-22 minutes. The cupcakes are done when a toothpick inserted into the center comes out clean or with a few moist crumbs.
- Let the cupcakes cool in the pan for 5 minutes. Then transfer them to a wire rack to cool completely before frosting.
- For the frosting: In a large bowl, beat the softened butter with an electric mixer on medium speed until smooth and creamy, about 2 minutes.
- In a separate bowl, sift together the powdered sugar and cocoa powder. Add the dry mixture to the butter in two additions, mixing on low speed after each addition.
- Add the heavy cream, vanilla extract, and a pinch of salt. Beat on medium speed for 2-3 minutes until the frosting is light, fluffy, and spreadable.
- Add the black gel food coloring, 1 teaspoon at a time, and mix until you reach your desired shade.
- Fit a piping bag with a large round tip and fill it with the black frosting. Pipe a generous swirl on each cooled cupcake.
- Take the pretzel sticks and gently push 8 of them into the frosting on each cupcake — 4 on each side.
- Place two candy eyes near the top center of each cupcake, pressing them lightly into the frosting.
- Serve immediately or store.
Notes
Don’t skip the hot water – it helps bloom the cocoa powder for deeper flavor. Room temperature ingredients matter for best texture. Color the frosting gradually to avoid a chemical taste. Break the pretzels carefully over a bowl to catch crumbs. Pipe the frosting in a spiral starting from the outside edge. These are best eaten within 24 hours of decorating as pretzel legs will soften.
Nutrition
- Serving Size: 1 cupcake
- Calories: 380
- Sugar: 35
- Sodium: 280
- Fat: 18
- Saturated Fat: 10
- Carbohydrates: 52
- Fiber: 2
- Protein: 4
Keywords: Halloween cupcakes, spider cupcakes, chocolate cupcakes, kid-friendly Halloween treats, easy Halloween dessert, black cat cupcakes