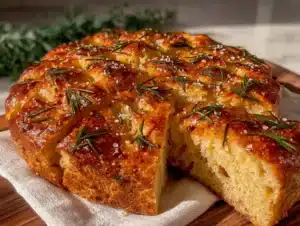
My aunt swore she hated sourdough. For years. “Too sour,” she’d say, wrinkling her nose at the starter jar I kept on my counter like a needy pet. “It smells like a science experiment gone wrong.” I’d just nod, because honestly, you don’t argue with a woman who’s been making her family’s Thanksgiving stuffing from scratch for forty years. Then last Christmas Eve, I pulled this focaccia out of the oven—golden, pillowy, fragrant with rosemary and olive oil—and set it on the table next to the antipasto platter. I caught her sneaking a second piece. And a third. She thought I wasn’t watching, but I saw her tear off a corner and dip it in the balsamic vinegar before anyone else had even sat down. “This isn’t bad,” she muttered, not quite meeting my eyes. That’s the thing about this lighter rosemary sourdough focaccia. It doesn’t announce itself as healthy or different. It just tastes so good that even the skeptics forget their principles. Maybe you’ve had that moment too—the one where a recipe quietly proves everyone wrong without trying to.
This version came about because I wanted a holiday bread that felt indulgent but didn’t leave me feeling like I needed a nap afterward. Traditional focaccia can be a gut-bomb, all heavy olive oil and dense carbs. But by using a sourdough starter and cutting back on the oil just a touch, you get that same satisfying chew and crispy edge without the post-dinner slump. It’s become my go-to for Thanksgiving, Christmas, and every holiday gathering in between. The rosemary makes it feel festive, the sourdough gives it that tangy depth, and the lighter touch means you can go back for seconds without guilt. Honestly, it’s the kind of bread that makes you close your eyes after the first bite—and then reach for another piece before you’ve even swallowed.
Why You’ll Love This Recipe
I’ve tested this recipe more times than I care to admit. Burned batches, under-proofed disasters, and one memorable attempt where I forgot the salt entirely. (Don’t do that. It’s sad bread.) But after all that trial and error, I can tell you with confidence: this is the version worth making. Here’s why it works:
- Lighter, Not Less Flavorful : By using a higher hydration dough and less olive oil than traditional recipes, you get a focaccia that’s airy and tender instead of greasy. The sourdough fermentation adds complexity that makes up for every drop of oil you save.
- Perfect for Holiday Entertaining : This bread looks impressive on a buffet table, but it’s actually one of the easiest things you can make. The dough does most of the work while you focus on the turkey or ham.
- Simple Ingredients : Flour, water, salt, starter, olive oil, and fresh rosemary. That’s it. No weird additives or trips to a specialty store.
- Make-Ahead Friendly : You can start the dough the day before and let it cold-ferment in the fridge. The flavor actually gets better, and you free up oven space on the big day.
- Crowd-Pleasing Texture : The contrast between the crispy, almost-fried bottom and the soft, airy crumb is next-level comfort food. Even the picky eaters at your table will be reaching for thirds.
What makes this different from every other focaccia recipe out there? It’s the balance. Most holiday breads are either too heavy or too dry. This one hits that sweet spot where it feels special but doesn’t weigh you down. I’ve brought it to potlucks where people asked for the recipe, served it at Thanksgiving where it disappeared before the turkey was carved, and made it for quiet Sunday dinners where it turned a simple soup into a memorable meal. It’s comfort food reimagined—healthier, faster (well, the active time is short), but with the same soul-soothing satisfaction.
What Ingredients You Will Need
This recipe uses simple, wholesome ingredients to deliver that signature focaccia texture without the heavy feeling. Most of these are pantry staples if you maintain a sourdough starter, and the fresh rosemary is easy to find during the holidays.
For the Dough
- 500 grams (4 cups) bread flour – I prefer King Arthur for its consistent protein content, but any unbleached bread flour works. The higher protein helps develop that chewy structure.
- 350 grams (1 1/2 cups) warm water – About 80°F to 85°F. Too hot and you’ll kill the good bacteria in your starter. Too cold and fermentation will crawl.
- 150 grams (2/3 cup) active sourdough starter – Make sure it’s bubbly and doubled in size. A hungry starter won’t give you the rise you need.
- 10 grams (2 teaspoons) fine sea salt – Don’t skip this. Salt controls fermentation and gives the bread flavor. I use Redmond or Celtic sea salt.
- 30 grams (2 tablespoons) extra-virgin olive oil – Plus more for the pan and topping. Use a good quality one here since you’ll taste it. California Olive Ranch is my everyday go-to.
For the Topping

- 2 tablespoons fresh rosemary, finely chopped – Strip the leaves from the stems and give them a rough chop. Dried rosemary won’t give you the same pop of flavor.
- Flaky sea salt, like Maldon – This is non-negotiable for that crunchy, salty finish. Regular table salt is too fine and will dissolve.
- Extra olive oil for drizzling – About 2 tablespoons, used right before baking.
Ingredient Tips: If you don’t have a sourdough starter, you can use 1 teaspoon of active dry yeast dissolved in the warm water with a pinch of sugar. Let it sit for 5 minutes until foamy, then proceed with the recipe. The flavor won’t be as complex, but the texture will still be lovely. For a gluten-free version, I’ve had good results with Cup4Cup’s gluten-free flour blend, though you’ll need to add 1 teaspoon of xanthan gum if it’s not already in the blend. And if rosemary isn’t your thing—though I can’t imagine why—try fresh thyme or even finely chopped sage for a more traditional holiday vibe.
Equipment Needed
You don’t need a lot of fancy gear for this recipe, which is one of the reasons I make it so often. Here’s what you’ll need:
- 10×15-inch baking sheet or half-sheet pan – This gives you the perfect thickness. A smaller pan will make the focaccia too thick and doughy in the center.
- Stand mixer with dough hook – Optional, but it makes the mixing easier. You can absolutely do this by hand with a wooden spoon and some elbow grease.
- Digital kitchen scale – I know, I know, but measuring flour by weight is so much more accurate than cups. It costs $15 and will change your baking life.
- Plastic bowl scraper or bench scraper – Helps handle the sticky dough without losing your mind.
- Clean kitchen towel or plastic wrap – For covering the dough during proofing.
- Two large mixing bowls – One for the dough, one for oiling.
If you don’t have a half-sheet pan, a 9×13-inch baking dish works in a pinch. The focaccia will be thicker and need about 5 extra minutes in the oven. And if you’re really in a bind, a cast-iron skillet makes a gorgeous round focaccia—just reduce the recipe by a third.
Preparation Method
This dough is forgiving, but it rewards patience. The key is giving it time to develop flavor and structure through those long, slow rises. Here’s how to do it:
- Mix the dough. In a large bowl or the bowl of your stand mixer, combine the bread flour and warm water. Mix until it forms a shaggy mass, then let it rest for 20 minutes. This autolyse step lets the flour absorb the water and makes the dough easier to work with later. You’ll notice it feels smoother already.
- Add the starter and salt. Add the active sourdough starter and sea salt. If using a stand mixer, mix on low speed with the dough hook for about 4 minutes. By hand, use a wet hand to squeeze and fold the dough until everything is incorporated—about 5 minutes. The dough will be sticky. That’s okay. Don’t be tempted to add more flour.
- Add the olive oil. Drizzle in the 30 grams of olive oil and continue mixing for another 2 minutes. The dough will start to feel silky and cohesive, pulling away from the sides of the bowl slightly.
- First rise with stretch and folds. Transfer the dough to a lightly oiled bowl. Cover with a damp towel and let it rest for 30 minutes. Then, with wet hands, grab one side of the dough, stretch it up, and fold it over the center. Rotate the bowl 90 degrees and repeat. Do this four times total (one full rotation). This is called a “stretch and fold,” and it builds structure without knocking out all the air. Repeat this process every 30 minutes for the next 2 hours—that’s four sets of folds total. You’ll notice the dough getting stronger and smoother with each round.
- Bulk fermentation. After the last set of folds, cover the bowl tightly with plastic wrap and let it rise at room temperature for 6 to 8 hours, or until almost doubled. The time depends on your starter’s strength and your kitchen temperature. In a warm kitchen (75°F), it might take 6 hours. In a cooler one (68°F), it could take 10. Look for a domed surface with small bubbles around the edges.
- Cold ferment (optional but recommended). For the best flavor, pop the covered bowl in the fridge overnight. This slows down fermentation and lets the sourdough tang develop. You can leave it for up to 24 hours. The next day, let it sit at room temperature for an hour before proceeding.
- Pan the dough. Generously oil your 10×15-inch baking sheet with about 2 tablespoons of olive oil. Use your fingers to spread it all over the bottom and up the sides. Turn the dough out into the pan. Don’t punch it down—just let it fall out gently. Use oiled fingers to gently stretch it toward the edges of the pan. If it resists, let it rest for 10 minutes and try again. The dough should be about 1/2-inch thick and reach all corners.
- Final proof. Cover the pan loosely with plastic wrap and let the dough rise for 2 to 3 hours, until it’s puffy and nearly doubled in thickness. You’ll see bubbles forming on the surface. When you poke it gently, the indentation should spring back slowly. If it springs back immediately, it needs more time.
- Preheat and dimple. About 30 minutes before baking, preheat your oven to 425°F with a rack in the middle. When the dough is ready, drizzle the remaining 2 tablespoons of olive oil over the top. Then, using your fingertips—press straight down to the bottom of the pan, creating deep dimples all over the surface. Don’t be shy. Those dimples hold the oil and rosemary and create those craggy, crispy bits everyone fights over.
- Top and bake. Sprinkle the chopped rosemary evenly over the surface, then finish with a generous pinch of flaky sea salt. Bake for 20 to 25 minutes, until the top is deep golden brown and the bottom sounds hollow when you tap it. The edges should be almost caramelized. If you have an instant-read thermometer, the internal temperature should read 200°F to 205°F.
- Cool and serve. Let the focaccia cool in the pan for 5 minutes, then transfer to a wire rack. Don’t skip this—if you cut it too soon, the steam will make the crumb gummy. Let it cool for at least 20 minutes before slicing. Or, you know, tear into it with your hands like a civilized animal. I won’t judge.
Cooking Tips & Techniques
I’ve made this recipe more times than I can count, and I’ve learned a few things the hard way. Here are the tips that make the difference between good focaccia and unforgettable focaccia:
Use warm water, not hot. I once got distracted and used water that was too hot—around 110°F. It killed the good bacteria in my starter, and the dough never rose properly. Aim for bathwater temperature. If it feels warm on your wrist but not hot, you’re good.
Don’t rush the stretch and folds. This is where the gluten develops without you having to knead for 15 minutes. I used to skip these folds when I was in a hurry, and the focaccia came out flat and dense. Those four sets of folds, spaced 30 minutes apart, are what give you that open, airy crumb. Set a timer. It’s worth it.
The dimpling matters more than you think. I learned this after making a batch where I barely pressed down—just sort of poked at the surface. The result was a flat, uninteresting top with no texture. You want to press your fingers all the way to the bottom of the pan. The oil will pool in those dimples and create crispy, almost fried pockets. That’s the good stuff.
Watch the salt on top. Flaky sea salt is potent. I once got heavy-handed and ended up with focaccia that was borderline inedible. A light, even sprinkle is all you need. You can always add more at the table, but you can’t take it away.
Cold fermentation is your friend. If you have the time, letting the dough rest in the fridge overnight transforms the flavor. It develops that tangy sourdough character that makes this bread feel special. Plus, it makes the timing easier for holiday cooking. Mix the dough the day before, let it cold-ferment, and bake it fresh on the big day.
Variations & Adaptations
This recipe is flexible, and I’ve tried several variations over the years. Here are some of my favorites:
Herb Garden Focaccia – Swap the rosemary for a mix of fresh thyme, oregano, and chives. This is lovely in spring and pairs beautifully with roasted vegetables or a simple green salad.
Everything Bagel Focaccia – After dimpling, sprinkle the top with everything bagel seasoning instead of rosemary. The sesame seeds and garlic get toasty in the oven. I made this for a Super Bowl party and it disappeared in minutes.
Garlic and Parmesan – Before the final proof, press 3 or 4 thinly sliced garlic cloves into the dough. After baking, brush with melted butter and sprinkle with grated Parmesan. It’s indulgent, but for a holiday gathering, it’s worth the splurge.
Gluten-Free Version – As I mentioned, Cup4Cup’s gluten-free flour works well here. The dough will be more like a thick batter than a traditional dough, so don’t expect to stretch and fold it. Just pour it into the oiled pan, let it rise for about 3 hours, and bake as directed. The texture is more delicate, but the flavor is still fantastic.
Whole Wheat Option – Replace half the bread flour with whole wheat flour. You’ll need to add an extra tablespoon of water since whole wheat absorbs more liquid. The flavor gets nuttier and more complex, perfect for a rustic holiday table.
Serving & Storage Suggestions
This focaccia is best served warm, straight from the oven, but it’s still excellent at room temperature. For holiday gatherings, I like to set it out on a wooden board with a small bowl of good olive oil and balsamic vinegar for dipping. It also makes incredible sandwiches the next day—try it with roasted turkey, cranberry sauce, and a smear of brie.
Storage: Keep leftover focaccia in an airtight container at room temperature for up to 3 days. Do not refrigerate—it will dry out and go stale faster. If you need to store it longer, wrap it tightly in plastic wrap and then foil, and freeze for up to 3 months.
Reheating: The best way to revive focaccia is in a 350°F oven for 5 to 7 minutes. It brings back that crispy exterior and soft interior. The microwave will make it rubbery, so avoid that unless you’re in a real pinch. For frozen focaccia, thaw at room temperature, then reheat in the oven.
One thing I love about this bread is that the flavors actually improve after a day. The rosemary infuses the olive oil, and the sourdough tang mellows into something deeper. So don’t stress about baking it at the last minute. Make it a day ahead, reheat it, and no one will know the difference.
Nutritional Information & Benefits
Per serving (based on 12 servings): Approximately 220 calories, 7g fat, 34g carbohydrates, 2g fiber, 6g protein. These are estimates and will vary based on your specific ingredients.
This lighter version of focaccia has about 30% less oil than traditional recipes, which cuts the calories and fat without sacrificing flavor. The sourdough fermentation also offers some benefits—the long fermentation breaks down phytic acid in the flour, making the nutrients more bioavailable. Some studies suggest sourdough bread has a lower glycemic impact than bread made with commercial yeast, which means it won’t spike your blood sugar as dramatically. That’s good news for anyone watching their energy levels during the holiday season.
Rosemary isn’t just for flavor, either. It’s packed with antioxidants and has anti-inflammatory properties. So while I wouldn’t call this a health food, it’s a smarter choice than many holiday breads. You can feel good about serving it to your family—and about going back for that second piece.
Conclusion
This lighter rosemary sourdough focaccia has become a staple in my holiday kitchen for one simple reason: it makes everyone happy. The skeptics, the health-conscious, the bread purists—they all find something to love in that crispy, airy, rosemary-flecked crumb. It’s the kind of recipe that proves you don’t need a ton of oil or butter to make something memorable. Just good ingredients, a little patience, and a willingness to let the dough do its thing.
I hope you’ll try this for your next holiday gathering. Customize it with your favorite herbs, play with the toppings, and don’t be afraid to make a mess in the kitchen. That’s part of the fun. And when you pull that golden loaf out of the oven and watch it disappear, come back and tell me about it. I’d love to hear how it turned out, what variations you tried, and whether anyone at your table had a conversion moment of their own. Drop a comment below or tag me in your photos—I’m always looking for inspiration.
Happy baking, friend. Your holiday table is about to get a whole lot more delicious.
Frequently Asked Questions
Can I use dried rosemary instead of fresh?
You can, but the flavor won’t be as bright. Dried rosemary is more concentrated, so use about 2 teaspoons instead of 2 tablespoons. I recommend fresh for the holidays—it just tastes more festive.
My dough is really sticky. Did I do something wrong?
Nope, that’s normal. Sourdough focaccia dough is wetter than regular bread dough. That high hydration is what gives it that open, airy crumb. Use wet hands or a bench scraper to handle it, and resist the urge to add more flour.
Can I make this without a sourdough starter?
Yes! Substitute 1 teaspoon of active dry yeast dissolved in the warm water with a pinch of sugar. Let it sit for 5 minutes until foamy, then proceed with the recipe. The flavor will be milder, but the texture will still be wonderful.
How do I know when the focaccia is fully baked?
The top should be deep golden brown, the edges should look almost caramelized, and the bottom should sound hollow when you tap it. If you have an instant-read thermometer, the internal temperature should read 200°F to 205°F.
Can I freeze this focaccia?
Absolutely. Let it cool completely, then wrap it tightly in plastic wrap and foil. Freeze for up to 3 months. To serve, thaw at room temperature and reheat in a 350°F oven for 5 to 7 minutes. It’ll taste almost as good as fresh-baked.
Pin This Recipe!

Lighter Rosemary Sourdough Focaccia: Easy Holiday Recipe
A lighter, airy sourdough focaccia with fresh rosemary and olive oil that feels indulgent but won’t weigh you down. Perfect for holiday gatherings, this bread has a crispy edge and soft crumb that even skeptics love.
- Prep Time: 20 minutes
- Cook Time: 25 minutes
- Total Time: 8 hours 45 minutes (includes rising and optional cold ferment)
- Yield: 12 servings 1x
- Category: Bread
- Cuisine: Italian
Ingredients
- 500 grams (4 cups) bread flour
- 350 grams (1 1/2 cups) warm water (80°F to 85°F)
- 150 grams (2/3 cup) active sourdough starter
- 10 grams (2 teaspoons) fine sea salt
- 30 grams (2 tablespoons) extra-virgin olive oil, plus more for pan and topping
- 2 tablespoons fresh rosemary, finely chopped
- Flaky sea salt (e.g., Maldon), for topping
- Extra olive oil for drizzling (about 2 tablespoons)
Instructions
- Mix the dough: In a large bowl, combine bread flour and warm water. Mix until shaggy, then let rest for 20 minutes (autolyse).
- Add starter and salt: Add active sourdough starter and sea salt. Mix on low speed with dough hook for 4 minutes, or by hand with a wet hand for 5 minutes. Dough will be sticky.
- Add olive oil: Drizzle in 30 grams olive oil and mix for another 2 minutes until silky and cohesive.
- First rise with stretch and folds: Transfer dough to lightly oiled bowl. Cover and rest 30 minutes. Perform stretch and folds (stretch one side, fold over center, rotate 90°, repeat) four times total. Repeat every 30 minutes for 2 hours (4 sets).
- Bulk fermentation: Cover bowl tightly with plastic wrap and let rise at room temperature for 6 to 8 hours until almost doubled.
- Cold ferment (optional): Refrigerate covered bowl overnight for up to 24 hours. Let sit at room temperature 1 hour before proceeding.
- Pan the dough: Generously oil a 10×15-inch baking sheet with about 2 tablespoons olive oil. Gently turn dough into pan. Use oiled fingers to stretch toward edges. Let rest 10 minutes if resistant.
- Final proof: Cover pan loosely with plastic wrap and let rise 2 to 3 hours until puffy and nearly doubled in thickness.
- Preheat and dimple: Preheat oven to 425°F. Drizzle remaining 2 tablespoons olive oil over dough. Use fingertips to press straight down to bottom of pan, creating deep dimples all over.
- Top and bake: Sprinkle chopped rosemary evenly, then finish with flaky sea salt. Bake 20 to 25 minutes until deep golden brown and bottom sounds hollow. Internal temperature should be 200°F to 205°F.
- Cool and serve: Let cool in pan 5 minutes, then transfer to wire rack. Cool at least 20 minutes before slicing.
Notes
For best flavor, cold ferment overnight. Use fresh rosemary for brightest taste. Dough is sticky; resist adding extra flour. Dimple deeply for crispy pockets. Flaky sea salt is non-negotiable for topping. Reheat in 350°F oven for 5-7 minutes.
Nutrition
- Serving Size: 1 slice (1/12 of rec
- Calories: 220
- Sodium: 390
- Fat: 7
- Saturated Fat: 1
- Carbohydrates: 34
- Fiber: 2
- Protein: 6
Keywords: sourdough focaccia, rosemary focaccia, holiday bread, lighter focaccia, sourdough bread, easy focaccia