I was supposed to be making snickerdoodles. That was the plan, anyway. A neighbor had dropped off a care package of cinnamon-sugar cookies the week before, and I thought, “I can do that. Easy.” But somewhere between measuring the cream of tartar and realizing I was out of it—honestly, I’d used the last bit in a weird science project my kid needed for school—the whole thing went sideways. I stood there, staring at the butter and sugar I’d already creamed, feeling that familiar panic rise. You know that feeling when you’re already committed, the mixer’s running, and there’s no turning back?
I grabbed the pumpkin pie spice instead. It was sitting right there, a jar I’d bought on a whim last November and barely touched. I figured, why not? And then I saw the cinnamon candies in the pantry—leftover from a holiday baking spree I’d completely forgotten about. I crushed a few, threw them in, and the dough turned this gorgeous, warm amber color. I was already rolling it out when I realized my hands were covered in dough and I had no cookie cutters clean. So I just… used my hand. I pressed my palm into the dough, cut around it with a knife, and made a turkey shape out of it with some extra dough and a few candy eyes. It was ridiculous. It was messy. And when it came out of the oven, golden and smelling like autumn in a kitchen, I knew I’d accidentally made something better than the snickerdoodles I’d set out to bake.
That first batch was lopsided and goofy-looking. The candies melted into little stained-glass spots, and the handprint looked more like a weird starfish than a turkey. But my family devoured them. My husband said they were the best cookies I’d ever made, and he’s not one for flattery. I kept making them, refining the dough, figuring out the right spice balance, and learning how to shape the turkeys so they actually looked like turkeys. Now, these cozy turkey hand sugar cookies are my go-to for fall gatherings, Thanksgiving parties, and lazy Sunday baking sessions. They’re the recipe that started as a total mess and turned into a tradition. Honestly, I think that’s why I love them so much. They remind me that sometimes the best things come from dropping the plan and just going with it.
Why You’ll Love This Recipe
Let me tell you why these cookies have earned a permanent spot in my recipe box. I’ve tested this dough at least a dozen times, tweaking the spice blend and the texture until it was just right. It’s the kind of recipe I’d confidently bring to a potluck or mail to a friend across the country.
- Quick & Easy: From start to finish, you’re looking at about 30 minutes of active work. The dough comes together in one bowl, no electric mixer required if you’ve got a strong arm and a wooden spoon. Perfect for those last-minute “I need to bring something” moments.
- Simple Ingredients: You probably have most of this in your pantry right now. Butter, sugar, flour, eggs, and a jar of pumpkin pie spice. No fancy extracts or hard-to-find imports. I’ve made these with margarine in a pinch, and they still turned out great.
- Perfect for Fall Gatherings: These are the cookies that disappear at Thanksgiving dinners, classroom parties, and cozy Friendsgiving celebrations. Kids love making the handprint shapes, and adults love the nostalgic flavor.
- Crowd-Pleaser: I’ve served these to picky eaters, spice skeptics, and cookie purists. Every single person has asked for the recipe. The texture is soft in the middle with slightly crisp edges, and the spice blend is warm without being overpowering.
- Unbelievably Delicious: The secret is the combination of pumpkin pie spice and a tiny hint of cinnamon candy. It adds this subtle warmth and a touch of sweetness that makes you close your eyes after the first bite. It’s comfort food in cookie form.
What makes this recipe different from every other cut-out cookie? It’s the handprint shape. There’s something deeply satisfying about using your own hand to create the cookie. It feels personal, like you’re literally putting a piece of yourself into the baking. Plus, the dough is sturdy enough to hold the shape without spreading, so your turkeys actually look like turkeys. This isn’t just another sugar cookie recipe—it’s the one that makes people say, “Wait, you made these with your hand?” and then smile.
What Ingredients You Will Need
This recipe uses simple, wholesome ingredients that work together to create a soft, flavorful cookie with just the right amount of spice. Most of these are pantry staples, so you can whip up a batch without a special trip to the store.
For the Cookie Dough
- 1 cup (2 sticks) unsalted butter, softened to room temperature (I prefer Land O’Lakes for consistent results, but any brand works)
- 1 cup granulated sugar (adds sweetness and helps with spreading)
- 1 large egg, room temperature (cold eggs can seize the butter mixture)
- 1 teaspoon vanilla extract (pure vanilla extract gives the best flavor, but imitation works in a pinch)
- 2 ½ cups all-purpose flour, plus more for dusting (King Arthur Flour is my go-to for consistent protein content)
- ½ teaspoon baking powder (helps the cookies rise just a bit without puffing up)
- ½ teaspoon salt (balances the sweetness and enhances the spice)
- 2 teaspoons pumpkin pie spice (you can make your own with cinnamon, nutmeg, ginger, and cloves if you don’t have a jar)
For the Decoration
- ¼ cup cinnamon candies, crushed (like Red Hots or cinnamon imperials—these create little melted windows of flavor)
- Candy eyes (optional, for the turkey face)
- Orange and red gel food coloring (for the wattle and beak, if you want to get fancy)
- Powdered sugar (for dusting, if you prefer a simpler look)
Ingredient Tips: For the best texture, make sure your butter is truly softened—you should be able to press a finger into it and leave an indent without it being greasy. If you’re in a hurry, cut the butter into small cubes and let it sit for 10 minutes. Don’t microwave it; you’ll end up with melted butter and flat cookies. I’ve made that mistake, and it’s not pretty.
Substitution Guidance: If you don’t have pumpkin pie spice, mix 1 teaspoon cinnamon, ½ teaspoon nutmeg, ¼ teaspoon ginger, and ¼ teaspoon cloves. For a dairy-free version, use vegan butter sticks (not margarine from a tub, which has too much water). The texture will be slightly different, but still delicious. If you’re avoiding refined sugar, coconut sugar works, though the cookies will be darker and slightly less sweet.
Equipment Needed
You don’t need a lot of fancy tools for this recipe, which is part of its charm. Here’s what you’ll need:
- Large mixing bowl (I use a ceramic one, but glass or metal works fine)
- Electric mixer (handheld or stand mixer—both work; I’ve made these with a whisk and some elbow grease, and it’s totally doable)
- Rolling pin (a wine bottle works in a pinch, just wrap it in plastic wrap first)
- Parchment paper (non-negotiable for easy cleanup and preventing sticking)
- Baking sheets (rimmed sheets are best to prevent sliding)
- Sharp knife or pizza cutter (for cutting around your handprint)
- Cooling rack (wire rack helps cookies cool evenly and stay crisp)
- Plastic wrap (for chilling the dough)
Budget-Friendly Options: If you don’t have a rolling pin, a clean, empty wine bottle works beautifully. No electric mixer? A wooden spoon and some determination will get the job done—just make sure your butter is very soft. I’ve also used a glass jar as a rolling pin in a pinch. The key is to chill the dough well so it’s easy to work with, regardless of your tools.
Preparation Method
Let’s get baking. This recipe is straightforward, but I’ve included every little detail I’ve learned from making these cookies at least twenty times. Trust me, these small things make a big difference.
- Cream the butter and sugar. In a large mixing bowl, beat the softened butter and granulated sugar together until light and fluffy, about 3-4 minutes with an electric mixer on medium speed. You’re looking for a pale yellow color and a texture that looks like thick, creamy frosting. Scrape down the sides of the bowl halfway through. This step is crucial because it incorporates air into the dough, giving the cookies a tender texture.
- Add the egg and vanilla. Crack the egg into a small bowl first (just in case you get shell pieces—I’ve learned this the hard way). Add it to the butter mixture along with the vanilla extract. Beat on low speed until just combined. The mixture might look a little curdled at this point, but don’t panic. That’s normal. It’ll come together when you add the dry ingredients.
- Mix the dry ingredients. In a separate bowl, whisk together the flour, baking powder, salt, and pumpkin pie spice. Whisking ensures everything is evenly distributed. I’ve skipped this step before and ended up with one cookie that tasted like pure baking powder. Not fun.
- Combine wet and dry. Gradually add the dry ingredients to the wet mixture, mixing on low speed after each addition. I add about a third at a time, scraping the bowl between additions. Stop mixing as soon as the flour disappears. Overmixing develops gluten and makes the cookies tough. The dough should be soft but not sticky. If it feels too sticky to handle, add a tablespoon of flour at a time until it firms up.
- Chill the dough. Divide the dough in half, flatten each half into a disk about 1 inch thick, wrap tightly in plastic wrap, and refrigerate for at least 30 minutes. This is non-negotiable. Chilled dough is much easier to roll out and cut without sticking. I’ve tried rushing this step, and the cookies spread into weird, blobby shapes. Trust me on this one.
- Preheat the oven. While the dough chills, preheat your oven to 350°F (175°C). Line two baking sheets with parchment paper. No greasing needed—the parchment does the work.
- Roll out the dough. Lightly flour your work surface and rolling pin. Take one disk of dough out of the fridge (leave the other one in there). Roll it out to about ¼-inch thickness. If the dough cracks at the edges, let it sit for 2-3 minutes to warm up slightly. If it sticks, dust more flour underneath. I’ve found that rolling between two sheets of parchment paper works best to prevent sticking and makes cleanup a breeze.
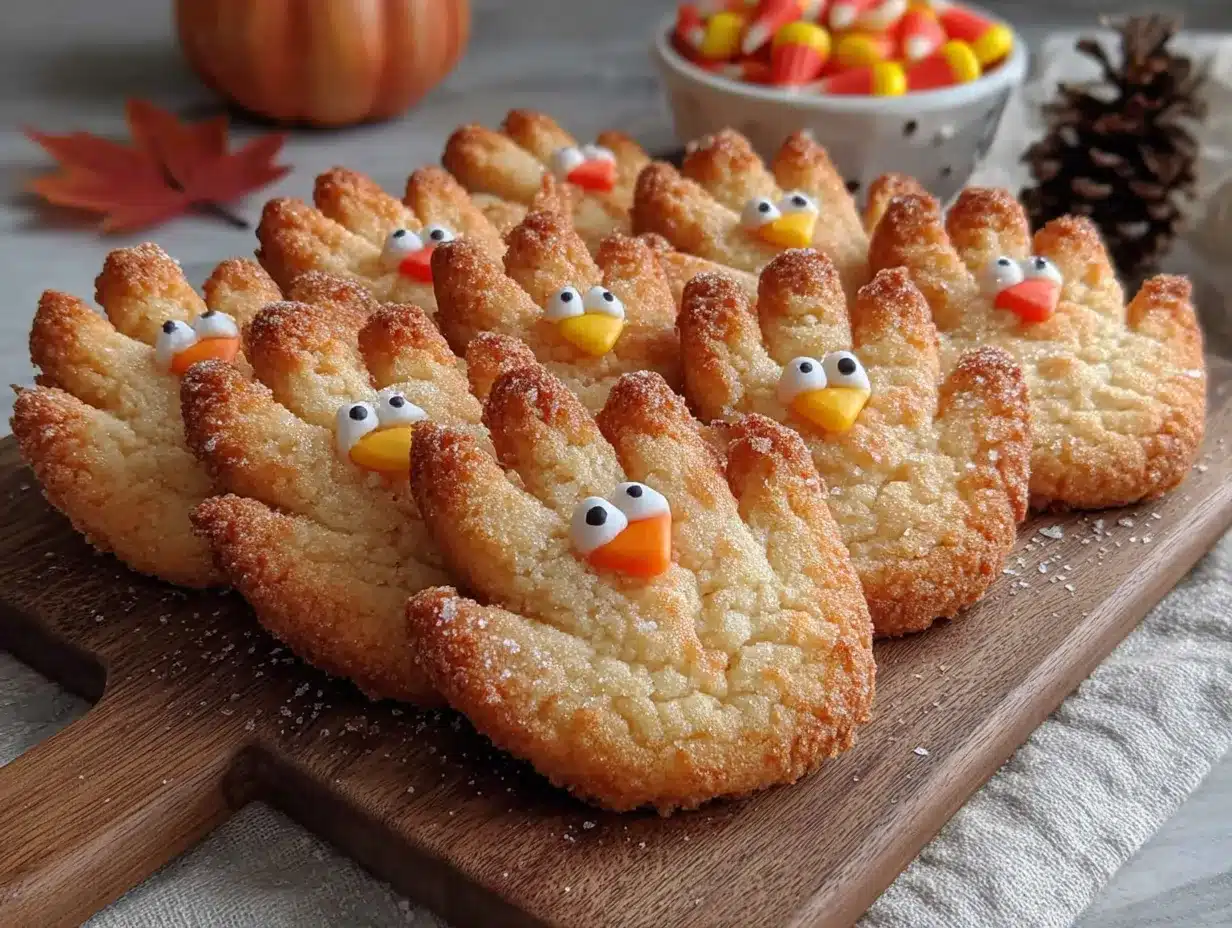
- Create the handprint. Here’s the fun part. Press your clean, dry hand firmly into the dough. Don’t wiggle—just press straight down and lift straight up. You want a clean impression. Then, using a sharp knife or pizza cutter, cut around your handprint, leaving about ½ inch of dough around the outline. Carefully transfer the handprint cookie to the prepared baking sheet using a thin spatula. Repeat with the remaining dough, re-rolling scraps as needed. You should get about 12-16 cookies, depending on hand size.
- Add the decorations. Before baking, press crushed cinnamon candies into the “feathers” (the fingers) of each handprint. Add candy eyes if using. Be gentle—you don’t want to distort the shape. The candies will melt and create beautiful stained-glass effects as they bake.
- Bake. Bake for 10-12 minutes, or until the edges are just barely golden. The centers will look slightly underdone, but that’s what you want. They’ll continue to set as they cool. I always set a timer for 10 minutes and check. Every oven is different; my old oven took 11 minutes exactly, but my new one does it in 10.
- Cool. Let the cookies cool on the baking sheet for 5 minutes. This allows them to firm up so they don’t break when you move them. Then transfer to a wire cooling rack to cool completely. The cinnamon candies will harden as they cool, creating a beautiful, shiny finish.
Cooking Tips & Techniques
After making these cookies more times than I can count, I’ve collected a few tricks that make the process smoother and the results more consistent.
Don’t skip the chill. I know it’s tempting to rush, but chilling the dough is what prevents the cookies from spreading into flat, shapeless blobs. If you’re in a hurry, pop the rolled-out dough in the freezer for 10 minutes instead of 30 in the fridge. It works in a pinch, but the texture won’t be quite as tender.
Flour your hand. Before pressing your hand into the dough, dust your palm with a little flour. This prevents sticking and gives you a cleaner impression. I learned this after my first attempt left me with dough caked under my fingernails and a smudged handprint.
Use a thin spatula. When transferring the cut handprints to the baking sheet, use a thin, flexible spatula. A thick one will distort the shape. I’ve ruined more cookies than I’d like to admit with a bulky spatula. If the dough starts to stick to the work surface, slide the spatula under it slowly, lifting gently.
Watch the candy. Cinnamon candies can burn if they’re too close to the edge of the cookie or if the oven runs hot. If you notice them browning too quickly, tent the baking sheet with foil for the last 2 minutes of baking. Also, crushed candies work better than whole ones—they melt more evenly and don’t create huge puddles of sugar.
Multitask smartly. While one batch bakes, roll out the second disk of dough. This keeps the workflow smooth. I also like to prep the crushed candies and candy eyes before I start baking, so I’m not scrambling with sticky fingers while the oven timer ticks.
My biggest failure: The first time I made these, I forgot to add the baking powder. The cookies came out dense and flat, like little hockey pucks. They still tasted good (butter and sugar save everything), but they weren’t the soft, tender cookies I was going for. Now I double-check my ingredients before I start mixing.
Variations & Adaptations
One of the best things about this recipe is how adaptable it is. I’ve tried several variations over the years, and they’ve all been winners in their own way.
Gluten-Free Version: Substitute the all-purpose flour with a 1:1 gluten-free baking flour blend (I like Bob’s Red Mill). Add an extra tablespoon of flour to compensate for the lack of gluten structure. The cookies will be slightly more crumbly, but the flavor is spot-on. Chill the dough for an extra 15 minutes to make it easier to handle.
Spice It Up: If you’re a fan of bold flavors, add ¼ teaspoon of cayenne pepper to the dough along with the pumpkin pie spice. It gives the cookies a subtle warmth that pairs beautifully with the cinnamon candies. I made this version for a Friendsgiving party, and people couldn’t stop talking about the “secret ingredient.”
Chocolate Lover’s Twist: Replace ¼ cup of the flour with unsweetened cocoa powder. The chocolate base with the cinnamon candy topping is incredible—like a Mexican hot chocolate in cookie form. I’ve also drizzled melted white chocolate over the cooled cookies for a beautiful presentation.
No-Candy Version: If you don’t have cinnamon candies or prefer a simpler cookie, skip them entirely. After baking and cooling, dust the cookies with powdered sugar or drizzle with a simple glaze made from powdered sugar and milk. The handprint shape is still adorable and festive.
Seasonal Adaptations: In the spring, swap the pumpkin pie spice for lemon zest and use pastel-colored sprinkles instead of cinnamon candies. In the summer, add freeze-dried strawberry powder for a fruity twist. The handprint shape works for any occasion—it’s all about the flavors and decorations you choose.
Serving & Storage Suggestions
These cookies are best served at room temperature, straight from the cooling rack. The edges are slightly crisp, the centers are soft, and the melted cinnamon candies add a delightful crunch. I like to arrange them on a wooden platter with a few cinnamon sticks and star anise for a cozy fall display.
What to Serve With Them: A warm mug of apple cider or chai tea is the perfect companion. For a dessert spread, pair them with pumpkin pie, apple crisp, or a simple vanilla ice cream. They’re also wonderful alongside a cup of coffee for an afternoon treat. I’ve even crumbled them over vanilla yogurt for a quick breakfast—don’t judge, it’s delicious.
Storage Instructions: Store the cookies in an airtight container at room temperature for up to 5 days. Layer them between sheets of parchment paper to prevent sticking and crushing. If you live in a humid climate, add a silica gel packet to the container to keep them crisp. I’ve found that a slice of bread placed in the container helps maintain moisture—just replace it every other day.
Freezer Instructions: These cookies freeze beautifully. Place them in a single layer on a baking sheet and freeze until solid, then transfer to a freezer-safe bag or container. They’ll keep for up to 3 months. To thaw, let them sit at room temperature for 15-20 minutes. You can also freeze the unbaked dough—just roll it into a disk, wrap tightly, and freeze for up to 2 months. Thaw in the fridge overnight before rolling and cutting.
Flavor Development: Honestly, these cookies taste even better the next day. The spices meld together, and the texture softens slightly. If you can resist eating them all on day one, they’re even more delicious on day two.
Nutritional Information & Benefits
While these are definitely a treat, there are a few nutritional highlights worth noting. Each cookie (based on a recipe yielding 14 cookies) contains approximately:
- Calories: 210
- Fat: 10g
- Carbohydrates: 28g
- Protein: 2g
- Sugar: 15g
- Fiber: 1g
Health Benefits of Key Ingredients: Pumpkin pie spice contains cinnamon, which has anti-inflammatory properties and may help regulate blood sugar. Ginger aids digestion, and cloves are packed with antioxidants. While the butter and sugar aren’t exactly health foods, the spices add a nutritional boost that makes these cookies a slightly better choice than plain sugar cookies.
Dietary Considerations: This recipe contains gluten, dairy, and eggs. For a dairy-free version, use vegan butter. For an egg-free version, substitute with a flax egg (1 tablespoon ground flaxseed mixed with 3 tablespoons water, let sit for 5 minutes). The texture will be slightly denser but still delicious.
Allergen Note: Cinnamon candies often contain artificial colors and may not be suitable for those with sensitivities. Check the label or use natural cinnamon candies if needed. The cookies are nut-free as written, but always check your ingredients for cross-contamination if allergies are a concern.
Conclusion
These cozy turkey hand sugar cookies have become a fall tradition in my kitchen, and I think they deserve a spot in yours too. They started as a happy accident—a failed attempt at snickerdoodles that turned into something way more fun and delicious. The handprint shape makes them personal, the spice blend makes them cozy, and the cinnamon candy topping makes them unforgettable.
I love this recipe because it’s forgiving. If your handprint is a little crooked or the candies melt into unexpected patterns, that’s part of the charm. These cookies aren’t about perfection—they’re about the joy of creating something with your own hands (literally) and sharing it with people you care about.
So go ahead, get your hands dirty. Press your palm into that dough, crush some candies, and bake up a batch of cookies that will make your kitchen smell like autumn and your heart feel full. And when you take that first bite—warm, spiced, and sweet—you’ll understand why this recipe stuck with me. I’d love to hear how yours turn out. Drop a comment below, share a photo, or tell me about your own kitchen happy accidents. Happy baking, friend!
Frequently Asked Questions
Can I make the dough ahead of time?
Absolutely. You can prepare the dough up to 3 days in advance and keep it wrapped tightly in the refrigerator. You can also freeze the dough for up to 2 months. Just thaw it in the fridge overnight before rolling and cutting.
My cookies spread too much. What went wrong?
This usually happens when the dough isn’t chilled enough. Make sure you chill it for at least 30 minutes. Also, check that your butter wasn’t too soft—it should be soft but not greasy. If your baking sheet is warm from a previous batch, let it cool completely before adding more cookies.
Can I use a different spice blend?
Of course. If you don’t have pumpkin pie spice, use 1 teaspoon cinnamon, ½ teaspoon nutmeg, ¼ teaspoon ginger, and ¼ teaspoon cloves. You can also experiment with apple pie spice, chai spice, or even a pinch of cardamom for a unique twist.
How do I get clean handprint impressions?
Dust your hand lightly with flour before pressing into the dough. Press straight down without wiggling, and lift straight up. If the dough sticks, chill it for another 10 minutes. A clean, dry hand also helps—no lotion or moisture on your palm.
Can I make these cookies without cinnamon candies?
Yes. Skip the candies and decorate the baked cookies with royal icing, a simple powdered sugar glaze, or just a dusting of powdered sugar. The handprint shape is still adorable and festive without the candy topping.
Pin This Recipe!

Perfect Cozy Turkey Hand Sugar Cookie Recipe

These cozy turkey hand sugar cookies are a happy accident turned fall tradition—soft, spiced, and topped with melted cinnamon candies for a beautiful stained-glass effect. Perfect for Thanksgiving gatherings and lazy Sunday baking sessions.
- Prep Time: 30 minutes
- Cook Time: 12 minutes
- Total Time: 1 hour 12 minutes
- Yield: 14 servings 1x
- Category: Dessert
- Cuisine: American
Ingredients
- 1 cup (2 sticks) unsalted butter, softened to room temperature
- 1 cup granulated sugar
- 1 large egg, room temperature
- 1 teaspoon vanilla extract
- 2 ½ cups all-purpose flour, plus more for dusting
- ½ teaspoon baking powder
- ½ teaspoon salt
- 2 teaspoons pumpkin pie spice
- ¼ cup cinnamon candies, crushed (like Red Hots or cinnamon imperials)
- Candy eyes (optional, for the turkey face)
- Orange and red gel food coloring (optional, for the wattle and beak)
- Powdered sugar (optional, for dusting)
Instructions
- Cream the butter and sugar: In a large mixing bowl, beat the softened butter and granulated sugar together until light and fluffy, about 3-4 minutes with an electric mixer on medium speed. Scrape down the sides of the bowl halfway through.
- Add the egg and vanilla: Crack the egg into a small bowl, then add it to the butter mixture along with the vanilla extract. Beat on low speed until just combined.
- Mix the dry ingredients: In a separate bowl, whisk together the flour, baking powder, salt, and pumpkin pie spice.
- Combine wet and dry: Gradually add the dry ingredients to the wet mixture, mixing on low speed after each addition. Add about a third at a time, scraping the bowl between additions. Stop mixing as soon as the flour disappears.
- Chill the dough: Divide the dough in half, flatten each half into a disk about 1 inch thick, wrap tightly in plastic wrap, and refrigerate for at least 30 minutes.
- Preheat the oven: While the dough chills, preheat your oven to 350°F (175°C). Line two baking sheets with parchment paper.
- Roll out the dough: Lightly flour your work surface and rolling pin. Take one disk of dough out of the fridge. Roll it out to about ¼-inch thickness.
- Create the handprint: Press your clean, dry hand firmly into the dough. Using a sharp knife or pizza cutter, cut around your handprint, leaving about ½ inch of dough around the outline. Carefully transfer the handprint cookie to the prepared baking sheet using a thin spatula. Repeat with the remaining dough, re-rolling scraps as needed.
- Add the decorations: Before baking, press crushed cinnamon candies into the ‘feathers’ (the fingers) of each handprint. Add candy eyes if using.
- Bake: Bake for 10-12 minutes, or until the edges are just barely golden. The centers will look slightly underdone.
- Cool: Let the cookies cool on the baking sheet for 5 minutes, then transfer to a wire cooling rack to cool completely.
Notes
Chill the dough for at least 30 minutes to prevent spreading. Dust your hand with flour before pressing into the dough for a clean impression. Crushed cinnamon candies work better than whole ones for even melting. Cookies taste even better the next day as the spices meld together.
Nutrition
- Serving Size: 1 cookie
- Calories: 210
- Sugar: 15
- Sodium: 95
- Fat: 10
- Saturated Fat: 6
- Carbohydrates: 28
- Fiber: 1
- Protein: 2
Keywords: turkey cookies, handprint cookies, sugar cookies, fall cookies, Thanksgiving cookies, pumpkin pie spice cookies, cinnamon candy cookies


