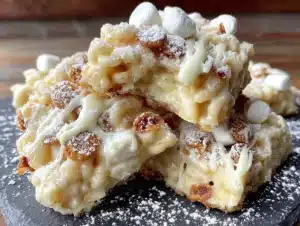
The neighborhood cookie swap was in two days and I’d completely forgotten. Everyone else would be bringing their grandmother’s secret recipes, those multi-layered bar cookies that take three hours, and the kind of intricate decorated sugar cookies that belong on magazine covers. I had a half-empty bag of semi-sweet chocolate chips, a bag of marshmallows that was probably meant for hot cocoa, and about twenty minutes before I needed to leave for work. Honestly, I almost just bought a tub of store-bought cookies and called it a day. But then I remembered a no-bake recipe a friend had mentioned ages ago, the kind that uses pantry staples and comes together in minutes. I figured, what’s the worst that could happen?
So, there I was, frantically melting white chocolate and peanut butter in the microwave, praying I wouldn’t burn it. I dumped in the marshmallows and a handful of crispy rice cereal, stirred like my life depended on it, and dropped spoonfuls onto wax paper. They looked a little lumpy, a little imperfect, and I was honestly a bit embarrassed to bring them. I mean, they were so simple. I wrapped them in a plastic container and mentally prepared to be the underdog of the cookie swap.
You know that feeling when you’re the one who shows up with the “easy” thing and everyone else has clearly slaved away for hours? That was me. I set my humble little avalanche cookies next to a tower of macarons and a plate of intricately braided stollen. I braced for polite, pitying smiles. But then, someone took a bite. Then another person. Then suddenly, my container was empty, and people were asking for the recipe. “What are these called?” they asked. “They’re incredible!” Honestly, I was shocked. That’s how these easy no-bake avalanche cookies with white chocolate and marshmallow became my go-to. They’re the recipe that taught me sometimes the simplest things, the ones you throw together in a panic, end up being the biggest hits. And that’s why I keep making them, for every potluck and party where I want to show up with something that disappears fast.
Why You’ll Love This Recipe
Let me tell you, after years of testing (and sometimes failing) in my own kitchen, these avalanche cookies are a total win. I’ve brought them to countless family gatherings and office parties, and they never last long. Here is why I think you’ll absolutely love them too.
- Quick & Easy: These come together in under 15 minutes. No oven, no mixer, no complicated steps. Perfect for when you need a dessert in a hurry or just don’t want to heat up the kitchen.
- Simple Ingredients: You likely have everything you need in your pantry right now. Peanut butter, white chocolate chips, marshmallows, and crispy rice cereal. That’s it. No fancy grocery store trips required.
- Perfect for Parties: These are a crowd-pleaser for holiday cookie exchanges, potlucks, birthday parties, or any gathering where you need a dessert that travels well and impresses everyone. They are the ultimate host’s secret weapon.
- No-Bake Magic: This is the best part. You don’t need to worry about oven temperatures, baking times, or burning anything. Just melt, mix, and drop. It’s practically foolproof.
- Unbelievably Delicious: The combination of creamy white chocolate, salty peanut butter, soft marshmallows, and crunchy cereal is pure magic. Every bite has that perfect sweet and salty, soft and crunchy texture that makes you close your eyes and say “wow.”
What makes this recipe different from any other no-bake cookie out there is the texture. I’ve tried versions that are too hard, too sticky, or just plain bland. This one is perfectly balanced. The ratio of white chocolate to peanut butter is key—it creates a coating that’s firm but not rock-hard, with a soft, chewy center from the marshmallows. It’s not just another version; it’s the best version. This recipe is comfort food reimagined—faster, simpler, but with that same soul-soothing satisfaction that makes you reach for another one.
What Ingredients You Will Need
This recipe uses simple, wholesome ingredients to deliver that perfect sweet and salty bite. Most of these are pantry staples, making these cookies incredibly easy to whip up anytime a craving hits.
- White Chocolate Chips (2 cups / 340g): The base of our cookie. I recommend using a good quality brand like Ghirardelli or Guittard for the best melt and flavor. They melt smoothly and have a creamy, buttery taste. Avoid white melting wafers if you can, as they have a different texture and flavor.
- Creamy Peanut Butter (1/2 cup / 130g): This adds the perfect salty balance to the sweet white chocolate. It also helps bind everything together. I prefer using a standard creamy peanut butter like Skippy or Jif for the best consistency. Natural peanut butter can be too oily and might cause the mixture to separate, so I’d steer clear of that for this recipe.
- Mini Marshmallows (3 cups / 150g): These give the cookies their signature soft, chewy pockets. I use mini marshmallows because they distribute more evenly through the mixture. You can use regular-sized marshmallows, but I’d recommend cutting them into quarters so they aren’t too overwhelming in each bite.
- Crispy Rice Cereal (2 cups / 60g): This is what gives the cookies their name—they look like little avalanches of crunchy goodness! It adds that essential crunch that contrasts with the soft marshmallows. Any brand of crispy rice cereal works perfectly here.
Optional Add-ins:
- Salt (a pinch): If your peanut butter isn’t salted, add a tiny pinch of flaky sea salt to the mixture to really make the flavors pop.
- Chopped Nuts (1/2 cup / 60g): For extra crunch, you can fold in some chopped salted peanuts or almonds. It adds a lovely texture and more of that salty flavor.
- Dried Fruit (1/2 cup / 80g): Dried cranberries or chopped dried cherries add a tart pop that cuts through the sweetness beautifully.
Equipment Needed
You don’t need a lot of fancy equipment for this recipe, which is another reason I love it. Here is what you’ll need:
- Microwave-Safe Bowl (a large one): You’ll need a decent-sized bowl to melt the white chocolate and peanut butter, and then mix everything together. A 4-cup glass measuring cup works great too.
- Rubber Spatula: This is essential for stirring the mixture and scraping every last bit of goodness from the bowl. A silicone spatula is my favorite because it’s heat-resistant.
- Baking Sheet: You’ll need a standard baking sheet to hold the cookies while they set. Line it with wax paper or parchment paper for easy cleanup.
- Wax Paper or Parchment Paper: This is crucial for preventing the cookies from sticking to the baking sheet. I always use wax paper for this recipe.
- Cookie Scoop or Two Spoons: For dropping the mixture onto the baking sheet. A small cookie scoop (about 1.5 tablespoons) makes perfectly uniform cookies, but two spoons work just fine.
- Measuring Cups and Spoons: For accurately measuring your ingredients. This is important for getting the texture right.
Budget-Friendly Tip: If you don’t have a cookie scoop, don’t worry! Just use two regular spoons to scoop and drop the mixture. They won’t be perfectly round, but they’ll taste just as amazing. And honestly, the rustic look is part of their charm.
Preparation Method

Okay, let’s get to the fun part. This method is so simple, you’ll be amazed at the results. Follow these steps, and you’ll have a batch of delicious avalanche cookies in no time.
- Prepare Your Workspace: First, line a large baking sheet with wax paper or parchment paper. Set it aside. This step is important because once the mixture is ready, you’ll need to work quickly.
- Melt the Base: In a large microwave-safe bowl, combine 2 cups of white chocolate chips and 1/2 cup of creamy peanut butter. Microwave in 30-second intervals, stirring well after each interval. It usually takes about 1 to 1.5 minutes total. Be careful not to overheat it, or the chocolate can seize up and become grainy. I’ve learned this the hard way! Stir until the mixture is completely smooth and glossy.
- Add the Dry Ingredients: Once the white chocolate and peanut butter are fully melted and smooth, immediately add 3 cups of mini marshmallows and 2 cups of crispy rice cereal. Fold everything together gently with your rubber spatula. You want to make sure every marshmallow and piece of cereal is coated in the white chocolate mixture, but be careful not to crush the cereal or marshmallows too much. The mixture will be thick and sticky.
- Drop the Cookies: Work quickly while the mixture is still warm and pliable. Using a small cookie scoop or two spoons, drop heaping tablespoons of the mixture onto your prepared baking sheet. Leave about an inch of space between each cookie. They won’t spread, so you can pack them fairly close together.
- Shape and Set: If the mixture starts to get too stiff, you can pop the bowl back in the microwave for 10-15 seconds to soften it. As you drop each cookie, you can gently press the top with your fingers to shape them into a more rounded mound. Don’t worry about making them perfect—the rustic, lumpy look is what makes them so charming.
- Let Them Set: Place the baking sheet in the refrigerator for at least 30 minutes, or until the cookies are completely firm. You’ll know they’re ready when the white chocolate has set and they are solid to the touch.
- Serve and Enjoy: Once set, you can transfer the cookies to an airtight container. They are ready to eat right away! I love the contrast between the firm white chocolate coating and the soft, chewy marshmallow inside.
Sensory Cues: When you’re melting the white chocolate, you’re looking for a smooth, glossy, and pourable consistency. When you fold in the marshmallows and cereal, you’ll hear a satisfying crunch as the cereal gets coated. The finished cookies should look like little mounds of crunchy, white chocolate goodness with visible pockets of marshmallow.
Cooking Tips & Techniques
Over the years, I’ve made these cookies more times than I can count, and I’ve picked up a few tricks along the way. Here are my best tips to ensure your avalanche cookies turn out perfectly every time.
- Don’t Overheat the Chocolate: This is the most important tip. White chocolate is delicate and can easily seize or burn if overheated. Always melt it in short bursts and stir frequently. If it looks like it’s starting to separate or get grainy, you’ve overheated it. It’s better to have a few unmelted chips than a burnt batch.
- Work Quickly: The mixture will start to set as it cools. Have your baking sheet lined and your cookie scoop ready before you start melting the chocolate. This will make the process much smoother and less stressful.
- Use a Cookie Scoop: For uniform cookies that look professional, a cookie scoop is your best friend. It also makes the process much faster. If you don’t have one, use two spoons to scoop and drop the mixture.
- Refrigerate for Best Texture: Don’t skip the refrigeration step. It’s essential for the cookies to set properly. If you’re in a hurry, you can pop them in the freezer for about 15 minutes, but keep an eye on them so they don’t get too hard.
- Add a Pinch of Salt: I always add a small pinch of flaky sea salt to the melted chocolate mixture. It really enhances the sweetness and balances the flavors beautifully. It’s a small step that makes a big difference.
- My Biggest Failure: I once tried to double the batch and used a bowl that was too small. The mixture overflowed when I tried to stir everything together, and I ended up with a sticky mess on my counter. Learn from my mistake—use a large bowl!
Variations & Adaptations
One of the best things about this recipe is how versatile it is. You can easily adapt it to suit your taste or what you have on hand. Here are a few of my favorite variations.
- Chocolate Avalanche Cookies: Swap the white chocolate chips for semi-sweet or milk chocolate chips. The flavor will be richer and more decadent. You can also use dark chocolate for a less sweet version.
- Peanut Butter Cup Avalanche: Fold in 1/2 cup of chopped peanut butter cups (like Reeses’s Pieces or chopped mini cups) along with the marshmallows and cereal. It adds another layer of peanut butter flavor and a fun, melty texture.
- Mint Avalanche Cookies: Use white chocolate chips and add 1/2 teaspoon of peppermint extract to the melted mixture. Fold in 1/4 cup of crushed peppermint candies or candy canes at the end. These are perfect for the holidays!
- Vegan & Dairy-Free Version: Use vegan white chocolate chips (like those from Enjoy Life) and a vegan butter or coconut oil instead of peanut butter (use a 1:1 ratio). Make sure your marshmallows are vegan-friendly as well (Dandies is a great brand).
- Gluten-Free Version: This recipe is naturally gluten-free as long as you use certified gluten-free crispy rice cereal. Many brands are, but it’s always good to double-check the label.
- My Personal Favorite: I love making a “Trail Mix” version. I swap out 1/2 cup of the crispy rice cereal for a mix of chopped almonds, dried cranberries, and a few dark chocolate chips. The combination of textures and flavors is absolutely addictive.
Serving & Storage Suggestions
These avalanche cookies are incredibly versatile when it comes to serving and storing. Here is everything you need to know to keep them fresh and delicious.
- Serving Temperature: These cookies are best served cold, straight from the refrigerator. The white chocolate coating is firm, and the marshmallows have a lovely chewy texture. They are also delicious at room temperature, but they will be a bit softer.
- Presentation: For a party, I love arranging them on a festive platter or in a decorative tin. A dusting of powdered sugar or a drizzle of melted dark chocolate on top makes them look extra special. For a cookie swap, pack them in a clear cellophane bag tied with a ribbon for a beautiful homemade gift.
- Complementary Dishes: These cookies are fantastic on a dessert table alongside other no-bake treats like peanut butter balls or chocolate crackles. They pair beautifully with a glass of cold milk, a hot cup of coffee, or a mug of hot chocolate.
- Storage Instructions: Store the cookies in an airtight container in the refrigerator. They will stay fresh for up to 2 weeks. I usually layer them between sheets of wax paper to prevent them from sticking together.
- Freezing Instructions: These cookies freeze beautifully. Place them in a single layer on a baking sheet and freeze for about an hour, or until solid. Then transfer them to a freezer-safe bag or container. They will keep for up to 3 months. You can eat them frozen (they are like little ice cream bites!) or thaw them in the refrigerator for a few hours.
- Flavor Development: Honestly, these cookies taste even better the next day. The flavors meld together, and the texture becomes perfectly balanced. So, feel free to make them a day ahead of your event!
Nutritional Information & Benefits
While these are definitely a treat, it’s always good to know what’s in your food. Here is an approximate nutritional breakdown for one cookie (based on a batch of 24 cookies).
| Nutrient | Amount per Cookie |
|---|---|
| Calories | ~150 |
| Fat | 8g |
| Saturated Fat | 4g |
| Carbohydrates | 18g |
| Sugar | 13g |
| Protein | 3g |
| Fiber | 1g |
Health Benefits of Key Ingredients: Peanut butter provides a good source of protein and healthy fats, which can help keep you feeling satisfied. White chocolate contains calcium and a small amount of antioxidants from the cocoa butter. While these cookies are a sweet indulgence, using simple ingredients means you know exactly what you’re eating.
Dietary Considerations: This recipe can be easily adapted to be gluten-free and vegan (see variations). It does contain peanuts and dairy (from the white chocolate), so it’s not suitable for those with allergies to those ingredients.
My Personal Perspective: I believe in balance. These cookies are a fun, easy treat that brings joy to gatherings. I don’t stress about the sugar content when I’m sharing them with friends and family. It’s about the experience and the memories made around the table.
Conclusion
So, there you have it. These easy no-bake avalanche cookies with white chocolate and marshmallow are my go-to for a reason. They are incredibly simple to make, use pantry staples, and always steal the show. Whether you’re a seasoned baker or a complete beginner, you can make these cookies and feel like a rockstar. I love how they bring a little bit of unexpected joy to any gathering.
I encourage you to make these your own. Play around with the variations I shared, or come up with your own twist. Maybe you’ll add some shredded coconut or a drizzle of caramel. The possibilities are endless! I’d love to hear how they turn out for you. Please leave a comment below and let me know if you tried any fun adaptations. And if you loved them as much as I do, don’t forget to share this recipe with a friend who needs a quick and impressive dessert in their life. Happy no-baking!
Frequently Asked Questions
Can I use natural peanut butter in this recipe?
I generally don’t recommend it. Natural peanut butter has a higher oil content and can separate, which can make the mixture greasy and prevent the cookies from setting properly. Stick with a standard creamy peanut butter like Skippy or Jif for the best results.
Why did my white chocolate seize up?
White chocolate can seize if it gets too hot or if any water gets into the bowl. Always melt it in short 30-second intervals and stir well. Make sure your bowl and spatula are completely dry. If it does seize, it’s usually best to start over with fresh chocolate.
Can I make these cookies without a microwave?
Absolutely! You can melt the white chocolate and peanut butter using a double boiler. Simply place a heat-safe bowl over a pot of simmering water (make sure the bowl doesn’t touch the water) and stir until smooth. This method is a bit slower but works perfectly.
How long do these cookies last?
Stored in an airtight container in the refrigerator, these cookies will stay fresh for up to 2 weeks. They also freeze beautifully for up to 3 months. I honestly think they taste even better the next day!
Can I use salted butter instead of peanut butter?
I wouldn’t recommend it. The peanut butter provides a specific flavor and texture that is key to the recipe. The fat content and consistency of peanut butter are different from butter, so substituting it would change the final result significantly.
Pin This Recipe!

Easy No-Bake Avalanche Cookies with White Chocolate & Marshmallow

These easy no-bake avalanche cookies with white chocolate and marshmallow are a quick, crowd-pleasing dessert made with simple pantry staples. They combine creamy white chocolate, salty peanut butter, soft marshmallows, and crunchy cereal for a perfect sweet and salty treat.
- Prep Time: 10 minutes
- Cook Time: 5 minutes
- Total Time: 45 minutes (including chilling)
- Yield: 24 cookies 1x
- Category: Dessert
- Cuisine: American
Ingredients
- 2 cups (340g) white chocolate chips
- 1/2 cup (130g) creamy peanut butter (e.g., Skippy or Jif)
- 3 cups (150g) mini marshmallows
- 2 cups (60g) crispy rice cereal
- Pinch of flaky sea salt (optional, if peanut butter is unsalted)
- 1/2 cup (60g) chopped salted peanuts or almonds (optional)
- 1/2 cup (80g) dried cranberries or chopped dried cherries (optional)
Instructions
- Line a large baking sheet with wax paper or parchment paper and set aside.
- In a large microwave-safe bowl, combine 2 cups white chocolate chips and 1/2 cup creamy peanut butter. Microwave in 30-second intervals, stirring well after each, until smooth and glossy (about 1 to 1.5 minutes total). Do not overheat.
- Immediately add 3 cups mini marshmallows and 2 cups crispy rice cereal to the melted mixture. Fold gently with a rubber spatula until everything is evenly coated. Work quickly as the mixture will start to set.
- Using a small cookie scoop or two spoons, drop heaping tablespoons of the mixture onto the prepared baking sheet, spacing them about 1 inch apart. If the mixture stiffens, microwave for 10-15 seconds to soften.
- Gently press the tops with your fingers to shape into rounded mounds if desired. The rustic look is part of the charm.
- Refrigerate the baking sheet for at least 30 minutes, or until the cookies are completely firm.
- Transfer to an airtight container and serve cold or at room temperature.
Notes
Do not overheat white chocolate; melt in short bursts. Use standard creamy peanut butter (not natural) for best results. Work quickly as mixture sets fast. Refrigerate for at least 30 minutes to set. Cookies taste even better the next day. Store in refrigerator for up to 2 weeks or freeze for up to 3 months.
Nutrition
- Serving Size: 1 cookie
- Calories: 150
- Sugar: 13
- Sodium: 50
- Fat: 8
- Saturated Fat: 4
- Carbohydrates: 18
- Fiber: 1
- Protein: 3
Keywords: no-bake cookies, avalanche cookies, white chocolate, marshmallow, peanut butter, crispy rice cereal, easy dessert, quick cookies, holiday cookies, cookie swap